


 Download PDF
Precision 4mA to 20mA Current Loop Receiver datasheet
Document overview
- PDF pages: 13
Technical content
Page 1
SBVS019
Page 2
SPECIFICATIONS
ELECTRICAL
At T = +25°C and VS = ±15V, unless otherwise noted.
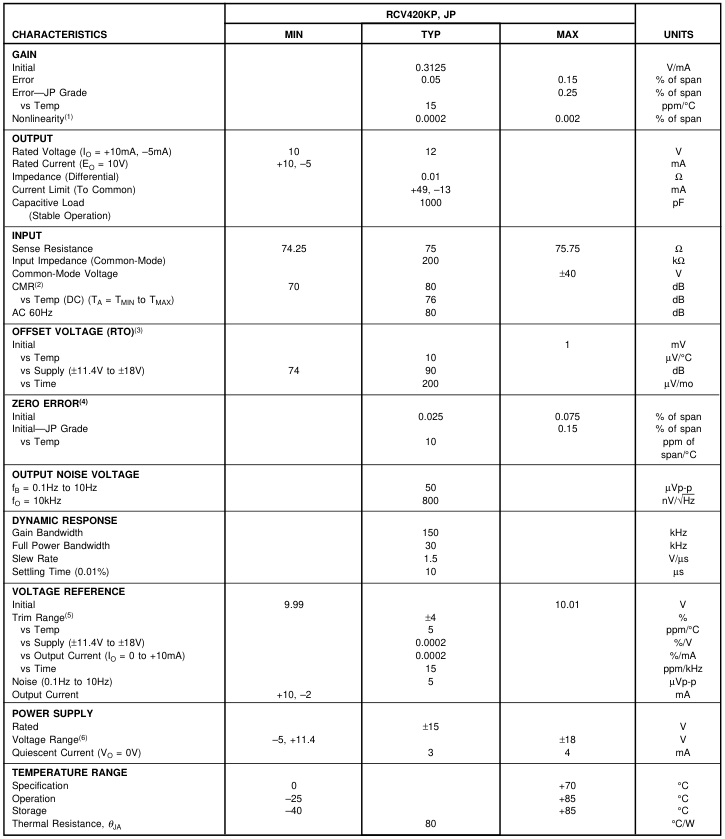
NOTES: (1) Nonlinearity is the max peak deviation from best fit straight line. (2) With 0 source impedance on Rcv Com pin. (3) Referred to output with all inputs grounded including Ref In. (4) With 4mA input signal and Voltage Reference connected (includes VOS, Gain Error, and Voltage Reference Errors). (5) External trim slightly affects drift. (6) IO Ref = 5mA, IO Rcv = 2mA.
Page 3
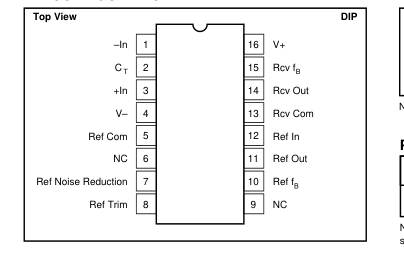
PIN CONFIGURATION
ORDERING INFORMATION
| PRODUCT | PERFORMANCE GRADE | PACKAGE |
| RCV420KP RCV420JP | 0°C to +70°C 0°C to +70°C | 16-Pin Plastic DIP 16-Pin Plastic DIP |
ABSOLUTE MAXIMUM RATINGS(1)
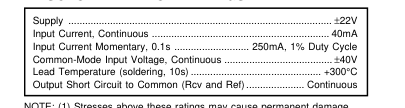
NOTE: (1) Stresses above these ratings may cause permanent damage.
PACKAGE INFORMATION

NOTE: (1) For detailed drawing and dimension table, please see end of data sheet, or Appendix C of Burr-Brown IC Data Book.
The information provided herein is believed to be reliable; however, BURR-BROWN assumes no responsibility for inaccuracies or omissions. BURR-BROWN assumes no responsibility for the use of this information, and all use of such information shall be entirely at the user’s own risk. Prices and specifications are subject to change without notice. No patent rights or licenses to any of the circuits described herein are implied or granted to any third party. BURR-BROWN does not authorize or warrant any BURR-BROWN product for use in life support devices and/or systems.
Page 4
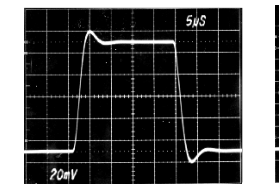
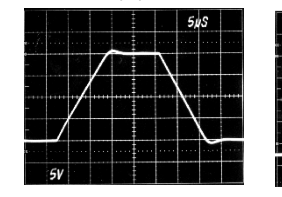
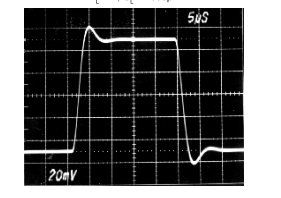
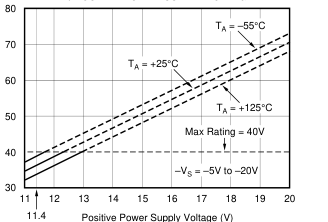
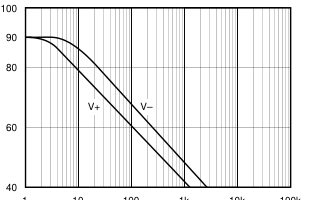
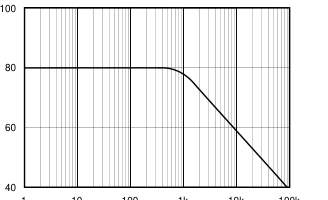
TYPICAL PERFORMANCE CURVES
At TA = +25°C, VS = ±15V, unless otherwise noted.
STEP RESPONSE
SMALL SIGNAL RESPONSE
SMALL SIGNAL RESPONSE
NO LOAD
RL = ∞, CL = 1000pF
NO LOAD
POSITIVE COMMON-MODE VOLTAGE RANGE vs POSITIVE POWER SUPPLY VOLTAGE
NEGATIVE COMMON-MODE VOLTAGE RANGE vs NEGATIVE POWER SUPPLY VOLTAGE
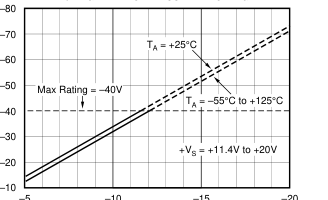
–5
–20
–10
–15
Negative Power Supply Voltage (V)
COMMON-MODE REJECTION
POWER-SUPPLY REJECTION
vs FREQUENCY
vs FREQUENCY
1 10 100 1k 10k 100k
1 10 100 1k 10k 100k
Frequency (Hz)
Frequency (Hz)
Page 5
THEORY OF OPERATION
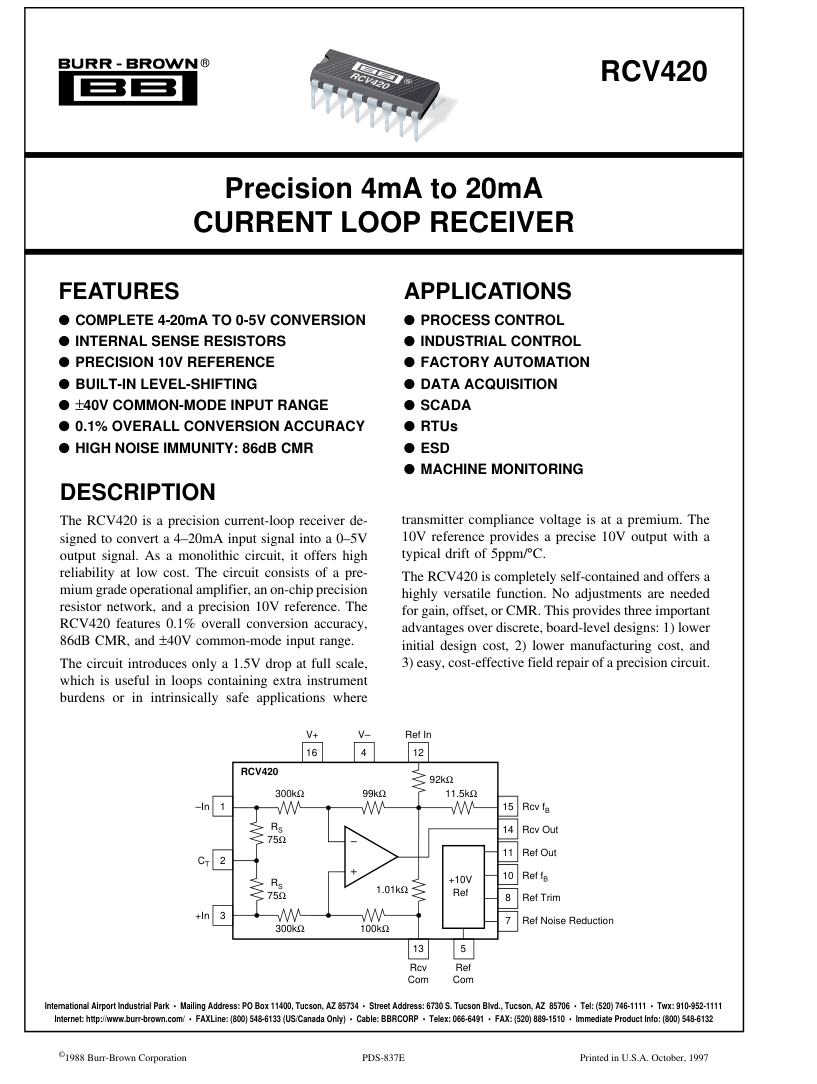
Refer to the figure on the first page. For 0 to 5V output with 4–20mA input, the required transimpedance of the circuit is: VOUT/IIN = 5V/16mA = 0.3125V/mA. To achieve the desired output (0V for 4mA and 5V for 20mA), the output of the amplifier must be offset by an amount: VOS = –(4mA)(0.3125V/mA) = –1.25V. The input current signal is connected to either +In or –In, depending on the polarity of the signal, and returned to ground through the center tap, CT. The balanced input—two matched 75Ω sense resistors, RS—provides maximum rejection of common-mode voltage signals on CT and true differential current-to-voltage conversion. The sense resistors convert the input current signal into a proportional voltage,
which is amplified by the differential amplifier. The voltage gain of the amplifier is: AD = 5V/(16mA)(75Ω) = 4.1667V/V. The tee network in the feedback path of the amplifier provides a summing junction used to generate the required –1.25V offset voltage. The input resistor network provides high-input impedance and attenuates common-mode input voltages to levels suitable for the operational amplifier’s common-mode signal capabilities.
BASIC POWER SUPPLY
AND SIGNAL CONNECTIONS
Figure 1 shows the proper connections for power supply and signal. Both supplies should be decoupled with 1µF tantalum capacitors as close to the amplifier as possible. To avoid gain and CMR errors introduced by the external circuit, connect grounds as indicated, being sure to minimize ground resistance. The input signal should be connected to either +In or –In, depending on its polarity, and returned to ground through the center tap, CT. The output of the voltage reference, Ref Out, should be connected to Ref In for the
necessary level shifting. If the Ref In pin is not used for level shifting, then it must be grounded to maintain high CMR.
GAIN AND OFFSET ADJUSTMENT
Figure 2 shows the circuit for adjusting the RCV420 gain. Increasing the gain of the RCV420 is accomplished by inserting a small resistor in the feedback path of the amplifier. Increasing the gain using this technique results in CMR degradation, and therefore, gain adjustments should be kept as small as possible. For example, a 1% increase in gain is typically realized with a 125Ω resistor, which degrades CMR by about 6dB. A decrease in gain can be achieved by placing matched resistors in parallel with the sense resistors, also shown in Figure 2. The adjusted gain is given by the following expression VOUT/IIN = 0.3125 x RX /(RX + RS). A 1% decrease in gain can be achieved with a 7.5kΩ
resistor. It is important to match the parallel resistance on each sense resistor to maintain high CMR. The TCR mismatch between the two external resistors will effect gain error drift and CMR drift. There are two methods for nulling the RCV420 output offset voltage. The first method applies to applications using the internal 10V reference for level shifting. For these applica-
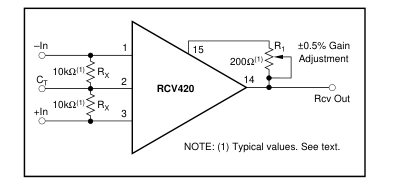
FIGURE 2. Optional Gain Adjustment.
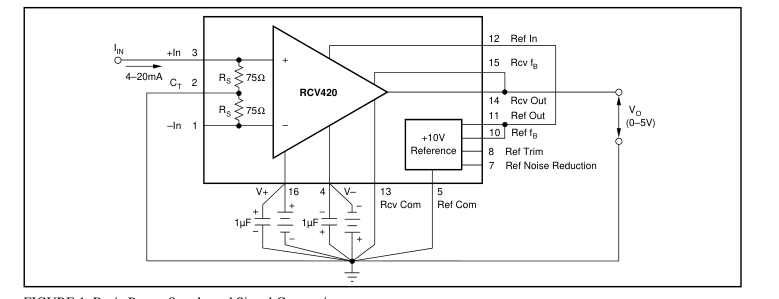
FIGURE 1. Basic Power Supply and Signal Connections.
Page 6
tions, the voltage reference output trim procedure can be used to null offset errors at the output of the RCV420. The voltage reference trim circuit is discussed under “Voltage Reference.” When the voltage reference is not used for level shifting or when large offset adjustments are required, the circuit in Figure 3 can be used for offset adjustment. A low impedance on the Rcv Com pin is required to maintain high CMR.
ZERO ADJUSTMENT
Level shifting the RCV420 output voltage can be achieved using either the Ref In pin or the Rcv Com pin. The disadvantage of using the Ref In pin is that there is an 8:1 voltage attenuation from this pin to the output of the RCV420. Thus, use the Rcv Com pin for large offsets, because the voltage on this pin is seen directly at the output. Figure 4 shows the circuit used to level-shift the output of the RCV420
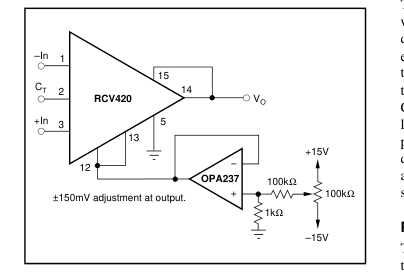
FIGURE 3. Optional Output Offset Nulling Using External Amplifier.
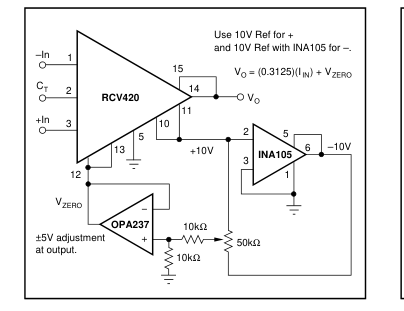
FIGURE 4. Optional Zero Adjust Circuit.
using the Rcv Com pin. It is important to use a low-output impedance amplifier to maintain high CMR. With this method of zero adjustment, the Ref In pin must be connected to the Rcv Com pin.
MAINTAINING COMMON-MODE REJECTION
Two factors are important in maintaining high CMR: (1) resistor matching and tracking (the internal resistor network does this) and (2) source impedance. CMR depends on the accurate matching of several resistor ratios. The high accuracies needed to maintain the specified CMR and CMR temperature coefficient are difficult and expensive to reliably achieve with discrete components. Any resistance im- balance introduced by external circuitry directly affects CMR. These imbalances can occur by: mismatching sense resistors when gain is decreased, adding resistance in the feedback path when gain is increased, and adding series resistance on the Rcv Com pin. The two sense resistors are laser-trimmed to typically match
within 0.01%; therefore, when adding parallel resistance to decrease gain, take care to match the parallel resistance on each sense resistor. To maintain high CMR when increasing the gain of the RCV420, keep the series resistance added to the feedback network as small as possible. Whether the Rcv Com pin is grounded or connected to a voltage reference for level shifting, keep the series resistance on this pin as low as possible. For example, a resistance of 20Ω on this pin degrades CMR from 86dB to approximately 80dB. For applications requiring better than 86dB CMR, the circuit shown in Figure 5 can be used to adjust CMR.
PROTECTING THE SENSE RESISTOR
The 75Ω sense resistors are designed for a maximum continuous current of 40mA, but can withstand as much as 250mA for up to 0.1s (see absolute maximum ratings). There are several ways to protect the sense resistor from
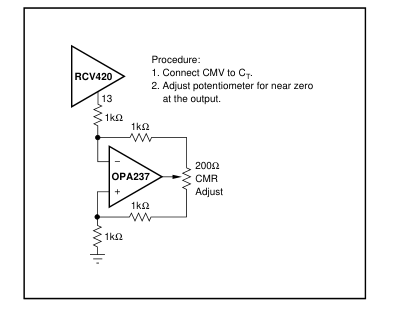
FIGURE 5. Optional Circuit for Externally Trimming CMR.
Page 7
overcurrent conditions exceeding these specifications. Refer to Figure 6. The simplest and least expensive method is a resistor as shown in Figure 6a. The value of the resistor is determined from the expression
RX = VCC/40mA – 75Ω
and the full scale voltage drop is
VRX = 20mA x RX.
For a system operating off of a 32V supply RX = 725Ω and VRX = 14.5V. In applications that cannot tolerate such a large voltage drop, use circuits 6b or 6c. In circuit 6b a power JFET and source resistor are used as a current limit. The 200Ω potentiometer, RX, is adjusted to provide a current limit of approximately 30mA. This circuit introduces a 1–4V drop at full scale. If only a very small series voltage drop at full scale can be tolerated, then a 0.032A series 217 fast-acting fuse should be used, as shown in Figure 6c. For automatic fold-back protection, use the circuit shown in Figure 15.
VOLTAGE REFERENCE
The RCV420 contains a precision 10V reference. Figure 8 shows the circuit for output voltage adjustment. Trimming the output will change the voltage drift by approximately 0.007ppm/°C per mV of trimmed voltage. Any mismatch in TCR between the two sides of the potentiometer will also affect drift, but the effect is divided by approximately 5. The trim range of the voltage reference using this method is typically ±400mV. The voltage reference trim can be used to trim offset errors at the output of the RCV420. There is an 8:1 voltage attenuation from Ref In to Rcv Out, and thus the trim range at the output of the receiver is typically ±50mV. The high-frequency noise (to 1MHz) of the voltage refer-
ence is typically 1mVp-p. When the voltage reference is used for level shifting, its noise contribution at the output of the receiver is typically 125µVp-p due to the 8:1 attenuation from Ref In to Rcv Out. The reference noise can be reduced by connecting an external capacitor between the Noise Reduction pin and ground. For example, 0.1µF capacitor reduces the high-frequency noise to about 200µVp-p at the output of the reference and about 25µVp-p at the output of the receiver.
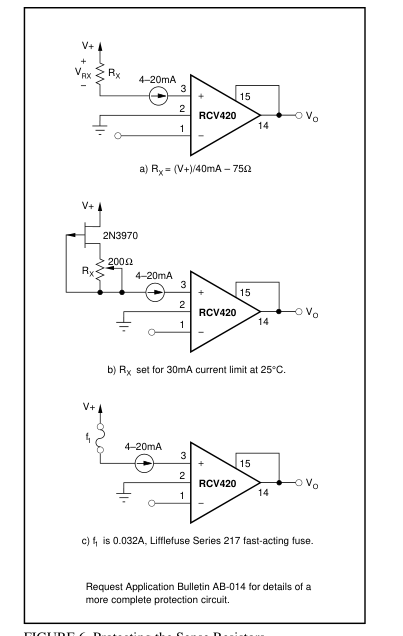
FIGURE 6. Protecting the Sense Resistors.
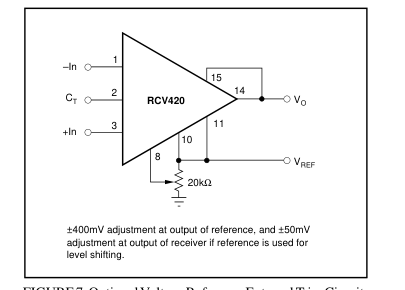
FIGURE 7. Optional Voltage Reference External Trim Circuit.
Page 8
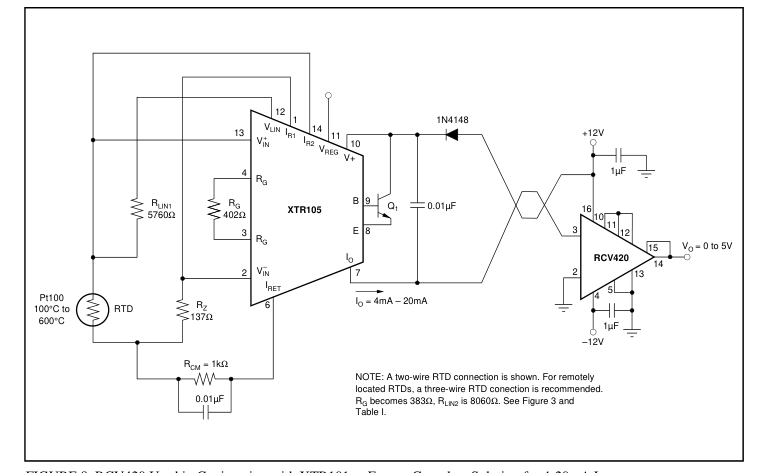
FIGURE 8. RCV420 Used in Conjunction with XTR101 to Form a Complete Solution for 4-20mA Loop.
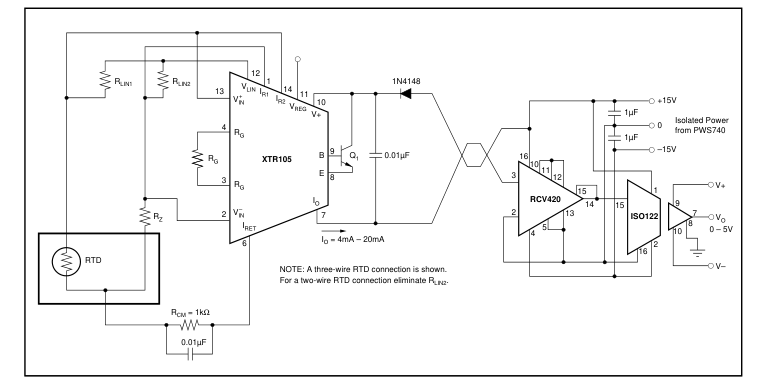
FIGURE 9. Isolated 4-20mA Instrument Loop (RTD shown).
Page 9
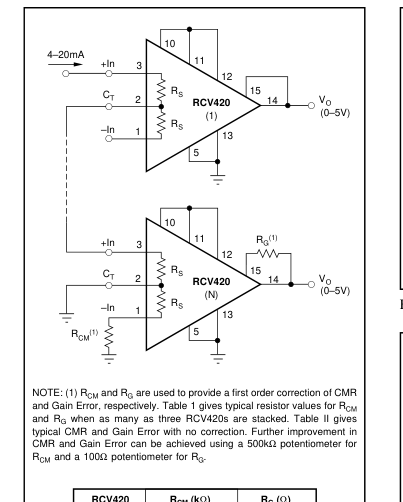
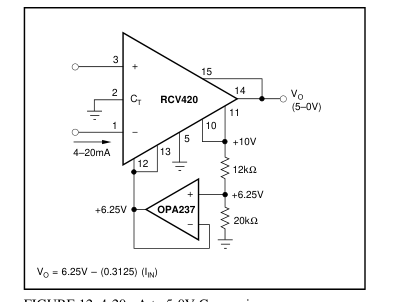
FIGURE 12. 4-20mA to 5-0V Conversion.
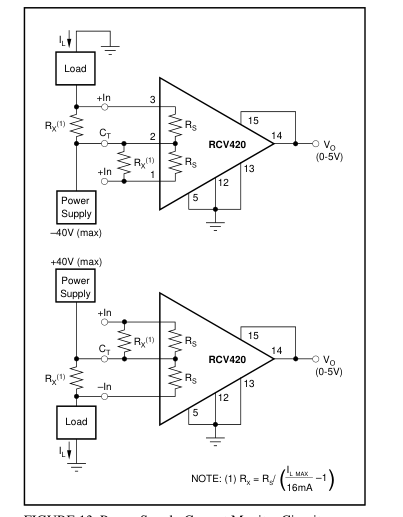
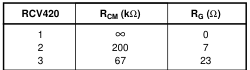
TABLE 1. Typical Values for RCM and RG.
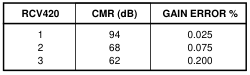
TABLE II. Typical CMR and Gain Error
Without Correction.
FIGURE 10. Series 4-20mA Receivers.
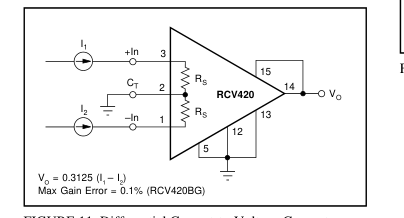
FIGURE 13. Power Supply Current Monitor Circuit.
FIGURE 11. Differential Current-to-Voltage Converter.
Page 10
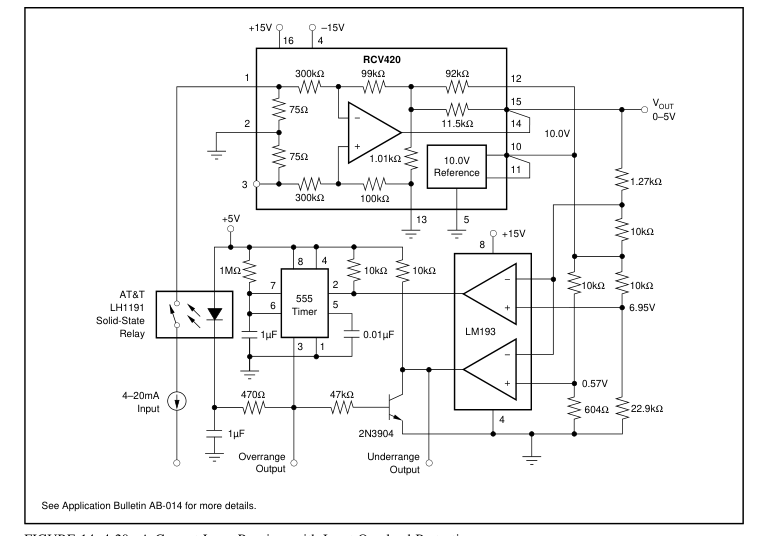
FIGURE 14. 4-20mA Current Loop Receiver with Input Overload Protection.
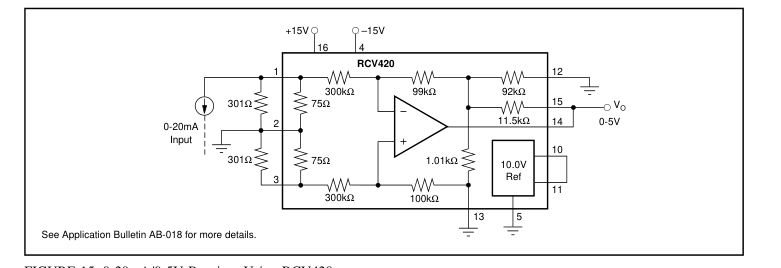
FIGURE 15. 0-20mA/0-5V Receiver Using RCV420.
Page 11
PACKAGE OPTION ADDENDUM
11-Nov-2025
www.ti.com
PACKAGING INFORMATION

(1) Status: For more details on status, see our product life cycle.
(2) Material type: When designated, preproduction parts are prototypes/experimental devices, and are not yet approved or released for full production. Testing and final process, including without limitation quality assurance, reliability performance testing, and/or process qualification, may not yet be complete, and this item is subject to further changes or possible discontinuation. If available for ordering, purchases will be subject to an additional waiver at checkout, and are intended for early internal evaluation purposes only. These items are sold without warranties of any kind.
(3) RoHS values: Yes, No, RoHS Exempt. See the TI RoHS Statement for additional information and value definition.
(4) Lead finish/Ball material: Parts may have multiple material finish options. Finish options are separated by a vertical ruled line. Lead finish/Ball material values may wrap to two lines if the finish value exceeds the maximum column width.
(5) MSL rating/Peak reflow: The moisture sensitivity level ratings and peak solder (reflow) temperatures. In the event that a part has multiple moisture sensitivity ratings, only the lowest level per JEDEC standards is shown. Refer to the shipping label for the actual reflow temperature that will be used to mount the part to the printed circuit board.
(6) Part marking: There may be an additional marking, which relates to the logo, the lot trace code information, or the environmental category of the part.
Multiple part markings will be inside parentheses. Only one part marking contained in parentheses and separated by a "~" will appear on a part. If a line is indented then it is a continuation of the previous line and the two combined represent the entire part marking for that device.
Important Information and Disclaimer:The information provided on this page represents TI's knowledge and belief as of the date that it is provided. TI bases its knowledge and belief on information provided by third parties, and makes no representation or warranty as to the accuracy of such information. Efforts are underway to better integrate information from third parties. TI has taken and continues to take reasonable steps to provide representative and accurate information but may not have conducted destructive testing or chemical analysis on incoming materials and chemicals. TI and TI suppliers consider certain information to be proprietary, and thus CAS numbers
and other limited information may not be available for release.
In no event shall TI's liability arising out of such information exceed the total purchase price of the TI part(s) at issue in this document sold by TI to Customer on an annual basis.
Addendum-Page 1
Page 12
PACKAGE MATERIALS INFORMATION
www.ti.com
10-Aug-2026
TUBE
T - Tube
height
L - Tube length

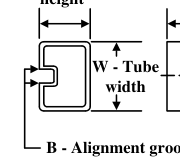
\*All dimensions are nominal
| Device | Package Name | Package Type | Pins | SPQ | L (mm) | W (mm) | T (µm) | B (mm) |
|---|---|---|---|---|---|---|---|---|
| RCV420JP | N | PDIP | 16 | 25 | 506 | 13.97 | 11230 | 4.32 |
| RCV420JP.A | N | PDIP | 16 | 25 | 506 | 13.97 | 11230 | 4.32 |
| RCV420KP | N | PDIP | 16 | 25 | 506 | 13.97 | 11230 | 4.32 |
| RCV420KP.A | N | PDIP | 16 | 25 | 506 | 13.97 | 11230 | 4.32 |
Pack Materials-Page 1
Page 13
IMPORTANT NOTICE AND DISCLAIMER
TI PROVIDES TECHNICAL AND RELIABILITY DATA (INCLUDING DATASHEETS), DESIGN RESOURCES (INCLUDING REFERENCE DESIGNS), APPLICATION OR OTHER DESIGN ADVICE, WEB TOOLS, SAFETY INFORMATION, AND OTHER RESOURCES “AS IS” AND WITH ALL FAULTS, AND DISCLAIMS ALL WARRANTIES, EXPRESS AND IMPLIED, INCLUDING WITHOUT LIMITATION ANY IMPLIED WARRANTIES OF MERCHANTABILITY, FITNESS FOR A PARTICULAR PURPOSE OR NON-INFRINGEMENT OF THIRD PARTY INTELLECTUAL PROPERTY RIGHTS. These resources are intended for skilled developers designing with TI products. You are solely responsible for (1) selecting the appropriate TI products for your application, (2) designing, validating and testing your application, and (3) ensuring your application meets applicable
standards, and any other safety, security, regulatory or other requirements. These resources are subject to change without notice. TI grants you permission to use these resources only for development of an application that uses the TI products described in the resource. Other reproduction and display of these resources is prohibited. No license is granted to any other TI intellectual property right or to any third party intellectual property right. TI disclaims responsibility for, and you fully indemnify TI and its representatives against any claims, damages, costs, losses, and liabilities arising out of your use of these resources. TI’s products are provided subject to TI’s Terms of Sale, TI’s General Quality Guidelines, or other applicable terms available either on
ti.com or provided in conjunction with such TI products. TI’s provision of these resources does not expand or otherwise alter TI’s applicable warranties or warranty disclaimers for TI products. Unless TI explicitly designates a product as custom or customer-specified, TI products are standard, catalog, general purpose devices. TI objects to and rejects any additional or different terms you may propose. IMPORTANT NOTICE
Copyright © 2026, Texas Instruments Incorporated
Last updated 10/2025