
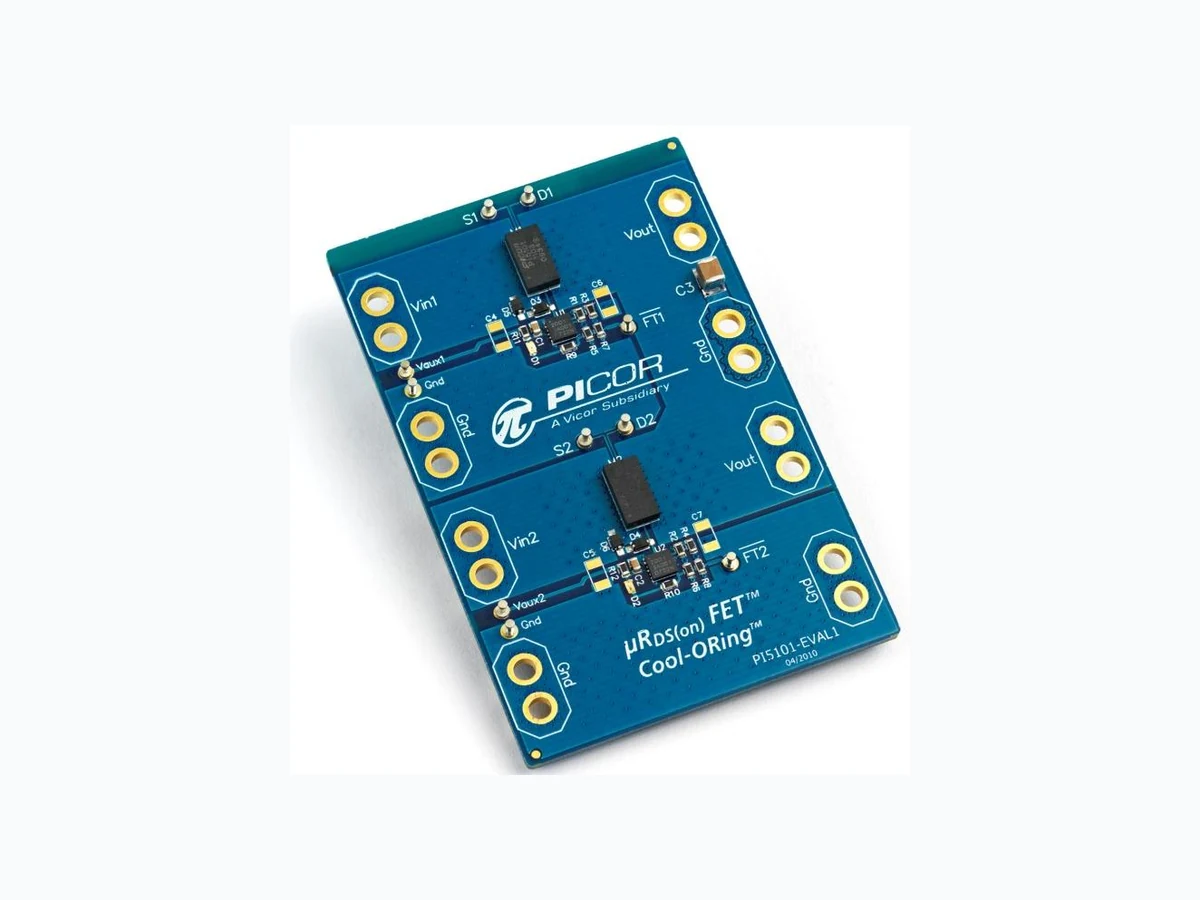

 Download PDF
DATASHEET SEARCH SITE
Document overview
- PDF pages: 12
Technical content
Page 1
PI5101-EVAL1
μRDS(on) FETTM Series
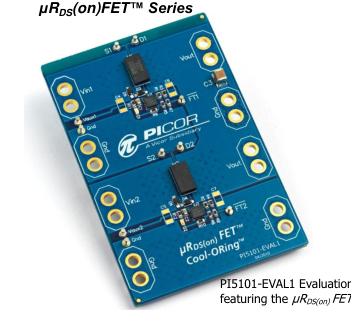
PI5101-EVAL1 3.3V/60A High Side Active ORing
Evaluation Board User Guide
Content Page
Introduction ........................................................... 1
Product Description ................................................ 2
Schematic ............................................................... 3
Bill of Material ........................................................ 4
Test Procedure: ...................................................... 5
Recommended Material and Test Equipment ...................................................... 5
Test set-up configuration ....................................... 5
PCB Layout.............................................................. 9
Mechanical Drawing ............................................. 11
The PI5101-EVAL1 Evaluation Board is intended to acquaint the user with the benefits and features of the μRDS(on)FET™ PI5101 in a full function Active ORing solution. It is not designed to be installed in end-use equipment.
Please read this document before setting up the PI5101- EVAL1 Evaluation Board and refer to the PI2001 and PI5101 product datasheets for device specifications, functional description and characteristics.
Introduction
The PI5101-EVAL1 allows the user to test the basic principles and operational characteristics low voltage high current Active ORing function in a redundant power architecture, while also experiencing the benefits and the value of the PI5101 ultra-low RDS(on) MOSFET. The PI5101- EVAL1 evaluation board is configured to receive two independent power source inputs, per a typical redundant power architecture, through two Active ORing channels that are combined to form a redundant power output. Each channel contains a PI2001 controller and PI5101 MOSFET.
The PI5101-EVAL1 evaluation board is designed with optimized PCB layout and component placement to represent a realistic high density final design for an embedded high side Active ORing solution for 3.3V Bus
During operation, the power devices and surrounding structures can be operated safely at high temperatures.
Remove power and use caution when connecting and disconnecting test probes and interface lines to avoid inadvertent short circuits and contact with hot surfaces.
When testing electronic products always use approved safety glasses. Follow good laboratory practice and procedures.
applications requiring up to 60A. This evaluation board is intended as an easy and simple way to test the electrical and thermal performance of the PI5101 ultra-low RDS(on) MOSFET and PI2001 Active ORing controller.
Both dynamic and steady state testing of the PI5101 and the PI2001 can be completed on the PI5101-EVAL1 evaluation board, in addition to using the key features of the product. Dynamic testing can be completed under a variety of system level fault conditions to check for response time to faults.
This document provides basic instructions for initial startup and configuration of the evaluation board. Further information on the functionality of the PI5101 and PI2001 can be found in the PI5101 and PI2001 product data sheet.
PI5101-EVAL1 User Guide Rev 1.0 Page 1 of 12
Page 2
Product Description
The PI5101 μRDS(on)FETTM solution combines a highperformance 5V, 360μΩ lateral N-Channel MOSFET in a thermally enhanced high density 4.1mm x 8mm x 2mm land-grid-array (LGA) package to enable world class performance in the footprint area of an industry standard SO-8 package. The PI5101 offers unprecedented figureof-merits for DC and switching application including RDS(on) x QG, gate resistance (RG) and package inductance (LDS) outperforming conventional Trench MOSFETs and enabling very low loss operation.
Using the PI2001 controller with the PI5101 ultra-low RDS(on) N-channel MOSFET provides very high efficiency and low power loss during steady state operation. The PI2001 controller provides an active low fault flag output to the system during excessive forward current, light load, reverse current, over-voltage, under-voltage, and over-temperature fault conditions. The under-voltage and over-voltage thresholds are programmable via an external resistor divider.
The PI5101 LGA package is fully compatible with industry standard SMT assembly processes.
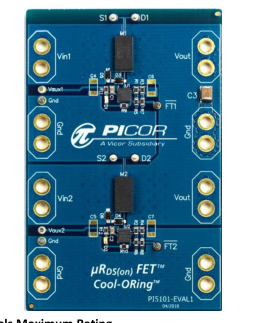
Terminals Maximum Rating
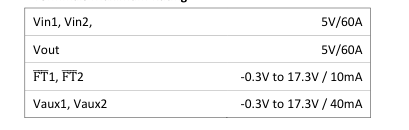
Figure 1: PI5101-EVAL1 Evaluation Board (1.8” x 2.8”)
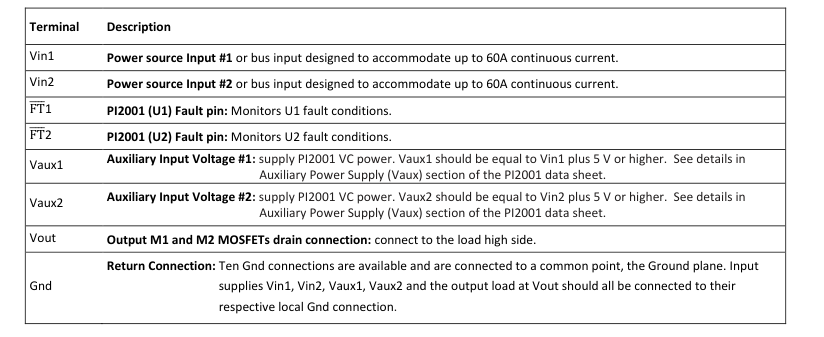
Table 1: PI5101-EVAL1 Evaluation Board Terminals Description
PI5101-EVAL1 User Guide Rev 1.0 Page 2 of 12
Page 3
Schematic
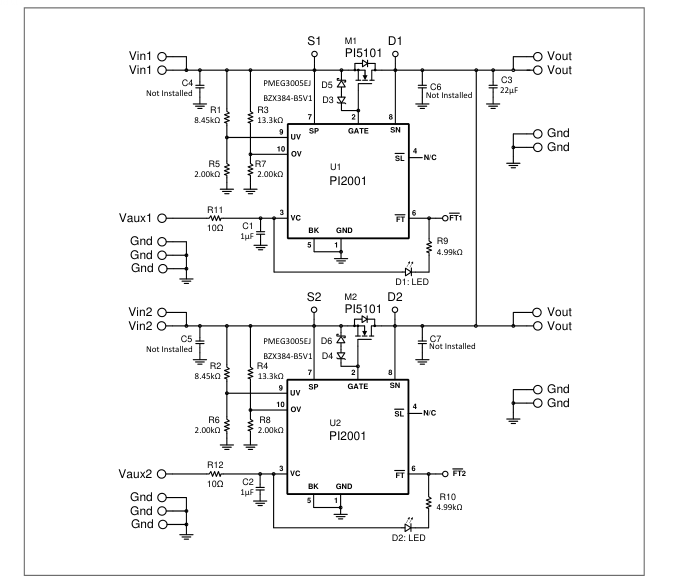
Figure 2: PI5101-EVAL1 Evaluation Board schematic.
PI5101-EVAL1 User Guide Rev 1.0 Page 3 of 12
Page 4
Bill of Material
| Item | QTY | Ref. Designator | Value/Part NO. | Description | Footprint | Manufacturer |
|---|---|---|---|---|---|---|
| 1 | 2 | C1, C2 | 1μF | MLCC Capacitor, X5R, 1μF,16V | 0603 | |
| 2 | 2 | C3 | 22μF | MLCC Capacitor, X5R, 22μF,25V | 1210 | |
| 3 | 4 | C4, C5, C6, C7 | Not Installed | 1206 | ||
| 4 | 2 | D1, D2 | LTST-C191CKT | LED, Red | 0603 LED | Lite-On |
| 5 | 2 | D3, D4 | BZX384-B5V1,115 | Zener Diode 5.1V 300mW | SOD323 | NXP |
| 6 | 2 | D5, D6 | PMEG3005EJ,115 | Schottky Diode, ,30V,500mA | SOD323 | NXP |
| 7 | 10 | D1, D2, 1, 2, Gnd, S1, S2, Vaux1, Vaux2 | 1528 | Turret Test point | TURRET - 1528 | Keystone Electronics |
| 8 | 16 | Gnd, Vin1, Vin2, Vout | 1502 | Turret Test point | TURRET - 1502 | Keystone Electronics |
| 9 | 2 | M1, M2 | PI5101-00-LGIZ | N-MOSFET, 5V, 60A | 3-Lead LGA | PICOR |
| 10 | 2 | R1, R2 | 8.45kΩ | Resistor, 8.45kΩ, 1%,0.1W | 0603 | |
| 11 | 2 | R3, R4 | 13.3kΩ | Resistor,13.3kΩ, 1%, 0.125W | 0603 | |
| 12 | 4 | R5, R6, R7, R8 | 2.00kΩ | Resistor, 2.00kΩ, 1%, 0.125W | 0603 | |
| 13 | 2 | R9, R10 | 4.99kΩ | Resistor, 4.99kΩ,1%,0.1W | 0603 | |
| 14 | 2 | R11, R12 | 10Ω | Resistor, 10Ω,1%,0.1W | 0603 | |
| 15 | 2 | U1, U2 | PI2001-00-QEIG | Picor Cool-ORing Controller IC | 3x3mm 10L DFN | PICOR |
Table 2: PI5101-EVAL1 Evaluation Board Bill of Materials
| Ref. Designator | Value/Part NO. | Functional Description |
|---|---|---|
| C1, C2, | 1uF | VC Bypass Capacitor |
| C3 | 22uF | Output (Load) Capacitor |
| C4, C5, C6, C7 | Not Installed | Snubber to reduce voltage ringing when the device turns off. Add the capacitors if long harnesses are used to connect the power source or load to the board. |
| D1, D2 | LTST-C191CKT | A fault is indicate exists when the LED is on |
| D3, D4 | BZX384-B5V1,115 | Zener diode clamps the gate voltage |
| D5, D6 | PMEG3005EJ,115 | Schottky Diode added to prevent current flow from Vin into the controller during gate discharge |
| M1, M2 | PI5101-00-LGIZ | PICOR ultra-low R MOSFET DS(on) |
| R1, R2 | 8.45kΩ | UV Voltage Divider Resistor ( R2UV as defined in section 2.1.2 and Figure 4) |
| R3, R4 | 13.3kΩ | OV Voltage Divider Resistor ( R2OV as defined in section 2.1.2 and Figure 4) |
| R5, R6, | 2.00kΩ | UV Voltage Divider Resistor ( R1UV as defined in section 2.1.2 and Figure 4) |
| R7, R8 | 2.00kΩ | OV Voltage Divider Resistor ( R1OV as defined in section 2.1.2 and Figure 4) |
| R9, R10 | 4.99kΩ | LED current limit resistor, selected to operate from 12V. |
| R11, R12 | 10Ω | VC bias resistor added for noise filtering |
| U1, U2 | PI2001-00-QEIG | PICOR Cool-ORing Active ORing Controller |
Table 3: Component functional description
PI5101-EVAL1 User Guide Rev 1.0 Page 4 of 12
Page 5
Test Procedure: Initial Test Set Up PI5101-EVAL1 is configured for a 3.3V redundant bus application. Under-Voltage (UV) and Over-Voltage (OV) voltage divider resistors are selected appropriately for 3.3V nominal bus voltage. Refer to section 2 on page 6 to calculate OV and UV resistor values if another input voltage is desired. Both PI2001 controllers are configured as Master.
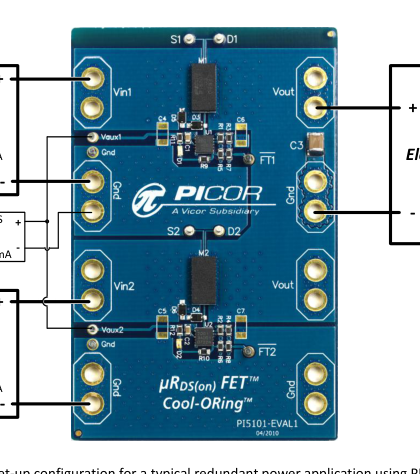
Baseline Test Procedure (Refer to Figure 3) 1. Recommended Material and Test Equipment 1.1. Material Needed-Picor supplied 1.1.1. PI5101-EVAL1 evaluation board 1.1.2. PI5101 Product Datasheet 1.1.3. PI2001 Product Datasheet 1.2. Recommended Users Supplied Equipment 1.2.1. Two DC power supplies: 0-5V; 60A each. 1.2.2. One DC power supplies: 12V, 100mA 1.2.3. Load: Electronic Load, Power resistors or actual load. 1.2.4. Multimeter. 1.2.5. Oscilloscope. 1.2.6. Appropriately sized interconnect cables. 1.2.7. Safety glasses.
+
PS1
DC
Electronic
0-5V/60A
Load
Logic PS
60A
PS3 12V/100mA
+
PS2
0-5V/60A
Figure 3: Test set-up configuration for a typical redundant power application using PI2001 and PI5101
PI5101-EVAL1 User Guide Rev 1.0 Page 5 of 12
Page 6
Before initial power-up follow these steps to configure the evaluation board for specific end application requirement: 2. UV and OV resistors set up: 2.1. UV and OV programmable resistors are configured for a 3.3V Vin (BUS voltage) application in a two-resistor voltage divider configuration as shown in Figure 4. UV is set to 2.6V and OV is set for 3.8V, R1OV and R1UV are 2.00KΩ 1%. If the PI5101-EVAL1 is required to be used with a different Vin voltage application please follow the following steps to change the resistor values. 2.1.1. It is important to consider the maximum current that will flow in the resistor divider and maximum error due to UV and OV input current.
2.1.2. Set and value based on system allowable minimum current and 1% error;
Where: : UV threshold voltage : UV voltage set (0.5Vtyp) : current : OV threshold voltage : OV voltage set (0.5Vtyp) : current
| Vin R2UV U1/U2 UV V_Logic R1UV R2OV PI2001 FT FT OV R1OV GND | ||
| Ref. Desg. | U1 | U2 |
| R1 UV | R5 | R6 |
| R2 UV | R1 | R2 |
| R1 OV | R7 | R8 |
| R2 OV | R3 | R4 |
Figure 4: UV & OV two resistor divider configuration
- Auxiliary Power Supply (Vaux): 3.1. The PI2001 Controller has a separate input (VC) that provides power to the control circuitry and the gate driver. An internal voltage regulator (VC) clamps the VC voltage to 15.5 V typically. 3.2. Connect independent power source to Vaux inputs of PI5101-EVAL1 Evaluation Board to supply power to the VC input. The Vaux voltage should be 5V higher than Vin (redundant power source output voltage) to fully enhance the PI5101. 3.3. 10 Ω bias resistors (Rbias, reference designators R11 and R12) are installed on the PI5101-EVAL1 between each Vaux input and VC pin of the PI2001 controllers (U1 and U2). 3.4. If Vaux is higher than the Clamp voltage, 15.5 V
typical, the Rbias value has to be changed using the following equations:
Where: : Vaux minimum voltage : Maximum PI2001 VC Clamp Voltage (16V) : PI2001 maximum Quiescent Current (4.2mA) Refer to PI2001 Datasheet for more details on Rbias.
- Hook Up of the Evaluation Board 4.1. OV and UV resistors values are configured for a 3.3 V input. If you are using the evaluation board at a different input voltage level you have to adjust the resistor values by replacing R1, R2, R3 and R4, or remove R3, R4, R5 and R6 to disable UV and OV function. 4.2. Please refer to the UV/OV section for details to set R1, R2, R3 and R4 proper values. 4.3. Connect the positive terminal of PS1 power supply to Vin1. Connect the ground terminal of PS1 to its local Gnd. Set the power supply to 3.3 V. Keep PS1 output disabled (OFF). 4.4. Connect the positive terminal of PS2 power supply to Vin2. Connect the ground terminal of
PS2 to its local Gnd. Set the power supply to 3.3 V. Keep PS2 output disabled (OFF). 4.5. Connect the positive terminal of PS3 power supply to Vaux1 and Vaux2. Connect the ground terminal of this power supply to Gnd. Set the power supply to 12 V. Keep PS3 output disabled (OFF). 4.6. Connect the electronic load to the output between Vout and Gnd. Set the load current to 20 A.
PI5101-EVAL1 User Guide Rev 1.0 Page 6 of 12
Page 7
- Initial Functional Test 5.1. Enable (turn ON) PS1 power supply output. 5.2. Turn on the electronic load. 5.3. Verify that the electronic load input voltage reading is one diode voltage drop below 3.3 V. 5.4. Enable (turn ON) PS3 power supply output. 5.5. Verify that the electronic load voltage reading increases to a few millivolts below 3.3 V. This verifies that the MOSFET is in conduction mode. 5.6. LED D1 should be off. This verifies that there is no fault condition. 5.7. Reduce PS1 output voltage to 2 V, 5.8. LED D1 should turn on, this verifies that the circuit is in an under-voltage fault condition. 5.9. Increase PS1 output to 3.3 V, LED D1 should turn off, then increase PS1 output to 4 V, LED
D1 should turn on indicating an over-voltage fault condition 5.10.Verify that Vin2 is at 0V. This verifies that the PI2001 (U2) MOSFET (M2) is off. 5.11.Enable (turn ON) PS2 output. 5.12.Verify that both PS1 and PS2 are sharing load current evenly by looking at the supply current. Power supplies output may need adjustment to set current sharing between the supplies. 5.13.Disable (turn OFF) PS1, PS2 and PS3 outputs. 5.14.Enable (turn ON) PS2 output then Enable PS3 output. 5.15.Verify that the electronic load voltage reading is few millivolts below 3.3 V. This verifies that the PI2001 (U2) MOSFET (M2) is in conduction mode. 5.16.LED D2 should be off. This verifies that there is
no fault condition. 5.17.Reduce PS2 output voltage to 2 V, 5.18.LED D2 should turn on, this verifies that the circuit is in an under-voltage fault condition. 5.19.Increase PS2 output to 3.3 V, LED D2 should turn off, then increase PS2 output to 4 V, LED D2 should turn on indicating an over voltage fault condition. 5.20.Verify that Vin1 is at 0V. This verifies that the PI2001 (U1) FET (Q1) is off. 6. PI5101 RDS(on) Measurement: 6.1. The PI5101 RDS(on) can be measured with a voltmeter between the test point S1 and test point D1 Kelvin connection for M1 and between the test point S2 and test point D2 Kelvin connection for M2. The potential between test point S1 and test point D1 is Drain-to-Source
voltage difference of M1 and the RDS(on) is:
Where: :
Drain-to-Source voltage difference
:
Input current.
Note: The RDS(on) value is temperature dependent and the junction temperature increases directly proportional to power dissipation. 7. Input short circuit test: PI2001 has a very fast response (160ns) to a reverse current (Input short) fault condition. Measuring such short period of event is critical and before the set-up is completed, consider the following: 7.1. To emulate a real application, the BUS supplies for this test should have a solid output source such as a DC-DC converter that supplies high current and can be connected very close to the evaluation board to reduce stray parasitic inductance. Or use the prospective supply sources of the end application where the PI5101
and/or PI2001 will be used. Typical bench power supplies have slow response to output load change. In this test when the power supply output is shorted and then released, the bench power supply may produce high output voltage with high current capability that may damage the device under test. 7.2. Do not install Input capacitors (C4 and/or C5) in this test. 7.3. Output capacitor (C3) should be installed. 7.4. Place the scope probes very close to the MOSFET drain and source to measure Vout and Vin, and make sure that the scope ground leads are very short. You may use a close by ground pad for the scope probe return, such as C4, C5, C6 and C7 Gnd pads. 7.5. Apply a short at one of the inputs (Vin1 or Vin2)
when both controllers (U1 and U2) are on, PS1, PS2 and PS3 are enabled. The short can be applied electronically using a MOSFET connected between Vin and Gnd or simply by connecting Vin to Gnd. Then measure the response time between when the short is applied and the MOSFET is disconnected (or turned off). An example for PI2001 response time to an input short circuit is shown in Figure 5.
PI5101-EVAL1 User Guide Rev 1.0 Page 7 of 12
Page 8
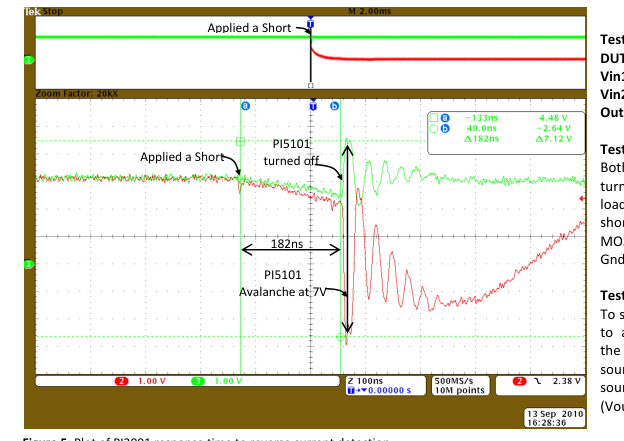
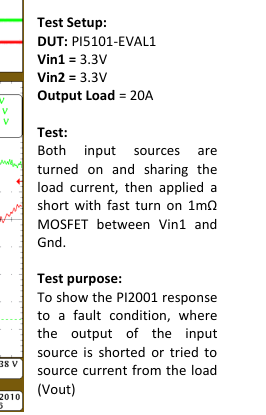
Figure 5: Plot of PI2001 response time to reverse current detection
PI5101-EVAL1 User Guide Rev 1.0 Page 8 of 12
Page 9
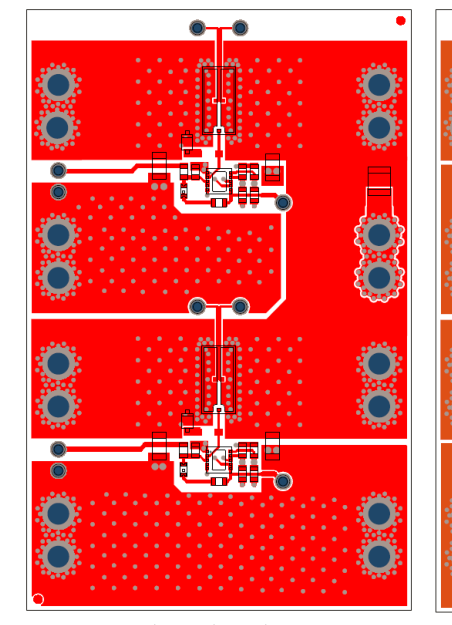
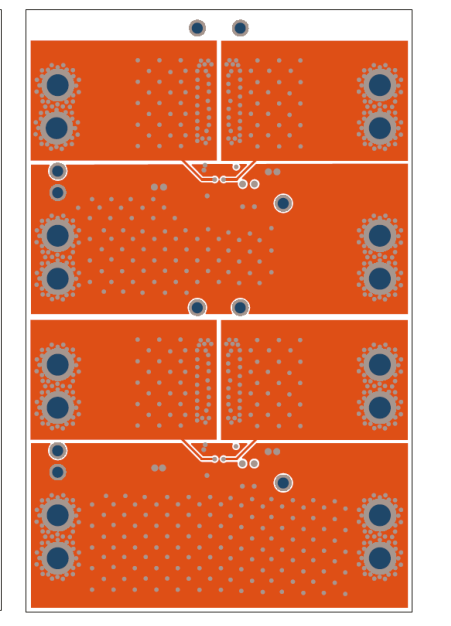
Figure 6: PI5101-EVAL1 layout top layer. Scale 2.0:1
Figure 7: PI5101-EVAL1 layout mid layer 2. Scale 2.0:1
PI5101-EVAL1 User Guide Rev 1.0 Page 9 of 12
Page 10
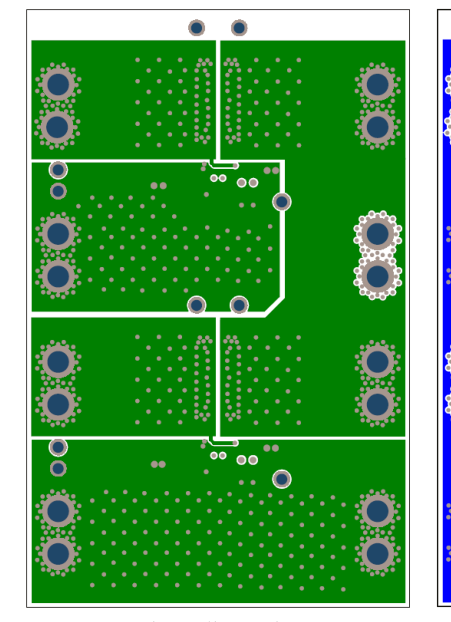
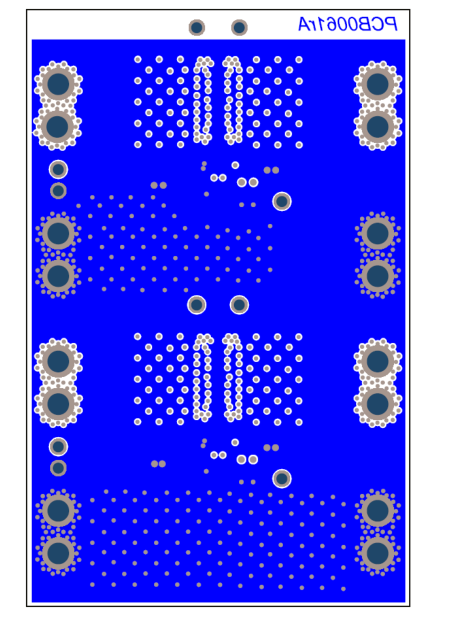
Figure 9: PI5101-EVAL1 layout bottom layer 2. Scale 2.0:1
Figure 8: PI5101-EVAL1 layout mid layer 1. Scale 2.0:1
PI5101-EVAL1 User Guide Rev 1.0 Page 10 of 12
Page 11
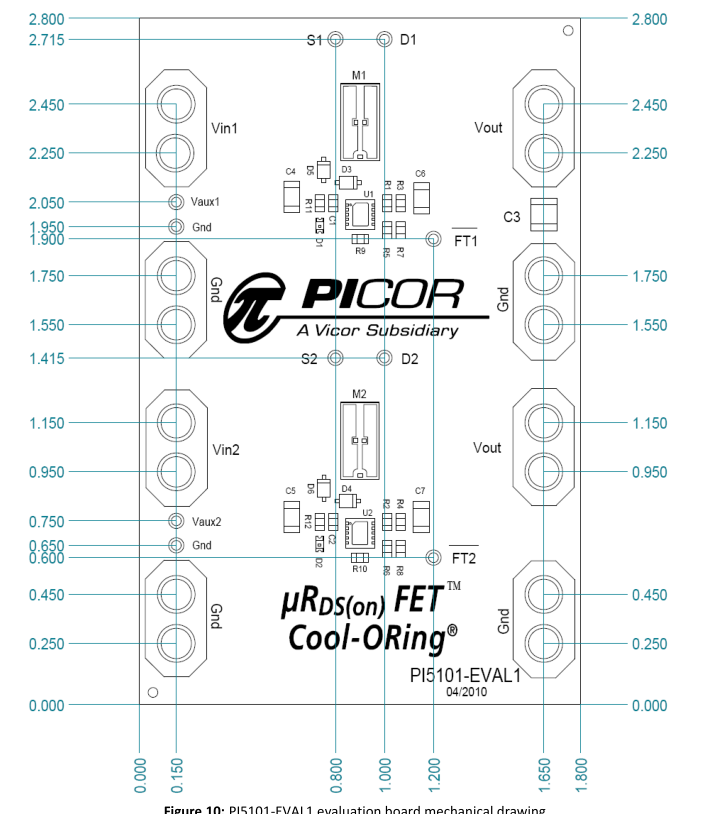
Figure 10: PI5101-EVAL1 evaluation board mechanical drawing
PI5101-EVAL1 User Guide Rev 1.0 Page 11 of 12
Page 12
Warranty
Vicor products are guaranteed for two years from date of shipment against defects in material or workmanship when in normal use and service. This warranty does not extend to products subjected to misuse, accident, or improper application or maintenance. Vicor shall not be liable for collateral or consequential damage. This warranty is extended to the original purchaser only.
EXCEPT FOR THE FOREGOING EXPRESS WARRANTY, VICOR MAKES NO WARRANTY, EXPRESS OR LIMITED, INCLUDING, BUT NOT LIMITED TO, THE WARRANTY OF MERCHANTABILITY OR FITNESS FOR A PARTICULAR PURPOSE.
Vicor will repair or replace defective products in accordance with its own best judgment. For service under this warranty, the buyer must contact Vicor to obtain a Return Material Authorization (RMA) number and shipping instructions. Products returned without prior authorization will be returned to the buyer. The buyer will pay all charges incurred in returning the product to the factory. Vicor will pay all reshipment charges if the product was defective within the terms of this warranty.
Information published by Vicor has been carefully checked and is believed to be accurate; however, no responsibility is assumed for inaccuracies. Vicor reserves the right to make changes to any products without further notice to improve reliability, function, or design. Vicor does not assume any liability arising out of the application or use of any product or circuit; neither does it convey any license under its patent rights nor the rights of others. Vicor general policy does not recommend the use of its components in life support applications wherein a failure or malfunction may directly threaten life or injury. Per Vicor Terms and Conditions of Sale, the user of Vicor components in life support applications
assumes all risks of such use and indemnifies Vicor against all damages.
Vicor’s comprehensive line of power solutions includes high density AC-DC and DC-DC modules and accessory components, fully configurable AC-DC and DC-DC power supplies, and complete custom power systems.
Information furnished by Vicor is believed to be accurate and reliable. However, no responsibility is assumed by Vicor for its use. Vicor components are not designed to be used in applications, such as life support systems, wherein a failure or malfunction could result in injury or death. All sales are subject to Vicor’s Terms and Conditions of Sale, which are available upon request.
Specifications are subject to change without notice.
Vicor Corporation 25 Frontage Road Andover, MA 01810 USA
Picor Corporation 51 Industrial Drive North Smithfield, RI 02896 USA
Customer Service: custserv@vicorpower.com Technical Support: apps@vicorpower.com
Tel: 800-735-6200 Fax: 978-475-6715
PI5101-EVAL1 User Guide Rev 1.0 Page 12 of 12