Download PDF
MPC750A MOTOROLA
Document overview
- PDF pages: 44
Technical content
Page 1
Order Number: MPC750EC/D
Rev. 2.3, 9/2001
Semiconductor Products Sector

Technical Data
MPC750A RISC Microprocessor
Hardware Specifications
This document is primarily concerned with the MPC750, however, unless otherwise noted, all information here applies also to the MPC740. The MPC750 and MPC740 are implementations of the PowerPC™ family of reduced instruction set computing (RISC) microprocessors. This document describes pertinent physical characteristics of the MPC750. For functional characteristics of the processor, refer to the MPC750 RISC Microprocessor User’s Manual. The MPC750 (and MPC740) is implemented in several semiconductor fabrication processes. Different processes may require different supply voltages and may have other electrical differences but will have the same functionality. As a designator to distinguish between MPC750 implementations in various processes,
a suffix is added to the MPC750 part number as shown below:
Table 1. MPC750 Microprocessors from Motorola
| Part Number | Process | Core Voltage | I/O Voltage | 5-Volt Tolerant |
|---|---|---|---|---|
| MPC750A, MPC740A | 0.29 µm CMOS, 5LM | 2.6 V | 3.3 V | No |
| XPC750P, XPC740P | 0.25 µm CMOS, 5LM | 1.9 V | 3.3 V | No |
This document will describe only the MPC750A implementation. The XPC750P is described in a separate document.
This document contains information on a new product under development by Motorola. Motorola reserves the right to change or discontinue this product without notice. © Motorola, Inc., 2001. All rights reserved.
Page 2
This document contains the following topics: Topic
Page
Section 1.1, “Overview”
3
Section 1.2, “Features”
4
Section 1.3, “General Parameters”
6
Section 1.4, “Electrical and Thermal Characteristics”
6
Section 1.4.1, “DC Electrical Characteristics”
6
Section 1.4.2, “AC Electrical Characteristics”
10
Section 1.4.2.1, “Clock AC Specifications”
10
Section 1.4.2.2, “60x Bus Input AC Specifications”
12
Section 1.4.2.3, “60x Bus Output AC Specifications”
14
Section 1.4.2.4, “L2 Clock AC Specifications”
15
Section 1.4.2.5, “L2 Bus Input AC Specifications”
18
Section 1.4.2.6, “L2 Bus Output AC Specifications”
19
Section 1.5, “Pin Assignments”
23
Section 1.6, “Pinout Listings”
25
Section 1.7, “Package Description”
29
Section 1.8, “System Design Information”
31
Section 1.9, “Document Revision History
42
To locate any published errata or updates for this document, refer to the website at http://www.mot.com/PowerPC/.
Page 3
Overview
1.1 Overview
The MPC750 is targeted for low-cost, low-power systems and supports the following power management
features—doze, nap, sleep, and dynamic power management. The MPC750 consists of a processor core
and an internal L2 Tag combined with a dedicated L2 cache interface and a 60x bus.
Figure 1 shows a block diagram of the MPC750.
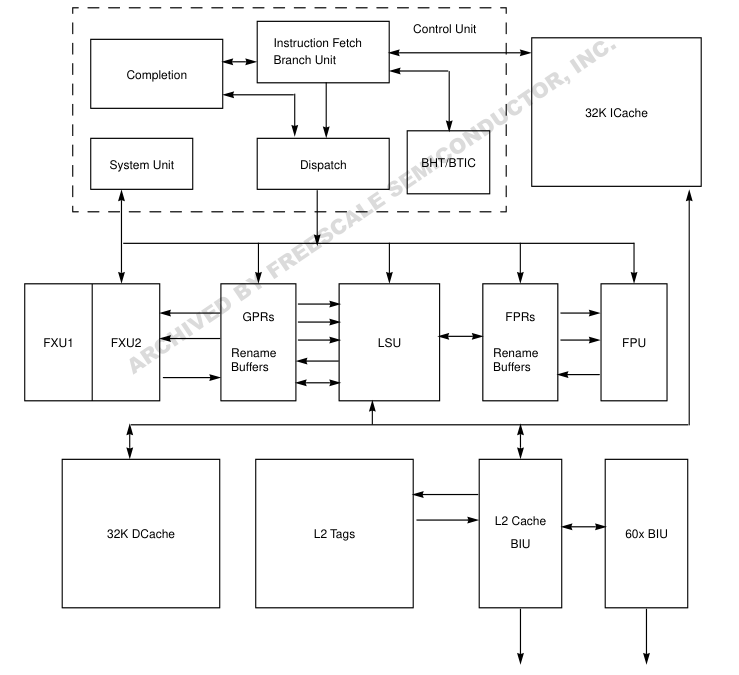
Figure 1. MPC750 Block Diagram
Page 4
Features
1.2 Features
This section summarizes features of the MPC750’s implementation of the PowerPC architecture. Major features of the MPC750 are as follows:
- Branch processing unit — Four instructions fetched per clock — One branch processed per cycle (plus resolving 2 speculations) — Up to 1 speculative stream in execution, 1 additional speculative stream in fetch — 512-entry branch history table (BHT) for dynamic prediction — 64-entry, 4-way set associative branch target instruction cache (BTIC) for eliminating branch delay slots
- Dispatch unit — Full hardware detection of dependencies (resolved in the execution units) — Dispatch two instructions to six independent units (system, branch, load/store, fixed-point unit 1, fixed-point unit 2, or floating-point)
— Serialization control (predispatch, postdispatch, execution serialization)
- Decode — Register file access — Forwarding control — Partial instruction decode
- Load/store unit — One cycle load or store cache access (byte, half-word, word, double-word) — Effective address generation — Hits under misses (one outstanding miss) — Single-cycle misaligned access within double word boundary — Alignment, zero padding, sign extend for integer register file — Floating-point internal format conversion (alignment, normalization) — Sequencing for load/store multiples and string operations — Store gathering — Cache and TLB instructions — Big- and little-endian byte addressing supported — Misaligned little-endian support in hardware
- Fixed-point units — Fixed-point unit 1 (FXU1)—multiply, divide, shift, rotate, arithmetic, logical — Fixed-point unit 2 (FXU2)—shift, rotate, arithmetic, logical — Single-cycle arithmetic, shift, rotate, logical — Multiply and divide support (multi-cycle) — Early out multiply
- Floating-point unit — Support for IEEE-754 standard single- and double-precision floating-point arithmetic — 3 cycle latency, 1 cycle throughput, single-precision multiply-add
Page 5
Features
— 3 cycle latency, 1 cycle throughput, double-precision add — 4 cycle latency, 2 cycle throughput, double-precision multiply-add — Hardware support for divide — Hardware support for denormalized numbers — Time deterministic non-IEEE mode
- System unit — Executes CR logical instructions and miscellaneous system instructions — Special register transfer instructions
- Cache structure — 32K, 32-byte line, 8-way set associative instruction cache — 32K, 32-byte line, 8-way set associative data cache — Single-cycle cache access — Pseudo-LRU replacement — Copy-back or write-through data cache (on a page per page basis) — Supports all PowerPC memory coherency modes — Non-blocking instruction and data cache (one outstanding miss under hits) — No snooping of instruction cache
- Memory management unit — 128 entry, 2-way set associative instruction TLB — 128 entry, 2-way set associative data TLB — Hardware reload for TLBs — 4 instruction BATs and 4 data BATs
52
— Virtual memory support for up to 4 exabytes (2
) of virtual memory 32
— Real memory support for up to 4 gigabytes (2
) of physical memory
- Level 2 (L2) cache interface (not implemented on MPC740) — Internal L2 cache controller and 4K-entry tags; external data SRAMs — 256K, 512K, and 1 Mbyte 2-way set associative L2 cache support — Copy-back or write-through data cache (on a page basis, or for all L2) — 64-byte (256K/512K) and 128-byte (1-Mbyte) sectored line size — Supports flow-through (reg-buf) synchronous burst SRAMs, pipelined (reg-reg) synchronous burst SRAMs, and pipelined (reg-reg) late-write synchronous burst SRAMs
— Core-to-L2 frequency divisors of ÷1, ÷1.5, ÷2, ÷2.5, and ÷3 supported
- Bus interface — Compatible with 60x processor interface — 32-bit address bus — 64-bit data bus — Bus-to-core frequency multipliers of 3x, 3.5x, 4x, 4.5x, 5x, 5.5x, 6x, 6.5x, 7x, 7.5x, 8x supported
- Integrated power management — Low-power 2.6/3.3-volt design — Three static power saving modes: doze, nap, and sleep
Page 6
General Parameters
— Automatic dynamic power reduction when internal functional units are idle
- Integrated Thermal Management Assist Unit — On-chip thermal sensor and control logic — Thermal Management Interrupt for software regulation of junction temperature.
- Testability — LSSD scan design — JTAG interface
- Reliability and serviceability—Parity checking on 60x and L2 cache buses
1.3 General Parameters
The following list provides a summary of the general parameters of the MPC750:
0.29 µm CMOS, five-layer metal
Technology:
2
7.56 mm x 8.79 mm (67 mm
Die size:
)
Transistor count
6.35 million
Logic design
Fully-static MPC740: Surface mount 255 ceramic ball grid array (CBGA) without L2
Packages
interface MPC750: Surface mount 360 ceramic ball grid array (CBGA) with L2 interface
Core power supply:
2.6V ± 100 mV
I/O power supply
3.3V ± 5% V dc
1.4 Electrical and Thermal Characteristics
This section provides the AC and DC electrical specifications and thermal characteristics for the MPC750.
1.4.1 DC Electrical Characteristics
The tables in this section describe the MPC750 DC electrical characteristics. Table 2 provides the absolute maximum ratings.
Table 2. Absolute Maximum Ratings
| Characteristic | Symbol | MPC750A Value | Unit | Notes |
|---|---|---|---|---|
| Core supply voltage | Vdd | –0.3 to 2.75 | V | 4 |
| PLL supply voltage | AVdd | –0.3 to 2.75 | V | 4 |
| L2 DLL supply voltage | L2AVdd | –0.3 to 2.75 | V | 4 |
| 60x bus supply voltage | OVdd | –0.3 to 3.6 | V | 3,5 |
Page 7
Electrical and Thermal Characteristics
Table 2. Absolute Maximum Ratings (Continued)
| Characteristic Symbol MPC750A Value Unit Notes L2 bus supply voltage L2OVdd –0.3 to 3.6 V 3,5 Input voltage V –0.3 to 3.6 V 2 in Storage temperature range T –55 to 150 °C stg Notes: 1. Functional and tested operating conditions are given in Table 3. Absolute maximum ratings are stress ratings only, and functional operation at the maximums is not guaranteed. Stresses beyond those listed may affect C . device reliability or cause permanent damage to the device. N I 2. Caution: Vin must not exceed OVdd/L2OVdd by more than 0.3V at any time including during power-on R , reset. O T 3. Caution: OVdd/L2OVdd must not exceed Vdd/AVdd by more than 1.2V at any time including during C U power-on reset. D N 4. Caution: Vdd/AVdd/L2AVdd must not exceed OVdd/L2OVdd by more than 0.4V at any time including O during power-on reset. C I M 5. V may overshoot/undershoot to a voltage and for a maximum duration as shown in Figure 2 in E S E gure 2 shows the allowable undershoot and overshoot voltage on the MPC750. L A C S E 4V E R (L2)OVdd + 5% F Y (L2)OVdd B D E V I H C V R IH A V IL Gnd Gnd - .3V Gnd - 1.0V Not to exceed 10% of t SYSCLK Figure 2. Overshoot/Undershoot Voltage ble 3 provides the recommended operating conditions for the MPC750. Table 3. Recommended Operating Conditions | ||||
|---|---|---|---|---|
| Characteristic | Symbol | MPC750A Value | Unit | Notes |
| Core supply voltage | Vdd | 2.6 ± 100mv | V | |
| PLL supply voltage | AVdd | 2.6 ± 100mv | V | |
| L2 DLL supply voltage | L2AVdd | 2.6 ± 100mv | V | |
| 60x bus supply voltage | OVdd | 3.135 to 3.465 | V | |
| Characteristic | Symbol | MPC750A Value | Unit | Notes |
|---|---|---|---|---|
| L2 bus supply voltage | L2OVdd | –0.3 to 3.6 | V | 3,5 |
| Input voltage | V in | –0.3 to 3.6 | V | 2 |
| Storage temperature range | T stg | –55 to 150 | °C |
Page 8
Electrical and Thermal Characteristics
Table 3. Recommended Operating Conditions (Continued)
| Characteristic | Symbol | MPC750A Value | Unit | Notes |
|---|---|---|---|---|
| L2 bus supply voltage | L2OVdd | 2.5 to 3.465 | V | |
| Input voltage | V in | GND to OVdd | V | |
| Die-junction temperature | T j | 0 to 105 | °C | |
| T j | -40 to 105 | °C | 1 |
Note:These are the recommended and tested operating conditions. Proper device operation outside of these conditions is not guaranteed. 1. For extended temperature parts marked MPC750ARXnnnTH or MPC740ARXnnnTH only (where nnn is the operating frequency from Table 8.
Table 4 provides the package thermal characteristics for the MPC750.
Table 4. Package Thermal Characteristics
| M Characteristic E S | Symbol | Value | Rating |
|---|---|---|---|
| E CBGA package thermal resistance, junction-to-case thermal resistance (typical) L A | θ JC | 0.03 | °C/W |
| C CBGA package thermal resistance, die junction-to-lead thermal resistance (typical) S E | θ JB | 3.8 | °C/W |
| E Note: Refer to Section 1.8, “System Design Information,” for more details about thermal management. R F Y B The MPC750 incorporates a thermal management assist unit (TAU) composed of a thermal sensor, D E digital-to-analog converter, comparator, control logic, and dedicated special-purpose registers (SPRs). See V I the MPC750 RISC Microprocessor User’s Manual for more information on the use of this feature. H C R Specifications for the thermal sensor portion of the TAU are found in Table 5. A Table 5. Thermal Sensor Specifications At recommended operating conditions (See Table 3) Num Characteristic Min Max Unit Notes 1 Temperature range 0 127 °C 1 2 Comparator settling time 20 — µs 2 3 Resolution 4 — °C 3 | |||
| Num | Characteristic | Min | Max | Unit | Notes |
|---|---|---|---|---|---|
| 1 | Temperature range | 0 | 127 | °C | 1 |
| 2 | Comparator settling time | 20 | — | µs | 2 |
| 3 | Resolution | 4 | — | °C | 3 |
Notes: 1. The temperature is the junction temperature of the die. The thermal assist unit’s raw output does not indicate an absolute temperature, but it must be interpreted by software to derive the absolute junction temperature. For information about the use and calibration of the TAU, see Motorola Application Note AN1800/D, “Programming the Thermal Assist Unit in the MPC750 Microprocessor”. 2. The comparator settling time value must be converted into the number of CPU clocks that need to be written into the THRM3 SPR. 3. Guaranteed by design and characterization.
Page 9
Electrical and Thermal Characteristics
Table 6 provides the DC electrical characteristics for the MPC750.
Table 6. DC Electrical Specifications
At recommended operating conditions (See Table 3)
| Characteristic | Symbol | Min | Max | Unit | Notes |
|---|---|---|---|---|---|
| Input high voltage (all inputs except SYSCLK) | V IH | 1.7 | L2OVdd + 0.3 | V | 2,3,4 |
| V IH | 2 | OVdd + 0.3 | V | 2,3, | |
| Input low voltage (all inputs except SYSCLK) | V IL | -0.3 | 0.2 * L2OVdd | V | 4 |
| V IL | -0.3 | 0.8 I | C . V N | ||
| SYSCLK input high voltage | CV IH | 2.4 | OVdd + 0.3 R , O | V | 2 |
| SYSCLK input low voltage | CV IL | -0.3 | T 0.4 C | V | |
| Input leakage current, V = OVdd in | I in | — | U D 30 N | µA | 2,3 |
| Hi-Z (off-state) leakage current, V = OVdd in | I TSI | O C — I | 30 | µA | 2,3,6 |
| Output high voltage, I = -6 mA OH | E V OH S | M 1.8 | — | V | |
| E V L OH A | 2.4 | — | V | ||
| Output low voltage, I = 6 mA S OL E | C V OL | — | 0.4 | V | |
| E Capacitance, V = 0 V, f = 1 MHz R in F | C in | — | 5.0 | pF | 3,5 |
Notes: 1. Nominal voltages; See Table 3 for recommended operating conditions. 2. For 60x bus signals, the reference is OVdd while L2OVdd is the reference for the L2 bus signals. 3. Excludes test signals (LSSD_MODE, L1_TSTCLK, L2_TSTCLK) and IEEE 1149.1 boundary scan (JTAG) signals. 4. Applicable to L2 bus interface only 5. Capacitance is periodically sampled rather than 100% tested. 6. The leakage is measured for nominal OVdd and Vdd, or both OVdd and Vdd must vary in the same direction (for example, both OVdd and Vdd vary by either +5% or -5%).
Table 7 provides the power consumption for the MPC750.
Table 7. Power Consumption for MPC750
| Processor (CPU) Frequency | Unit | Notes | |||
|---|---|---|---|---|---|
| 200 MHz | 233 MHz | 266 MHz | |||
| Full-On Mode | |||||
| Typical Maximum | 4.2 | 5.0 | 5.7 | W | 1, 3, 4 |
| 6.0 | 7.0 | 7.9 | W | 1, 2, 4 | |
| Doze Mode | |||||
| Maximum | 1.6 | 1.8 | 2.1 | W | 1, 2 |
| Nap Mode | |||||
| Maximum | 250 | 250 | 250 | mW | 1, 2 |
| Sleep Mode | |||||
| Maximum | 300 | 300 | 300 | mW | 1, 2 |
Page 10
Electrical and Thermal Characteristics
Table 7. Power Consumption for MPC750 (Continued)
| Processor (CPU) Frequency | Unit | Notes | |||
|---|---|---|---|---|---|
| 200 MHz | 233 MHz | 266 MHz | |||
| Sleep Mode—PLL and DLL Disabled | |||||
| Typical | 30 | 50 | 50 | mW | 1, 3 |
| Maximum | 60 | 100 | 100 | mW | 1, 2 |
| Notes: 1. These values apply for all valid 60x bus and L2 bus ratios. The values do not include I/O Supply Power (OVdd and C . N L2OVdd) or PLL/DLL supply power (AVdd and L2AVdd). OVdd and L2OVdd power is system dependent, but is typically I R , <10% of Vdd power. Worst case power consumption for AVdd = 15 mW and L2AVdd = 15 mW. O 2. Maximum power is measured at Vdd = 2.7V. T C 3. Typical power is an average value measured at Vdd = AVdd = L2AVdd = 2.6V, OVdd = L2OVdd = 3.3V in a system U D executing typical applications and benchmark sequences. N O 4. Full-On mode is measured using worst-case instruction sequence. C I M E S .2 AC Electrical Characteristics E L A C section provides the AC electrical characteristics for the MPC750. After fabrication, parts are s S E aximum processor core frequency as shown in Section 1.4.2.1, “Clock AC Specifications,” and t E R onformance to the AC specifications for that frequency. The processor core frequency is determ F e bus (SYSCLK) frequency and the settings of the PLL_CFG[0–3] signals. Parts are sol Y B mum processor core frequency; see Section 1.10, “Ordering Information”. D E V I .2.1 Clock AC Specifications H C R A e 8 provides the clock AC timing specifications as defined in Figure 3. Table 8. Clock AC Timing Specifications mmended operating conditions (See Table 3) 200 MHz 233 MHz 266 MHz Num Characteristic Unit Notes Min Max Min Max Min Max Processor frequency 150 200 150 233 150 266 MHz VCO frequency 300 400 300 466 300 533 MHz SYSCLK frequency 25 83.3 25 83.3 25 83.3 MHz 1 1 SYSCLK cycle time 12 40 12 40 12 40 ns 2, 3 SYSCLK rise and fall — 2 — 2 — 2 ns 2 time | |||||
| Num | Characteristic | 200 MHz | 233 MHz | 266 MHz | Unit | Notes | |||
|---|---|---|---|---|---|---|---|---|---|
| Min | Max | Min | Max | Min | Max | ||||
| Processor frequency | 150 | 200 | 150 | 233 | 150 | 266 | MHz | ||
| VCO frequency | 300 | 400 | 300 | 466 | 300 | 533 | MHz | ||
| SYSCLK frequency | 25 | 83.3 | 25 | 83.3 | 25 | 83.3 | MHz | 1 | |
| 1 | SYSCLK cycle time | 12 | 40 | 12 | 40 | 12 | 40 | ns | |
| 2, 3 | SYSCLK rise and fall time | — | 2 | — | 2 | — | 2 | ns | 2 |
Page 11
Electrical and Thermal Characteristics
Table 8. Clock AC Timing Specifications (Continued)
At recommended operating conditions (See Table 3)
| Num | Characteristic | 200 MHz | 233 MHz | 266 MHz | Unit | Notes | |||
|---|---|---|---|---|---|---|---|---|---|
| Min | Max | Min | Max | Min | Max | ||||
| 4 | SYSCLK duty cycle measured at 1.4V | 40 | 60 | 40 | 60 | 40 | 60 | % | 3 |
| SYSCLK jitter | — | ±150 | — | ±150 | — | ±150 | ps | 4 | |
| Internal PLL relock time | — | 100 | — | 100 | — | 100 | µs C N I , | . 5 | |
Notes: 1. Caution: The SYSCLK frequency and PLL_CFG[0–3] settings must be chosen such that the resulting SYSCLK (bus) frequency, CPU (core) frequency, and PLL (VCO) frequency do not exceed their respective maximum or minimum operating frequencies. Refer to the PLL_CFG[0–3] signal description in Section 1.8.1, “PLL Configuration,” for valid PLL_CFG[0–3] settings 2. Rise and fall times for the SYSCLK input are measured from 0.4 to 2.4V. 3. Timing is guaranteed by design and characterization. 4. The total input jitter (short term and long term combined) must be under ±150 ps. 5. Relock timing is guaranteed by design and characterization. PLL-relock time is the maximum amount of time
required for PLL lock after a stable Vdd and SYSCLK are reached during the power-on reset sequence. This specification also applies when the PLL has been disabled and subsequently re-enabled during sleep mode. Also note that HRESET must be held asserted for a minimum of 255 bus clocks after the PLL-relock time during the power-on reset sequence.
Figure 3 provides the SYSCLK input timing diagram.

SYSCLK
VM = Midpoint Voltage (1.4V)
Figure 3. SYSCLK Input Timing Diagram
Page 12
Electrical and Thermal Characteristics
1.4.2.2 60x Bus Input AC Specifications
Table 9 provides the 60x bus input AC timing specifications for the MPC750 as defined in Figure 4 and
Figure 5. Input timing specifications for the L2 bus are provided in Section 1.4.2.5, “L2 Bus Input AC
Specifications.
Table 9. 60x Bus Input AC Timing Specifications1
At recommended operating conditions (See Table 3)
| Num | Characteristic | 200, 233, 266 MHz | Unit I | Notes C . N | |
|---|---|---|---|---|---|
| Min | Max | ||||
| 10a | Address/Data/Transfer Attribute Inputs Valid to SYSCLK (Input Setup) | 2.5 | — T C | ns R , O | 2 |
| 10b | All Other Inputs Valid to SYSCLK (Input Setup) | 3.0 O | U — D N | ns | 3 |
| 10c | Mode select input setup to HRESET (DRTRY, TLBISYNC) S | C 8 M I E | — | t sysclk | 4,5,6,7 |
| 11a | E SYSCLK to Address/Data/Transfer Attribute L A Inputs Invalid (Input Hold) C | 0 | — | ns | 2 |
| 11b | S E SYSCLK to All Other Inputs Invalid (Input E R Hold) F | 0 | — | ns | 3 |
| 11c | Y HRESET to mode select input hold (DRTRY, B D TLBISYNC) E | 0 | — | ns | 4,6,7 |
Notes: 1. All input specifications are measured from the TTL level (0.8 to 2.0V) of the signal in question to the 1.4V of the rising edge of the input SYSCLK. Input and output timings are measured at the pin. 2. Address/Data/Transfer Attribute inputs are composed of the following—A[0–31], AP[0–3], TT[0–4], TBST, TSIZ[0–2], GBL, DH[0–31], DL[0–31], DP[0–7]. 3. All other signal inputs are composed of the following—TS, ABB, DBB, ARTRY, BG, AACK, DBG, DBWO, TA, DRTRY, TEA, DBDIS, HRESET, SRESET, INT, SMI, MCP, TBEN, QACK, TLBISYNC. 4. The setup and hold time is with respect to the rising edge of HRESET (see Figure 5). 5. tsysclk is the period of the external clock (SYSCLK) in nanoseconds (ns). The numbers given in the table
must be multiplied by the period of SYSCLK to compute the actual time duration (in nanoseconds) of the parameter in question. 6. Guaranteed by design and characterization. 7. This specification is for configuration mode select only. Also note that the HRESET must be held asserted for a minimum of 255 bus clocks after the PLL re-lock time during the power-on reset sequence.
Page 13
Electrical and Thermal Characteristics
Figure 4 provides the input timing diagram for the MPC750.
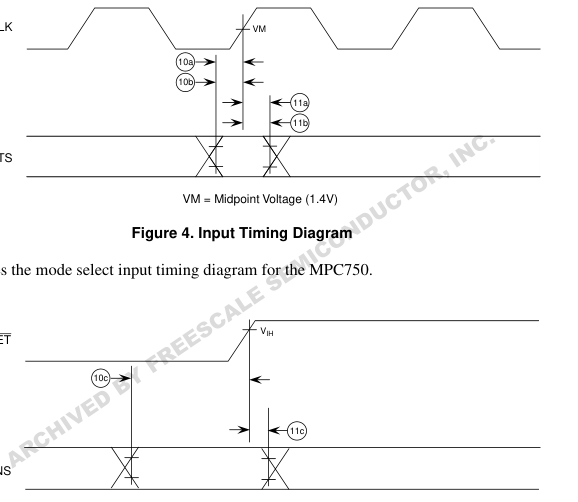
SYSCLK
ALL INPUTS
HRESET
MODE PINS
VIH = 2.0V
Figure 5. Mode Select Input Timing Diagram
Page 14
Electrical and Thermal Characteristics
1.4.2.3 60x Bus Output AC Specifications
Table 10 provides the 60x bus output AC timing specifications for the MPC750 as defined in Figure 6.
Output timing specifications for the L2 bus are provided in Section 1.4.2.6, “L2 Bus Output AC
Specifications.”
Table 10. 60x Bus Output AC Timing Specifications1
At recommended operating conditions (See Table 3), CL = 50 pF2
| Num | Characteristic | 200, 233, 266 MHz | Unit N I | Notes C . | |
|---|---|---|---|---|---|
| Min | Max | ||||
| 12 | SYSCLK to Output Driven (Output Enable Time) | 0.5 | — T C | ns R , O | |
| 13 | SYSCLK to Output Valid (TS, ABB, ARTRY, DBB) | — O | U 6.5 D N | ns | 5 |
| 14 | SYSCLK to all other Outputs Valid (all except TS, ABB, ARTRY, DBB) | C — M I E S | 6.5 | ns | 5 |
| 15 | E SYSCLK to Output Invalid (Output Hold) L A | 1.0 | — | ns | 3 |
| 16 | C SYSCLK to Output High Impedance (all S E except ABB, ARTRY, DBB) E R | — | 6.0 | ns | 8 |
| 17 | F SYSCLK to ABB, DBB High Impedance Y after precharge B D | — | 1.0 | t sysclk | 4,6,8 |
| 18 | E SYSCLK to ARTRY High Impedance V I before precharge H C | — | 5.5 | ns | 8 |
| 19 | R SYSCLK to ARTRY Precharge Enable A | 0.2*t sysclk +1.0 | — | ns | 3,4,7 |
| 20 | Maximum Delay to ARTRY Precharge | — | 1 | t sysclk | 4,7 |
| 21 | SYSCLK to ARTRY High Impedance After Precharge | — | 2 | t sysclk | 4,7,8 |
Notes: 1. All output specifications are measured from the 1.4V of the rising edge of SYSCLK to TTL level (0.8 V or 2.0 V) of the signal in question. Both input and output timing are measured at the pin. 2. All maximum timing specifications assume CL = 50 pF. 3. This minimum parameter assumes CL = 0 pF. 4. tsysclk is the period of the external bus clock (SYSCLK) in nanoseconds (ns). The numbers given in the table must be multiplied by the period of SYSCLK to compute the actual time duration of the parameter in question. 5. Output signal transitions from GND to 2.0V or OVdd to 0.8V. 6. Nominal precharge width for ABB and DBB is 0.5 tsysclk. 7. Nominal precharge width for ARTRY is 1.0 tsysclk.
- Guaranteed by design and characterization.
Page 15
Electrical and Thermal Characteristics
Figure 6 provides the output timing diagram for the MPC750.
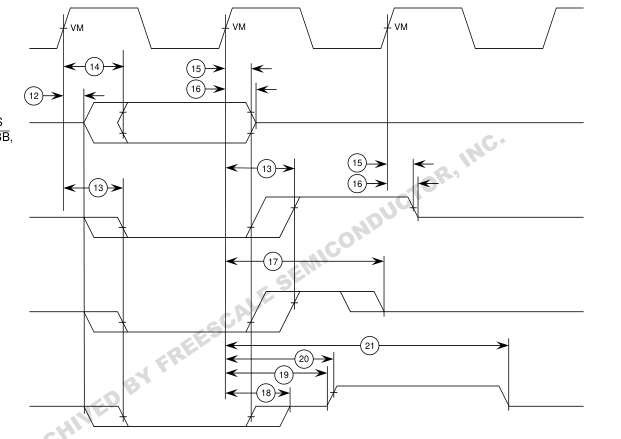
SYSCLK
ALL OUTPUTS (Except TS, ABB, ARTRY, DBB)
TS
ABB, DBB
ARTRY
VM = Midpoint Voltage (1.4V)
Figure 6. Output Timing Diagram
1.4.2.4 L2 Clock AC Specifications
Table 11 provides the L2CLK output AC timing specifications as defined in Figure 7.
Table 11. L2CLK Output AC Timing Specifications
At recommended operating conditions (See Table 3)
| Num | Characteristic | Min | Max | Unit | Notes |
|---|---|---|---|---|---|
| L2CLK frequency | 80 | 133 | MHz | 1,4 | |
| 22 | L2CLK cycle time | 7.5 | 12.5 | ns | |
| 23 | L2CLK duty cycle | 50 | % | 2 | |
Page 16
Electrical and Thermal Characteristics
Table 11. L2CLK Output AC Timing Specifications (Continued)
At recommended operating conditions (See Table 3)
| Num | Characteristic | Min | Max | Unit | Notes |
|---|---|---|---|---|---|
| Internal DLL-relock time | 640 | — | L2CLK | 3 | |
| L2CLKOUT output-to-output skew | 50 | ps | 5 | ||
| L2CLKOUT output jitter | 150 | ps | 5 |
Notes: 1. L2CLK outputs are L2CLK_OUTA, L2CLK_OUTB and L2SYNC_OUT pins. The L2 cache interface supports higher frequencies when appropriate load conditions have been considered. The L2 I/O drivers have been designed to support a 133 MHz L2 bus loaded with 4 off-the-shelf pipelined synchronous burst SRAMs. Running the L2 bus beyond 133 MHz requires tightly coupled customized SRAMs or a multi-chip module (MCM) implementation. The L2CLK frequency to core frequency settings must be chosen such that the resulting L2CLK frequency and core frequency do not exceed their respective maximum or minimum operating frequencies. L2CLK_OUTA and L2CLK_OUTB must have equal loading.
- The nominal duty cycle of the L2CLK is 50% measured at midpoint voltage. 3. The DLL re-lock time is specified in terms of L2CLKs. The number in the table must be multiplied by the period of L2CLK to compute the actual time duration in nanoseconds. Re-lock timing is guaranteed by design and characterization. 4. The L2CR[L2SL] bit should be set for L2CLK frequencies less than 110 MHz 5. Guaranteed by design and not tested.
Page 17
Electrical and Thermal Characteristics
The L2CLK_OUT timing diagram is shown in Figure 7.
L2 Single-Ended Clock Mode
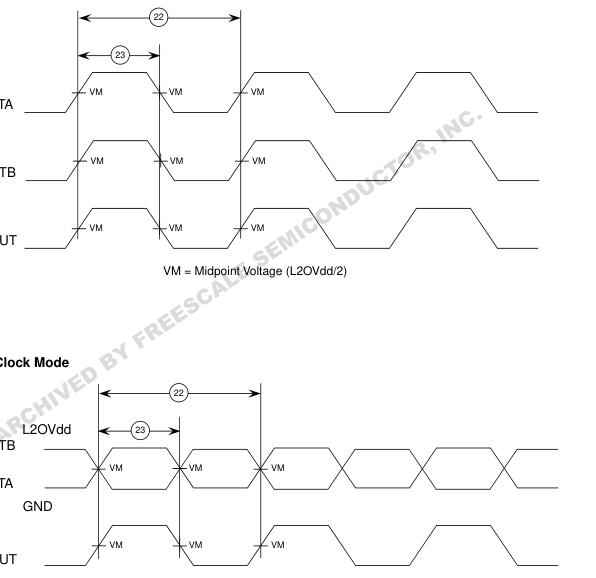
L2CLK_OUTA
L2CLK_OUTB
L2SYNC_OUT
L2 Differential Clock Mode
L2CLK_OUTB
L2CLK_OUTA
L2SYNC_OUT
VM = Midpoint Voltage (L2OVdd/2)
Figure 7. L2CLK_OUT Output Timing Diagram
Page 18
Electrical and Thermal Characteristics
1.4.2.5 L2 Bus Input AC Specifications
The L2 bus input interface AC timing specifications are found in Table 12.
Table 12. L2 Bus Input Interface AC Timing Specifications1
At recommended operating conditions (See Table 3)
| Num | Characteristic | Processor Frequency 200–266 MHz | Unit . | Notes | |
|---|---|---|---|---|---|
| Min | Max | ||||
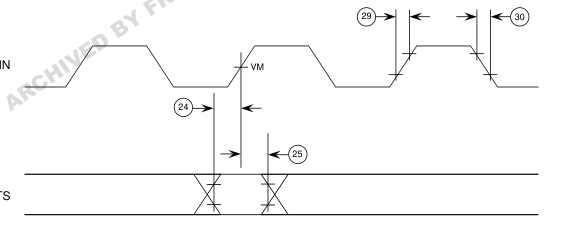
| 29,30 | L2SYNC_IN rise and fall time | — | 1.0 | C N ns I | 2 |
| 24 | Data and parity input setup to L2SYNC_IN | 2.0 | R — O | , ns | |
| 25 | L2SYNC_IN to data and parity input hold | 0.5 | T C — U | ns | |
Notes: 1. All input specifications are measured from the TTL level (0.8V or 2.0V) of the signal in question to the midpoint voltage of the rising edge of the input L2SYNC_IN. Input timings are measured at the pins (see Figure 8). 2. Rise and fall times for the L2SYNC_IN input are measured from 0.4 to 2.4V.
Figure 8 shows the L2 bus input timing diagrams for the MPC750.
L2SYNC_IN
ALL INPUTS
VM = Midpoint Voltage (1.4V)
Figure 8. L2 Bus Input Timing Diagrams
Page 19
Electrical and Thermal Characteristics
1.4.2.6 L2 Bus Output AC Specifications
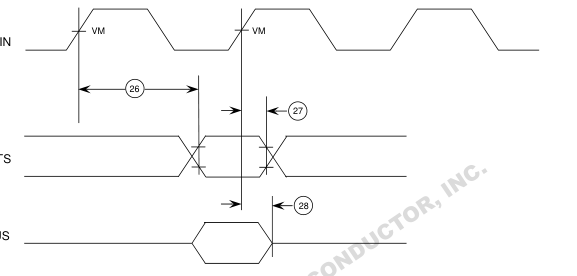
Table 13 provides the L2 bus output interface AC timing specifications for the MPC750 as defined in
Figure 9.
Table 13. L2 Bus Output Interface AC Timing Specifications1
At recommended operating conditions (See Table 3), CL = 20 pF3
| Num | Characteristic | L2CR[14–15] | Core Freq 200-266MHz | |
| Min | Max | |||
| 26 | L2SYNC_IN to output valid | 002 | — | 5.0 R , O |
| 01 | T — C | 5.5 | ||
| 10 N | U D — | 5.7 | ||
| O 11 C I | — | 6.0 | ||
| 27 | L2SYNC_IN to output hold S E L A C S E E R | M 002 E | 0.5 | — |
| 01 | 1.0 | — | ||
| 10 | 1.2 | — | ||
| 11 | 1.5 | — | ||
| 28 V I H C | F Y L2SYNC_IN to high impedance B D E | 002 | — | 4.0 |
| 01 | — | 4.5 | ||
| 10 | — | 4.7 | ||
| 11 | — | 5.0 | ||
| Notes: 1. All outputs are measured from the midpoint voltage of the rising edge of L2SYNC_IN to the TTL level (0.8V or 2.0V) of the signal in question. The output timings are measured at the pins. 2.The outputs are valid for both single-ended and differential L2CLK modes. For flow-thru and pipelined reg-reg synchronous burst RAMs, L2CR[14–15] = 00 is recommended. For pipelined delay-write synchronous burst SRAMs, L2CR[14–15] = 01 is recommended. 3. All maximum timing specifications assume C =20 pF. L 4. This measurement assumes C = 5 pF. L | ||||
Figure 9 shows the L2 bus output timing diagrams for the MPC750.
Page 20
Electrical and Thermal Characteristics
L2SYNC_IN
ALL OUTPUTS
L2DATA BUS
VM = Midpoint Voltage (1.4V)
Figure 9. L2 Bus Output Timing Diagrams
1.4.3 IEEE 1149.1 AC Timing Specifications
Table 14 provides the IEEE 1149.1 (JTAG) AC timing specifications as defined in Figure 10, Figure 11,
Figure 12, and Figure 13.
Table 14. JTAG AC Timing Specifications (Independent of SYSCLK)
At recommended operating conditions (See Table 3), CL = 50 pF
| Num | Characteristic | Min | Max | Unit | Notes |
|---|---|---|---|---|---|
| TCK frequency of operation | 0 | 33.3 | MHz | ||
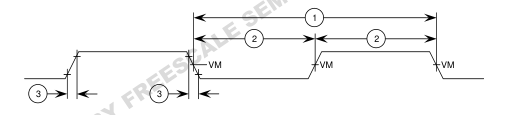
| 1 | TCK cycle time | 30 | — | ns | |
| 2 | TCK clock pulse width measured at 1.4V | 15 | — | ns | |
| 3 | TCK rise and fall times | 0 | 2 | ns | |
| 4 | Specification obsolete, intentionally omitted | ||||
| 5 | TRST assert time | 25 | — | ns | 1 |
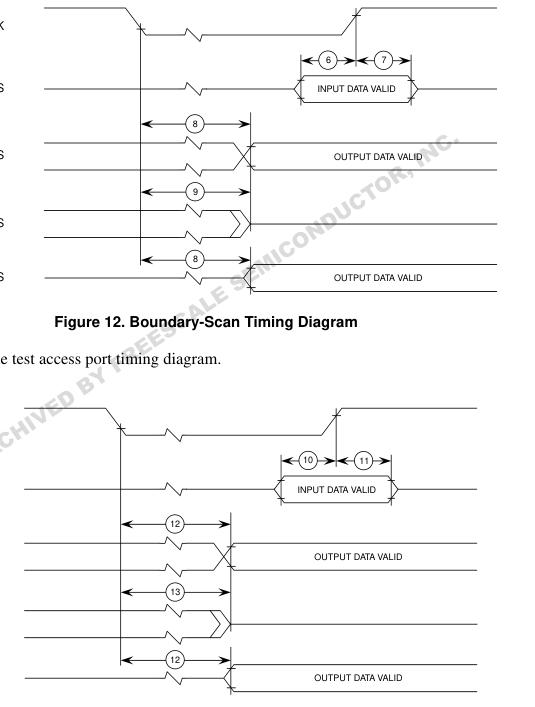
| 6 | Boundary-scan input data setup time | 4 | — | ns | 2 |
| 7 | Boundary-scan input data hold time | 15 | — | ns | 2 |
| 8 | TCK to output data valid | 4 | 20 | ns | 3 |
| 9 | TCK to output high impedance | 3 | 19 | ns | 3, 4 |
| 10 | TMS, TDI data setup time | 0 | — | ns |
Page 21
Electrical and Thermal Characteristics
Table 14. JTAG AC Timing Specifications (Independent of SYSCLK) (Continued) At recommended operating conditions (See Table 3), CL = 50 pF
| Num | Characteristic | Min | Max | Unit | Notes |
|---|---|---|---|---|---|
| 11 | TMS, TDI data hold time | 12 | — | ns | |
| 12 | TCK to TDO data valid | 4 | 12 | ns | |
| 13 | TCK to TDO high impedance | 3 | 9 | ns | 4 |
Notes: 1. TRST is an asynchronous level sensitive signal. The setup time is for test purposes only. 2. Non-JTAG signal input timing with respect to TCK. 3. Non-JTAG signal output timing with respect to TCK. 4. Guaranteed by design and characterization.
Figure 10 provides the JTAG clock input timing diagram.
TCK
VM = Midpoint Voltage
Figure 10. JTAG Clock Input Timing Diagram
Figure 11 provides the TRST timing diagram.
TRST
5
Figure 11. TRST Timing Diagram
Page 22
Electrical and Thermal Characteristics
Figure 12 provides the boundary-scan timing diagram.
TCK
DATA INPUTS
DATA OUTPUTS
DATA OUTPUTS
DATA OUTPUTS
Figure 13 provides the test access port timing diagram.
TCK
TDI, TMS
TDO
TDO
TDO
Figure 13. Test Access Port Timing Diagram
Page 23
Pin Assignments
1.5 Pin Assignments
Figure 14 (in part A) shows the pinout of the MPC740, 255 CBGA package as viewed from the top surface. Part B shows the side profile of the CBGA package to indicate the direction of the top surface view.
Part A
1 2 3 4 5 6 7 8
9 10 11 12 13 14 15 16
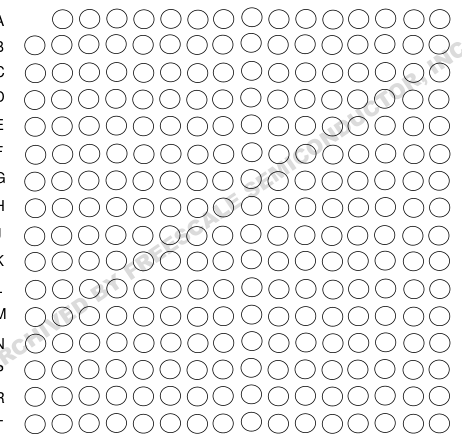
A B C D E F G H J K L M
N P R T
Not to Scale
Part B
View
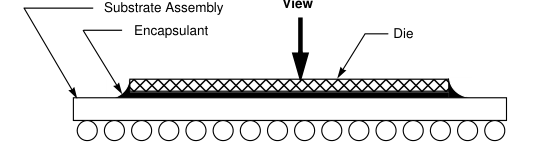
Figure 14. Pinout of the MPC740, 255 CBGA Package as Viewed from the Top Surface
Page 24
Pin Assignments
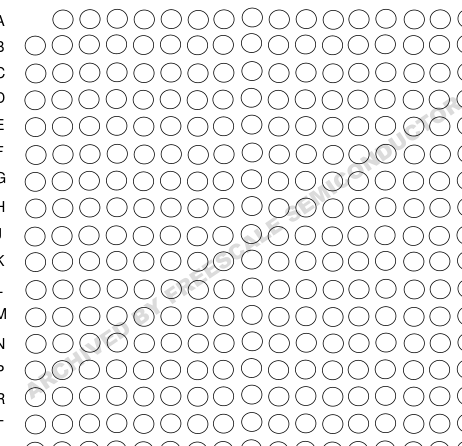
Figure 15 (in part A) shows the pinout of the MPC750, 360 CBGA package as viewed from the top
surface. Part B shows the side profile of the CBGA package to indicate the direction of the top surface
view.
Part A
10 11 12 13 14 15 16 17 18 19
1 2 3 4 5 6 7 8 9
A B C D E F G H J K L M
N P R T

U V W
Not to Scale
Part B
View
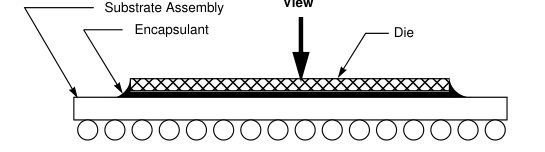
Figure 15. Pinout of the MPC750, 360 CBGA Package as Viewed from the Top Surface
Page 25
Pinout Listings
1.6 Pinout Listings
Table 15 provides the pinout listing for the MPC740, 255 CBGA package.
Table 15. Pinout Listing for the MPC740, 255 CBGA Package
| Signal Name | Pin Number | Active | I/O |
| A[0–31] | C16, E4, D13, F2, D14, G1, D15, E2, D16, D4, E13, G2, E15, H1, E16, H2, F13, J1, F14, J2, F15, H3, F16, F4, G13, K1, G15, K2, H16, M1, J15, P1 | High | I/O |
| AACK | L2 N | C . Low | Input |
| ABB | I K4 R , | Low | I/O |
| AP[0–3] | O C1, B4, B3, B2 T | High | I/O |
| ARTRY | C J4 U D | Low | I/O |
| AVDD | N A10 O | — | — |
| BG | C L1 M I | Low | Input |
| BR | E B6 S | Low | Output |
| CI | E E1 L A | Low | Output |
| CKSTP_IN | C D8 S | Low | Input |
| CKSTP_OUT | E A6 E R | Low | Output |
| CLK_OUT | F D7 Y | — | Output |
| DBB | B J14 D | Low | I/O |
| DBG | E N1 V I | Low | Input |
| DBDIS | H H15 C | Low | Input |
| A DBWO | R G4 | Low | Input |
| DH[0–31] | P14, T16, R15, T15, R13, R12, P11, N11, R11, T12, T11, R10, P9, N9, T10, R9, T9, P8, N8, R8, T8, N7, R7, T7, P6, N6, R6, T6, R5, N5, T5, T4 | High | I/O |
| DL[0–31] | K13, K15, K16, L16, L15, L13, L14, M16, M15, M13, N16, N15, N13, N14, P16, P15, R16, R14, T14, N10, P13, N12, T13, P3, N3, N4, R3, T1, T2, P4, T3, R4 | High | I/O |
| DP[0–7] | M2, L3, N2, L4, R1, P2, M4, R2 | High | I/O |
| DRTRY | G16 | Low | Input |
| GBL | F1 | Low | I/O |
| GND | C5, C12, E3, E6, E8, E9, E11, E14, F5, F7, F10, F12, G6, G8, G9, G11, H5, H7, H10, H12, J5, J7, J10, J12, K6, K8, K9, K11, L5, L7, L10, L12, M3, M6, M8, M9, M11, M14, P5, P12 | — | — |
| HRESET | A7 | Low | Input |
| INT | B15 | Low | Input |
| L1_TSTCLK 1 | D11 | High | Input |
| L2_TSTCLK 1 | D12 | High | Input |
| LSSD_MODE 1 | B10 | Low | Input |
| MCP | C13 | Low | Input |
| NC (No–Connect) | B7, B8, C3, C6, C8, D5, D6, H4, J16, A4, A5, A2, A3, B1, B5 | — | — |
| OVDD | C7, E5, E7, E10, E12, G3, G5, G12, G14, K3, K5, K12, K14, M5, M7, M10, M12, P7, P10 | — | — |
| PLL_CFG[0–3] | A8, B9, A9, D9 | High | Input |
Page 26
Pinout Listings
Table 15. Pinout Listing for the MPC740, 255 CBGA Package (Continued)
| Signal Name | Pin Number | Active | I/O |
| QACK | D3 | Low | Input |
| QREQ | J3 | Low | Output |
| RSRV | D1 | Low | Output |
| SMI | A16 | Low | Input |
| SRESET | B14 | Low | Input |
| SYSCLK | C9 | — . | Input |
| TA | H14 N I | C Low | Input |
| TBEN | C2 R , | High | Input |
| TBST | O T A14 C | Low | I/O |
| TCK | U C11 D | High | Input |
| TDI | N A11 O C | High | Input |
| TDO | I A12 M | High | Output |
| TEA | E S H13 E | Low | Input |
| TLBISYNC | L C4 A | Low | Input |
| TMS | C B11 S E | High | Input |
| TRST | E C10 R | Low | Input |
| TS | F J13 Y | Low | I/O |
| TSIZ[0–2] | B A13, D10, B12 D E | High | Output |
| TT[0–4] | V B13, A15, B16, C14, C15 I H | High | I/O |
| WT | C D2 R | Low | Output |
| A VDD 2 | F6, F8, F9, F11, G7, G10, H6, H8, H9, H11, J6, J8, J9, J11, K7, K10, L6, L8, L9, L11 | — | — |
| VOLTDET 3 | F3 | High | Output |
| Notes: 1. These are test signals for factory use only and must be pulled up to OVdd for normal machine operation. 2. OVdd inputs supply power to the I/O drivers and Vdd inputs supply power to the processor core. 3. Internally tied to GND in the MPC740 CBGA package to indicate to the power supply that a low-voltage processor is present. This signal is not a power supply input. Table 16 provides the pinout listing for the MPC750, 360 CBGA package. Table 16. Pinout Listing for the MPC750, 360 CBGA Package | |||
| Signal Name | Pin Number | Active | I/O |
| A[0–31] | A13, D2, H11, C1, B13, F2, C13, E5, D13, G7, F12, G3, G6, H2, E2, L3, G5, L4, G4, J4, H7, E1, G2, F3, J7, M3, H3, J2, J6, K3, K2, L2 | High | I/O |
| AACK | N3 | Low | Input |
| ABB | L7 | Low | I/O |
| AP[0–3] | C4, C5, C6, C7 | High | I/O |
| ARTRY | L6 | Low | I/O |
| AVDD | A8 | — | — |
| BG | H1 | Low | Input |
Page 27
Pinout Listings
Table 16. Pinout Listing for the MPC750, 360 CBGA Package (Continued)
| Signal Name | Pin Number | Active | I/O |
| BR | E7 | Low | Output |
| CKSTP_OUT | D7 | Low | Output |
| CI | C2 | Low | Output |
| CKSTP_IN | B8 | Low | Input |
| CLKOUT | E3 | — | Output |
| DBB | K5 N I | C . Low | I/O |
| DBDIS | G1 R , O | Low | Input |
| DBG | T K1 C U | Low | Input |
| DBWO | D D1 N | Low | Input |
| DH[0–31] | O W12, W11, V11, T9, W10, U9, U10, M11, M9, P8, W7, P9, W9, R10, W6, C I M V7, V6, U8, V9, T7, U7, R7, U6, W5, U5, W4, P7, V5, V4, W3, U4, R5 E | High | I/O |
| DL[0–31] | S M6, P3, N4, N5, R3, M7, T2, N6, U2, N7, P11, V13, U12, P12, T13, W13, E L U13, V10, W8, T11, U11, V12, V8, T1, P1, V1, U1, N1, R2, V3, U3, W2 A | High | I/O |
| DP[0–7] | C S L1, P2, M2, V2, M1, N2, T3, R1 E E | High | I/O |
| DRTRY | R H6 F | Low | Input |
| GBL | Y B1 B | Low | I/O |
| GND A | D E D10, D14, D16, D4, D6, E12, E8, F4, F6, F10, F14, F16, G9, G11, H5, H8, V H10, H12, H15, J9, J11, K4, K6, K8, K10, K12, K14, K16, L9, L11, M5, H I C M8, M10, M12, M15, N9, N11, P4, P6, P10, P14, P16, R8, R12, T4, T6, R T10, T14, T16 | — | — |
| HRESET | B6 | Low | Input |
| INT | C11 | Low | Input |
| L1_TSTCLK 1 | F8 | High | Input |
| L2ADDR[0–16] | L17, L18, L19, M19, K18, K17, K15, J19, J18, J17, J16, H18, H17, J14, J13, H19, G18 | High | Output |
| L2AVDD | L13 | — | — |
| L2CE | P17 | Low | Output |
| L2CLKOUTA | N15 | Low | Output |
| L2CLKOUTB | L16 | Low | Output |
| L2DATA[0–63] | U14, R13, W14, W15, V15, U15, W16, V16, W17, V17, U17, W18, V18, U18, V19, U19, T18, T17, R19, R18, R17, R15, P19, P18, P13, N14, N13, N19, N17, M17, M13, M18, H13, G19, G16, G15, G14, G13, F19, F18, F13, E19, E18, E17, E15, D19, D18, D17, C18, C17, B19, B18, B17, A18, A17, A16, B16, C16, A14, A15, C15, B14, C14, E13 | High | I/O |
| L2DP[0–7] | V14, U16, T19, N18, H14, F17, C19, B15 | High | I/O |
| L2OVDD | D15, E14, E16, H16, J15, L15, M16, P15, R14, R16, T15, F15 | — | — |
| L2SYNC_IN | L14 | — | Input |
| L2SYNC_OUT | M14 | — | Output |
| L2_TSTCLK1 | F7 | High | Input |
Page 28
Pinout Listings
Table 16. Pinout Listing for the MPC750, 360 CBGA Package (Continued)
| Signal Name | Pin Number | Active | I/O |
| L2WE | N16 | Low | Output |
| L2ZZ | G17 | High | Output |
| LSSD_MODE1 | F9 | Low | Input |
| MCP | B11 | Low | Input |
| NC (No–Connect) | B3, B4, B5, A19, W19, W1, K9, K114, K194 | — | — |
| OVDD | D5, D8, D12, E4, E6, E9, E11, F5, H4, J5, L5, M4, P5, R4, R6, R9, R11, N I T5, T8, T12 R , | C . — | — |
| PLL_CFG[0–3] | O A4, A5, A6, A7 T C | High | Input |
| QACK | U B2 D | Low | Input |
| QREQ | N J3 O C | Low | Output |
| RSRV | I M D3 E | Low | Output |
| SMI | S A12 E L | Low | Input |
| SRESET | A E10 C | Low | Input |
| SYSCLK | S E H9 E R | — | Input |
| TA | F F1 Y | Low | Input |
| TBEN | B A2 D | High | Input |
| TBST | E V A11 I | Low | I/O |
| TCK | H C B10 R | High | Input |
| A TDI | B7 | High | Input |
| TDO | D9 | High | Output |
| TEA | J1 | Low | Input |
| TLBISYNC | A3 | Low | Input |
| TMS | C8 | High | Input |
| TRST | A10 | Low | Input |
| TS | K7 | Low | I/O |
| TSIZ[0–2] | A9, B9, C9 | High | Output |
| TT[0–4] | C10, D11, B12, C12, F11 | High | I/O |
| WT | C3 | Low | Output |
| VDD 2 | G8, G10, G12, J8, J10, J12, L8, L10, L12, N8, N10, N12 | — | — |
| VOLTDET 3 | K13 | High | Output |
Notes: 1. These are test signals for factory use only and must be pulled up to OVdd for normal machine operation. 2. OVdd inputs supply power to the I/O drivers and Vdd inputs supply power to the processor core. 3. Internally tied to L2OVDD in the MPC750 CBGA package to indicate the power present at the L2 cache interface. This signal is not a power supply input. Caution: This is different from the MPC740 CBGA package. 4. These pins are reserved for potential future use as additional L2 address pins.
Page 29
Package Description
1.7 Package Description
The following sections provide the package parameters and mechanical dimensions for the MPC740, 255 CBGA packages.
1.7.1 Parameters for the MPC740
The package parameters are as provided in the following list. The package type is 21 x 21 mm, 255-lead ceramic ball grid array (CBGA). Package outline
21 x 21 mm 255 (16 x 16 ball array - 1)
Interconnects Pitch
1.27 mm (50 mil)
Minimum module height 2.45 mm Maximum module height 3.00 mm Ball diameter
0.89 mm (35 mil)
1.7.2 Mechanical Dimensions of the MPC740
Figure 16 provides the mechanical dimensions and bottom surface nomenclature of the MPC740, 255 CBGA package.
Page 30
Package Description
2X
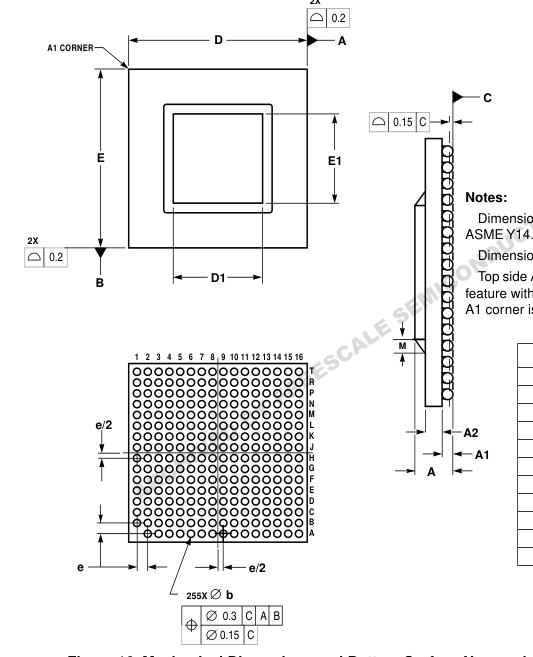
Dimensioning and tolerancing per ASME Y14.5M, 1994. Dimensions in millimeters. Top side A1 corner index is a metalized feature with various shapes. bottom side A1 corner is designated with a ball
| Millimeters | ||
| DIM | Min | Max |
| A | 2.45 | 3.00 |
| A1 | 0.79 | 0.99 |
| A2 | 0.9 | 1.10 |
| b | 0.82 | 0.93 |
| D | 21.00 BSC | |
| D1 | 8.3 | 8.5 |
| e | 1.27 BSC | |
| E | 21.00 BSC | |
| E1 | 9.0 | 9.2 |
| M | 2.00 | |
Figure 16. Mechanical Dimensions and Bottom Surface Nomenclature of the MPC740
1.7.3 Parameters for the MPC750
The package parameters are as provided in the following list. The package type is 25 x 25 mm, 360-lead ceramic ball grid array (CBGA). Package outline
25 x 25 mm
Interconnects
360 (19 x 19 ball array - 1)
Pitch
1.27 mm (50 mil)
Minimum module height 2.65 mm Maximum module height 3.20 mm Ball diameter
0.89 mm (35 mil)
Page 31
System Design Information
1.7.4 Mechanical Dimensions of the MPC750
Figure 17 provides the mechanical dimensions and bottom surface nomenclature of the MPC750, 360
CBGA package.
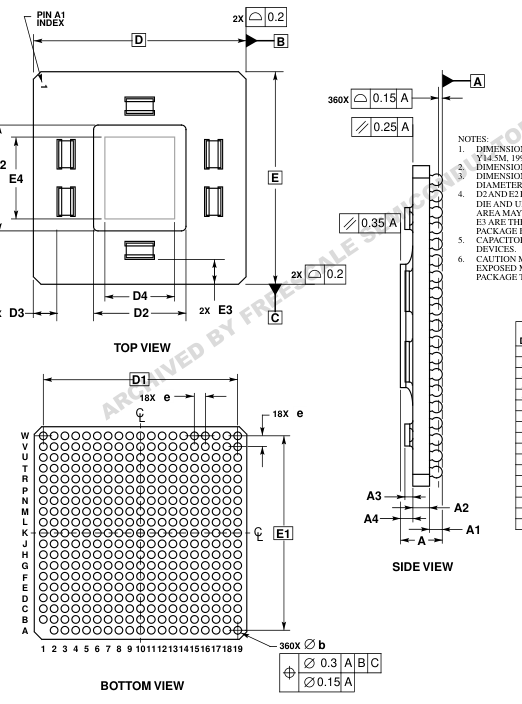
DIMENSIONS AND TOLERANCING PER ASME
E2
DIMENSIONS IN MILLIMETERS. DIMENSION b IS THE MAXIMUM SOLDER BALL DIAMETER MEASURED PARALLEL TO DATUM A. D2 AND E2 DEFINE THE AREA OCCUPIED BY THE DIE AND UNDERFILL. ACTUAL SIZE OF THIS AREA MAY BE SMALLER THAN SHOWN. D3 AND E3 ARE THE MINIMUM CLEARANCE FROM THE PACKAGE EDGE TO THE CHIP CAPACITORS. CAPACITORS MAY NOT BE PRESENT ON ALL
CAUTION MUST BE TAKEN NOT TO SHORT EXPOSED METAL CAPACITOR PADS ON
2X
MILLIMETERS
DIM MIN MAX
A 2.72 3.20 A1 0.80 1.00 A2 1.10 1.30 --- 0.60 A3 A4 0.82 0.90 b 0.82 0.93 25.00 BSC D D1 22.86 BSC --- 12.50 D2 D3 2.75 --- D4 6.00 9.00 1.27 BSC e 25.00 BSC E E1 22.86 BSC --- 14.30 E2 E3 3.00 --- E4 8.00 11.00
Figure 17. Mechanical Dimensions and Bottom Surface Nomenclature of the MPC750
1.8 System Design Information
This section provides electrical and thermal design recommendations for successful application of the
MPC750.
Page 32
System Design Information
1.8.1 PLL Configuration
The MPC750’s PLL is configured by the PLL_CFG[0–3] signals. For a given SYSCLK (bus) frequency,
the PLL configuration signals set the internal CPU and VCO frequency of operation. The PLL
configuration for the MPC750 is shown in Table 17 for nominal frequencies.
Table 17. MPC750 Microprocessor PLL Configuration
| PLL_CFG [0–3] | Sample Bus-to-Core Frequency in MHz (VCO Frequency in MHz) | ||||||||
| Bus-to- Core Multiplier | Core-to VCO Multiplier | Bus 25 MHz | Bus 33.3 MHz | Bus 40 MHz | Bus 50 MHz | Bus 66.6 MHz I , | Bus C . 75 MHz N | Bus 83.3 MHz | |
| 1000 | 3x | 2x | 150 (300) C | R 200 O T (400) | 225 (450) | 250 (500) | |||
| 1110 | 3.5x | 2x | C | U D 175 (350) N O | 233 (466) | 262 (525) | |||
| 1010 | 4x | 2x | E | I M 160 (320) E S | 200 (400) | 266 (533) | |||
| 0111 | 4.5x | 2x | S | L 150 A C (300) | 180 (360) | 225 (450) | |||
| 1011 | 5x | 2x Y | F R E E | 166 (333) | 200 (400) | 250 (500) | |||
| 1001 | 5.5x | B 2x D E V | 183 (366) | 220 (440) | |||||
| 1101 | H 6x C R A | I 2x | 150 (300) | 200 (400) | 240 (480) | ||||
| 0101 | 6.5x | 2x | 162 (325) | 216 (433) | 260 (520) | ||||
| 0010 | 7x | 2x | 175 (350) | 233 (466) | |||||
| 0001 | 7.5x | 2x | 187 (375) | 250 (500) | |||||
| 1100 | 8x | 2x | 200 (400) | 266 (533) | |||||
| 0011 | PLL off/bypass | PLL off, SYSCLK clocks core circuitry directly, 1x bus-to-core implied | |||||||
| 1111 | PLL off | PLL off, no core clocking occurs | |||||||
Notes: 1. PLL_CFG[0–3] settings not listed are reserved. 2. The sample bus-to-core frequencies shown are for reference only. Some PLL configurations may select bus, core, or VCO frequencies which are not useful, not supported, or not tested for by the MPC750; see Section 1.4.2.1, “Clock AC Specifications,” for valid SYSCLK and VCO frequencies. 3. In PLL-bypass mode, the SYSCLK input signal clocks the internal processor directly, the PLL is disabled, and the bus mode is set for 1:1 mode operation. This mode is intended for factory use only. Note: The AC timing specifications given in this document do not apply in PLL-bypass mode. 4. In clock-off mode, no clocking occurs inside the MPC750 regardless of the SYSCLK input.
Page 33
System Design Information
Table 18 provides sample core-to-L2 frequencies.
Table 18. Sample Core-to-L2 Frequencies
| Core Frequency in MHz | ÷1 | ÷1.5 | ÷2 | ÷2.5 | ÷3 |
| 200 | 200 | 133.3 | 100 | 80 | — |
| 208.3 | 208 | 138.6 | 104 | 83.3 | — |
| 210 | 210 | 140 | 105 | 84 | — |
| 220 | 220 | 146.6 | 110 | 88 | — C . |
| 225 | 225 | 150 | 112.5 | 90 R , | N I — |
| 233.3 | 233.3 | 155.5 | 116.6 | O 93.3 T C | — |
| 240 | 240 | 160 | 120 | U 96 D | 80 |
| 266 | 266 | 177.3 | N O 133 C | 106.4 | 88.6 |
Note: The core and L2 frequencies are for reference only. Some configurations may select core or L2 frequencies which are not useful, not supported, or not tested for by the MPC750; see Section 1.4.2.4, “L2 Clock AC Specifications,” for valid L2CLK frequencies. The L2CR[L2SL] bit should be set for L2CLK frequencies less than 110 MHz.
1.8.2 PLL Power Supply Filtering
The AVdd and L2AVdd power signals are provided on the MPC750 to provide power to the clock generation phase-locked loop and L2 cache delay-locked loop respectively. To ensure stability of the internal clock, the power supplied to the AVdd input signal should be filtered using a circuit similar to the one shown in Figure 18. The circuit should be placed as close as possible to the AVdd pin to ensure it filters out as much noise as possible. An identical but separate circuit should be placed as close as possible to the L2AVdd pin.
10 Ω Vdd
AVdd (or L2AVdd)
0.1 µF
10 µF
GND
Figure 18. PLL Power Supply Filter Circuit
1.8.3 Decoupling Recommendations
Due to the MPC750’s dynamic power management feature, large address and data buses, and high operating frequencies, the MPC750 can generate transient power surges and high frequency noise in its power supply, especially while driving large capacitive loads. This noise must be prevented from reaching other components in the MPC750 system, and the MPC750 itself requires a clean, tightly regulated source of power. Therefore, it is recommended that the system designer place at least one decoupling capacitor at each Vdd and OVdd pin (and L2OVdd for the 360 CBGA) of the MPC750. It is also recommended that these decoupling capacitors receive their power from separate Vdd, OVdd, and GND power planes in the
PCB, utilizing short traces to minimize inductance.
Page 34
System Design Information
These capacitors should vary in value from 220 pF to 10 µF to provide both high- and low-frequency filtering, and should be placed as close as possible to their associated Vdd or OVdd pins. Suggested values for the Vdd pins—220 pF (ceramic), 0.01 µF (ceramic), and 0.1 µF (ceramic). Suggested values for the OVdd pins—0.01 µF (ceramic), 0.1 µF (ceramic), and 10 µF (tantalum). Only SMT (surface mount technology) capacitors should be used to minimize lead inductance. In addition, it is recommended that there be several bulk storage capacitors distributed around the PCB, feeding the Vdd and OVdd planes, to enable quick recharging of the smaller chip capacitors. These bulk
capacitors should have a low ESR (equivalent series resistance) rating to ensure the quick response time necessary. They should also be connected to the power and ground planes through two vias to minimize inductance. Suggested bulk capacitors—100 µF (AVX TPS tantalum) or 330 µF (AVX TPS tantalum).
1.8.4 Connection Recommendations
To ensure reliable operation, it is highly recommended to connect unused inputs to an appropriate signal level. Unused active low inputs should be tied to Vdd. Unused active high inputs should be connected to GND. All NC (no-connect) signals must remain unconnected. Power and ground connections must be made to all external Vdd, OVdd, and GND pins of the MPC750. External clock routing should ensure that the rising-edge of the L2 clock is coincident at the CLK input of all SRAMs and at the L2SYNC_IN input of the MPC750. The L2CLKOUTA network could be used only, or the L2CLKOUTB network could also be used depending on the loading, frequency, and number of
SRAMs.
1.8.5 Output Buffer DC Impedance
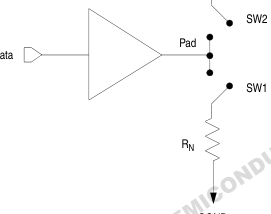
The MPC750 60x and L2 I/O drivers were characterized over process, voltage, and temperature. To measure Z0, an external resistor is connected to the chip pad, either to OVdd or OGND. Then, the value of such resistor is varied until the pad voltage is OVdd/2; see Figure 19. The output impedance is actually the average of two components, the resistances of the pull-up and pull-down devices. When Data is held low, SW1 is closed (SW2 is open), and RN is trimmed until Pad = OVdd/2. RN then becomes the resistance of the pull-down devices. When Data is held high, SW2 is closed (SW1 is open), and RP is trimmed until Pad = OVdd/2. RP then becomes the resistance of the
pull-up devices. With a properly designed driver RP and RN are close to each other in value. Then Z0 = (RP + RN)/2.
Page 35
System Design Information
OVdd
RP
OGND
Figure 19. Driver Impedance Measurement
Table 19 summarizes the signal impedance results. The driver impedance values were derived by simulation at 65 °C. As the process varies, the output impedance will be reduced by several ohms.
Table 19. Impedance Characteristics
Vdd = 2.6V, OVdd = 3.3V, Tj = 65 °C
| I H Process C R | 60x | L2 | Symbol | Unit |
|---|---|---|---|---|
| A TYP | 43 | 38 | Z 0 | Ohms |
Page 36
System Design Information
1.8.6 Pull-up Resistor Requirements
The MPC750 requires high-resistive (weak: 10 KΩ) pull-up resistors on several control signals of the bus interface to maintain the control signals in the negated state after they have been actively negated and released by the MPC750 or other bus masters. These signals are TS, ABB, DBB, and ARTRY. In addition, the MPC750 has one open-drain style output that requires a pull-up resistors (weak or stronger: 4.7 KΩ–10 KΩ) if it is used by the system. This signal is CKSTP_OUT. During inactive periods on the bus, the address and transfer attributes on the bus are not driven by any master and may float in the high-impedance state for relatively long periods of time. Since the MPC750
must continually monitor these signals for snooping, this float condition may cause excessive power draw by the input receivers on the MPC750 or by other receivers in the system. It is recommended that these signals be pulled up through weak (10 KΩ) pull-up resistors or restored in some manner by the system. The snooped address and transfer attribute inputs are A[0–31], AP[0–3], TT[0–4], TBST, and GBL. The data bus input receivers are normally turned off when no read operation is in progress and do not require pull-up resistors on the data bus. Other data bus receivers in the system, however, may require pullups, or that those signals be otherwise driven by the system during inactive periods. The data bus
signals are DH[0–31], DL[0–31], DP[0–7]. If address or data parity is not used by the system, and the respective parity checking is disabled through HID0, the input receivers for those pins are disabled, and those pins do not require pull-up resistors and should be left unconnected by the system. If all parity generation is disabled through HID0, then all parity checking should also be disabled through HID0, and all parity pins may be left unconnected by the system. No pull-up resistors are normally required for the L2 interface.
1.8.7 Thermal Management Information
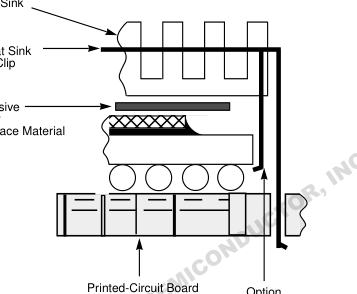
This section provides thermal management information for the ceramic ball grid array (CBGA) package for air-cooled applications. Proper thermal control design is primarily dependent upon the system-level design—the heat sink, airflow and thermal interface material. To reduce the die-junction temperature, heat sinks may be attached to the package by several methods—adhesive, spring clip to holes in the printed-circuit board or package, and mounting clip and screw assembly; see Figure 20. This spring force should not exceed 5.5 pounds of force.
Page 37
System Design Information
CBGA Package
Heat Sink
Heat Sink
Adhesive or Thermal Interface Material
Option
Figure 20. Package Exploded Cross-Sectional View with Several Heat Sink Options
The board designer can choose between several types of heat sinks to place on the MPC750. There are several commercially-available heat sinks for the MPC750 provided by the following vendors: Chip Coolers Inc.
800-227-0254 (USA/Canada)
333 Strawberry Field Rd.
401-739-7600
Warwick, RI 02887-6979 International Electronic Research Corporation (IERC)
818-842-7277
135 W. Magnolia Blvd. Burbank, CA 91502 Thermalloy
214-243-4321
2021 W. Valley View Lane P.O. Box 810839 Dallas, TX 75731 Wakefield Engineering
617-245-5900
60 Audubon Rd. Wakefield, MA 01880 Aavid Engineering
603-528-3400
One Kool Path Laconia, NH 03247-0440 Ultimately, the final selection of an appropriate heat sink depends on many factors, such as thermal performance at a given air velocity, spatial volume, mass, attachment method, assembly, and cost.
Page 38
System Design Information
1.8.7.1 Internal Package Conduction Resistance
For the exposed-die packaging technology, shown in Table 4, the intrinsic conduction thermal resistance paths are as follows:
- The die junction-to-case (or top-of-die for exposed silicon) thermal resistance
- The die junction-to-ball thermal resistance
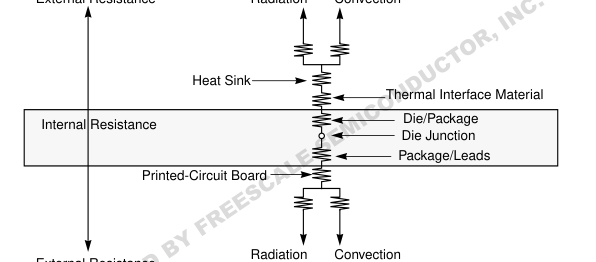
Figure 21 depicts the primary heat transfer path for a package with an attached heat sink mounted to a printed-circuit board.
External Resistance
Radiation
Convection
External Resistance
(Note the internal versus external package resistance)
Figure 21. C4 Package with Heat Sink Mounted to a Printed-Circuit Board
Heat generated on the active side of the chip is conducted through the silicon, then through the heat sink attach material (or thermal interface material), and finally to the heat sink where it is removed by forced-air convection. Since the silicon thermal resistance is quite small, for a first-order analysis, the temperature drop in the silicon may be neglected. Thus, the heat sink attach material and the heat sink conduction/convective thermal resistances are the dominant terms.
1.8.7.2 Adhesives and Thermal Interface Materials
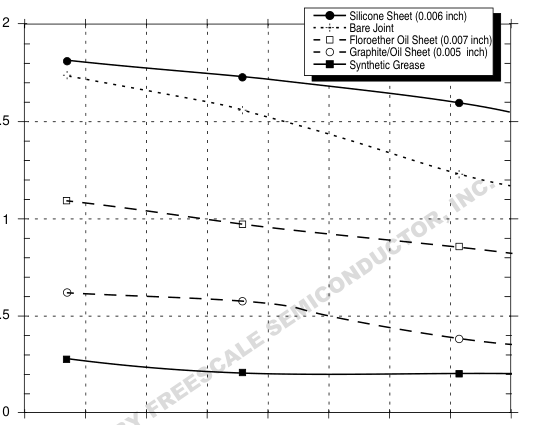
A thermal interface material is recommended at the package lid-to-heat sink interface to minimize the thermal contact resistance. For those applications where the heat sink is attached by spring clip mechanism, Figure 22 shows the thermal performance of three thin-sheet thermal-interface materials (silicone, graphite/oil, floroether oil), a bare joint, and a joint with thermal grease as a function of contact pressure. As shown, the performance of these thermal interface materials improves with increasing contact pressure. The use of thermal grease significantly reduces the interface thermal resistance. That is, the bare joint results in a thermal resistance approximately 7 times greater than the thermal grease joint.
Heat sinks are attached to the package by means of a spring clip to holes in the printed-circuit board (see Figure 20). This spring force should not exceed 5.5 pounds of force. Therefore, the synthetic grease offers the best thermal performance, considering the low interface pressure. Of course, the selection of any thermal interface material depends on many factors—thermal performance requirements, manufacturability, service temperature, dielectric properties, cost, etc.
Page 39
System Design Information
1.5
0.5
0 10 20 30 40 50 60 70 80
Contact Pressure (psi)
Figure 22. Thermal Performance of Select Thermal Interface Material
The board designer can choose between several types of thermal interface. Heat sink adhesive materials should be selected based upon high conductivity, yet adequate mechanical strength to meet equipment shock/vibration requirements. There are several commercially-available thermal interfaces and adhesive materials provided by the following vendors: Dow-Corning Corporation
517-496-4000
Dow-Corning Electronic Materials PO Box 0997 Midland, MI 48686-0997 Chomerics, Inc.
617-935-4850
77 Dragon Court Woburn, MA 01888-4850 Thermagon Inc.
216-741-7659
3256 West 25th Street Cleveland, OH 44109-1668 Loctite Corporation
860-571-5100
1001 Trout Brook Crossing Rocky Hill, CT 06067 AI Technology (e.g. EG7655)
609-882-2332
1425 Lower Ferry Rd. Trent, NJ 08618
Page 40
System Design Information
The following section provides a heat sink selection example using one of the commercially available heat sinks.
1.8.7.3 Heat Sink Selection Example
For preliminary heat sink sizing, the die-junction temperature can be expressed as follows: Tj = Ta + Tr + (θjc + θint + θsa) \* Pd Where: Tj is the die-junction temperature Ta is the inlet cabinet ambient temperature Tr is the air temperature rise within the computer cabinet θjc is the junction-to-case thermal resistance θint is the adhesive or interface material thermal resistance θsa is the heat sink base-to-ambient thermal resistance Pd is the power dissipated by the device During operation the die-junction temperatures (Tj) should be maintained less than the value specified in Table 3. The temperature of the air cooling the component greatly depends upon the ambient inlet air
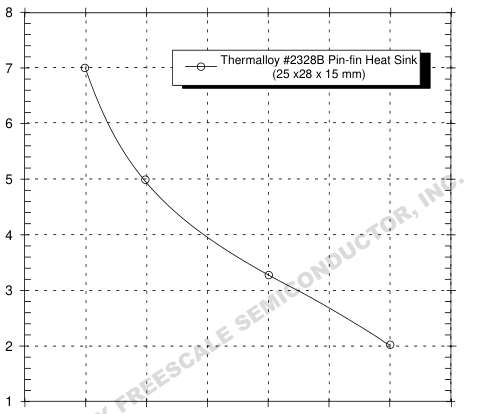
temperature and the air temperature rise within the electronic cabinet. An electronic cabinet inlet-air temperature (Ta) may range from 30 to 40 °C. The air temperature rise within a cabinet (Tr) may be in the range of 5 to 10 °C. The thermal resistance of the thermal interface material (θint) is typically about 1 °C/W. Assuming a Ta of 30 °C, a Tr of 5 °C, a CQFP package θjc = 2.2, and a power consumption (Pd) of 4.5 watts, the following expression for Tj is obtained: Die-junction temperature: Tj = 30 °C + 5 °C + (2.2 °C/W + 1.0 °C/W + θsa) \* 4.5 W For a Thermalloy heat sink #2328B, the heat sink-to-ambient thermal resistance (θsa) versus airflow velocity is shown in Figure 23.
Page 41
System Design Information
0 0.5 1 1.5 2 2.5 3 3.5
Approach Air Velocity (m/s)
Figure 23. Thermalloy #2328B Heat Sink-to-Ambient Thermal Resistance Versus Airflow Velocity
Assuming an air velocity of 0.5 m/s, we have an effective Rsa of 7 °C/W, thus Tj = 30 °C + 5 °C + (2.2 °C/W +1.0 °C/W + 7 °C/W) \* 4.5 W, resulting in a die-junction temperature of approximately 81 °C which is well within the maximum operating temperature of the component. Other heat sinks offered by Chip Coolers, IERC, Thermalloy, Wakefield Engineering, and Aavid Engineering offer different heat sink-to-ambient thermal resistances, and may or may not need air flow. Though the die junction-to-ambient and the heat sink-to-ambient thermal resistances are a common figure-of-merit used for comparing the thermal performance of various microelectronic packaging
technologies, one should exercise caution when only using this metric in determining thermal management because no single parameter can adequately describe three-dimensional heat flow. The final die-junction operating temperature, is not only a function of the component-level thermal resistance, but the system-level design and its operating conditions. In addition to the component's power consumption, a number of factors affect the final operating die-junction temperature—airflow, board population (local heat flux of adjacent components), heat sink efficiency, heat sink attach, heat sink placement, next-level interconnect technology, system air temperature rise, altitude, etc.
Due to the complexity and the many variations of system-level boundary conditions for today's microelectronic equipment, the combined effects of the heat transfer mechanisms (radiation, convection and conduction) may vary widely. For these reasons, we recommend using conjugate heat transfer models for the board, as well as, system-level designs. To expedite system-level thermal analysis, several “compact” thermal-package models are available within FLOTHERM®. These are available upon request.
Page 42
Document Revision History
1.9 Document Revision History
Table 20. Document Revision History
| Document Revision | Substantive Change(s) |
| Rev 1 | Modified introduction to indicate this document also addresses MPC750P parts fabricated in .19µ process with attendant changes in supply voltages and electrical characteristics. |
| Changed Section 1.3, “General Parameters,” to include new Technology, Die size, and Core power supply for MPC750P. | |
| Changed Table 2 to include absolute maximum supply voltage for MPC750P. C . | |
| N I Changed Table 3 to include recommended supply voltages for MPC750P and extended L2 bus R , supply voltage down to 2.5V for all parts. O | |
| T C Added Table 7 to provide power consumption of MPC750P. U | |
| D Changed Table 8, Table 9, and Table 10 to show test conditions appropriate to the process and add N O 300 MHz to AC specifications. C | |
| I M Changed Table 9 to reduce input hold time (spec 11a and 11b) from 1ns to 0ns for all CPU E frequencies. S | |
| E Changed Table 11, Table 12 and Table 13 to show extended test conditions for L2OVdd and add A L 300MHz to AC specifications. C S | |
| E Changed Table 13 and Table 14 to show test conditions appropriate to the process. E | |
| Rev 2 | R F Removed Preliminary overlay from document |
| Y B Deleted electrical specifications for the MPC750P part and created a separate specification D describing the unique operating conditions of that part. E V | |
| I Corrected Active polarity of CKSTP_OUT, CKSTP_IN, L2CE, L2WE, L2SYNC_IN, L2SYNC_OUT in H C Table 17. R | |
| A Added extended junction temperature parts to Table 3. | |
| Rev 2.1 | Removed 333MHz column from Table 13. |
| Rev 2.2 | In Table 7, Maximum sleep power is increased to 300 mW. |
| Rev 2.3 | Corrected Figure 16 and Figure 17, which omitted some dimensions due to format error. |
1.10 Ordering Information
This section provides the part numbering nomenclature for the MPC750. Note that the individual part
numbers correspond to a maximum processor core frequency. For available frequencies, contact your local
Motorola sales office.
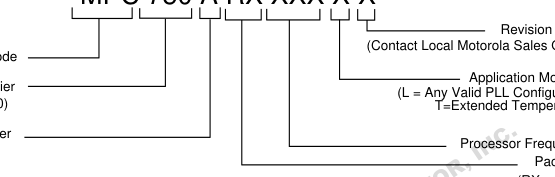
Figure 24 provides the Motorola part numbering nomenclature for the MPC750. In addition to the
processor frequency, the part numbering scheme also consists of a part modifier and application modifier.
The part modifier indicates any enhancement(s) in the part from the original production design. The bus
divider may specify special bus frequencies or application conditions. Each part number also contains a
Page 43
Ordering Information
revision code. This refers to the die mask revision number and is specified in the part numbering scheme
for identification purposes only.
MPC 750 A RX XXX X X
Revision Level
Product Code
Part Identifier (740 or 750)
Part Modifier
Package (RX = BGA)
Figure 24. Motorola Part Number Key
Page 44
DigitalDNA is a trademark of Motorola, Inc. The PowerPC name, the PowerPC logotype, and PowerPC 603e are trademarks of International Business Machines Corporation used by Motorola under license from International Business Machines Corporation.