

 Download PDF
LF_18 HIROSE
Document overview
- PDF pages: 12
Technical content
Page 1

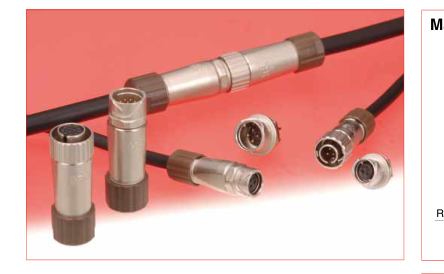
■Features
1. Ease of shielded termination and
connector assembly
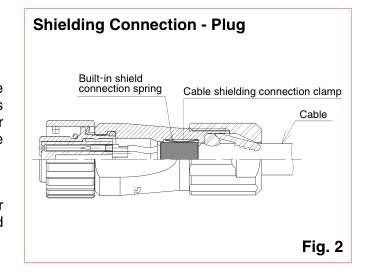
All components are self-aligning and do not require complex assembly tooling. The shield of the cable is connected with the metal housing of the connector using simple shielding clamp, supplied with the connector. (Fig. 2)
2. Water and dust protected
The LF series is a rugged, waterproof connector series that is IP67 and IP68 rated in the mated condition. IP67 : Left in water at a depth of 1 m for 30 minutes
IP68 : Left in water at a depth of 2 m for 14 days
3. Simplified assembly procedure
No use of screws makes wiring and mounting easier.
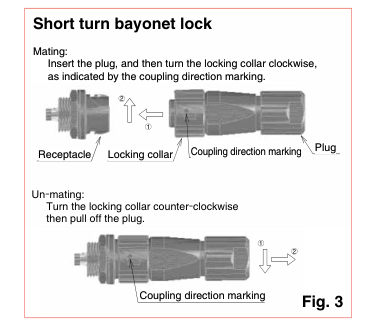
4. Bayonet lock
Short turn bayonet lock assures secure vibration resistant mating of the connectors. (Fig. 3)
5. Acquired safety standard
4 pos. is 10A and meets safety standards (TÜV) Also 3- and 4-pos. have acquired the UL standard.
6. High current rating capacity
| No. of contacts | Current rating |
| 3 | 5A max. |
| 4 | 10A max. |
| 6, 12 and 20 | 2A max. |
| 11 | 10A max. 2A max. |
In cases where the application will demand a high level of reliability, such as automotive,
2018.7④
please contact a company representative for further information.
Page 2
■Product Specifi cations
| Ratings | Voltage rating | 125V AC, 175V DC (3 pos.) 125V AC, 125V DC (4 pos.) 30V AC, 42V DC (6 pos. , 12pos. , 20pos.) 125V AC, 125V DC (11 pos. A to D) 30V AC, 42V DC (11 pos. 1 to 7) |
| Current rating | 5A max. (3 pos.) 10A max. (4 pos.) 2A max. (6 pos. , 12pos. , 20pos.) 10A(11 pos. A to D), 2A(11 pos. 1 to 7) | |
| Operating temperature range | –25ç to +85ç | |
| Storage temperature range | –10ç to +60ç |
| Item | Specifi cations | Conditions |
|---|---|---|
| 1.Contact resistance | 15mø max. (3, 6, 12, 20 pos.) 5mø max. (4 pos.) 5mø max. (A to D), 15mø max. (1 to 7)(11 pos.) | 1A DC |
| 2.Insulation resistance | 1000Mø min. | 500V DC (3, 4 pos.) 100V DC (6, 12, 20 pos.) 500V DC (A to D), 100V DC (1 to 7)(11pos.) |
| 3.Withstanding voltage | No fl ashover or insulation breakdown. | 1250V AC/1 minute (3, 4 pos.) 300V AC/1 minute (6, 12, 20 pos.) 1250V AC(A to D),300V AC(1 to 7) / 1 minute(11pos.) |
| 4.Vibration | No electrical discontinuity for 10µs max. | 10 → 55 → 10Hz /cycle, single amplitude of 0.75mm 5 minutes / cycle, three directions, 10 cycles for each direction. |
| 5.Shock | No electrical discontinuity for 10µs max | Acceleration of 490m/s2, duration of 11ms, three directions, three times for each direction. |
| 6.Durability6. (Mating/un-mating) | 30mø max. (3, 6, 12, 20 pos.) 10mø max. (4 pos.) 10mø max.(A to D), 30mø max.(1 to 7)(11pos.) | 1000 cycles |
| 7.Temperature cycle | Insulation resistance : 100Mø min. | Temperature : -55ç → Room temperature → +85ç → Room temperature Time : 30 → 2 to 3 → 30 → 2 to 3 (minutes) 5 cycles |
| 8.Humidity | Insulation resistance : 10Mø min. (at high humidity condition) Insulation resistance : 100Mø min. (at dry condition) | 96 hours at temperature of 40ç and humidity of 90% to 95%. |
| 9.Water / dust protection | When mated with corresponding connector. | Complete dust protection. No water penetration when submerged for 48 hours at the depth of 1.8 meter. |
■Materials / Finish
| Components | Material | Finish / Color | Remarks |
| Body / back shell | Zinc alloy | Nickel plated | –––––––––– |
| Insulator | PPS | Black | UL94V-0 |
| Contacts | Copper alloy | Selective Gold plated | –––––––––– |
| Packing | Chloroprene rubber | Black | –––––––––– |
| Tightening collar | PPS | Brown | UL94V-0 |
■Product Number Structure
Refer to the chart below when determining the product specifications from the product number. Please select from the product numbers listed in this catalog when placing orders.
LF 07 - W B P \* - 6 S (\*\*)
❶ ❷ ❸ ❹ ❺ ❻ ❼ ❽
| 1 Series name : LF | 6 No. of contacts : 3, 4, 6, 11, 12, 20 |
| 2 Shell size 07 10 13 | 7 Contact type P : Male contact S : Female contact |
| 8 Other specifications : A two-digit character is added to indicate other specifications as needed. | |
| 3 Waterproof W : Waterproof type | |
| 4 Lock Mechanism B : Bayonet lock | |
| 5 Connector type P : Plug R : Receptacle J : Jack (* : Form change zoning symbols in an identical class) |
Page 3
■Plugs
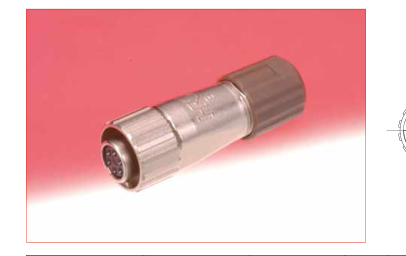
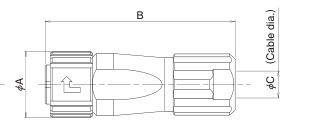
(Representative example.)
Unit : mm
| Part No. | HRS No. | No. of contacts | ØA | B | ØC | Weight |
|---|---|---|---|---|---|---|
| LF07WBP-3S(31) | 136-0003-7 31 | 3 | 12.3 | 35.8 | 5 | 11g |
| LF07WBP-3P(31) | 136-0004-0 31 | |||||
| LF07WBP-6S(31) | 136-0001-1 31 | 6 | ||||
| LF07WBP-6P(31) | 136-0002-4 31 | |||||
| LF10WBP-4S(31) | 136-0005-2 31 | 4 | 14.8 | 41.8 | 7.3 | 17g |
| LF10WBP-4P(31) | 136-0006-5 31 | |||||
| LF10WBP-12S(31) | 136-0007-8 31 | 12 | ||||
| LF10WBP-12P(31) | 136-0008-0 31 | 16g | ||||
| LF13WBP-20S | 136-0009-3 | 20 | 17.9 | 51.9 | 8.7 | 29g |
| LF13WBP-20P | 136-0010-2 | |||||
| LF13WBP-11S | 136-0011-5 | 11 | ||||
| LF13WBP-11P | 136-0012-8 |
- Lock ease type
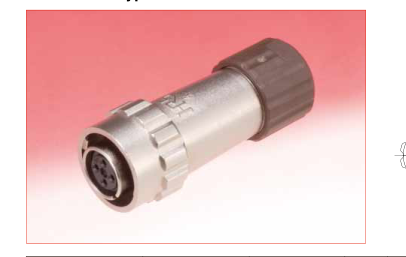
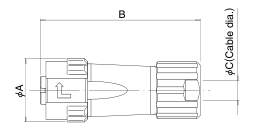
(Representative example.)
Unit : mm
| Part No. | HRS No. | No. of contacts | ØA | B | ØØCC | Weight |
|---|---|---|---|---|---|---|
| LF07WBPD-6S(31) | 136-0020-6 31 | 6 | 14.3 | 35.8 | 5 | 12g |
| LF10WBPD-4S(31) | 136-0014-3 31 | 4 | 16.8 | 41.8 | 7.3 | 19g |
| LF10WBPD-4P(31) | 136-0017-1 31 | |||||
| LF10WBPD-12S(31) | 136-0015-6 31 | 12 | ||||
| LF10WBPD-12P(31) | 136-0018-4 31 |
Page 4
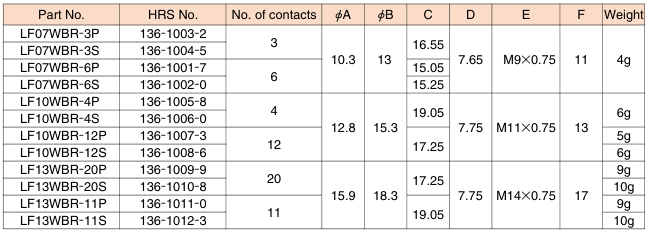
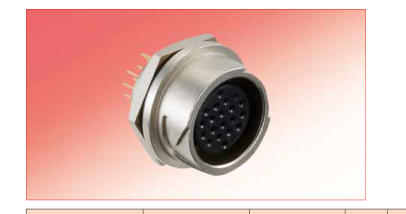
■Receptacles
- Front panel mount type・Solder Type
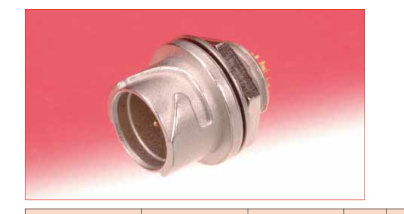
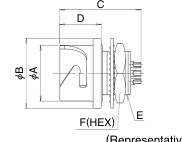
(Representative example.) Unit : mm
- Front panel mount type・Through hole Type
C
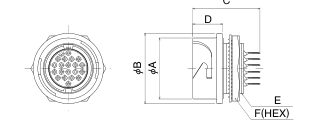
(Representative example.) Unit : mm
| Part No. | HRS No. | No. of contacts | ØA | ØB | C | D | E | F | Weight |
|---|---|---|---|---|---|---|---|---|---|
| LF13WBR-20SD | 136-1017-7 | 20 | 15.9 | 18.3 | 17.5 | 7.75 | M14∞0.75 | 17 | 9g |
Page 5
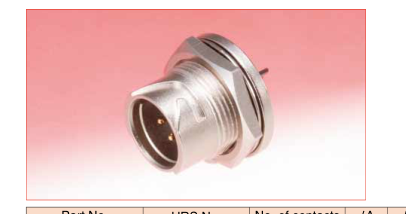
■Receptacles
- Rear panel mount type・Solder Type
D(HEX)
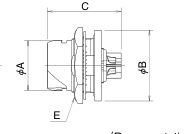
(Representative example.) Unit : mm
| Part No. | HRS No. | No. of contacts | ØA | ØB | C | D | E | Weight |
|---|---|---|---|---|---|---|---|---|
| LF10WBRB-4P | 136-1118-4 | 4 | 12.8 | 18.3 | 19.05 | 17 | M14∞0.75 | 10g |
| LF10WBRB-12P | 136-1013-6 | 12 | 17.25 | |||||
| LF10WBRB-12S | 136-1014-9 | |||||||
| LF13WBRB-20S | 136-1018-0 | 20 | 15.9 | 21.5 | 19.25 | 20 | M17∞0.75 | 16g |
| LF13WBRB-11S | 136-1019-2 | 11 |
- Rear panel mount type ・ Through hole Type
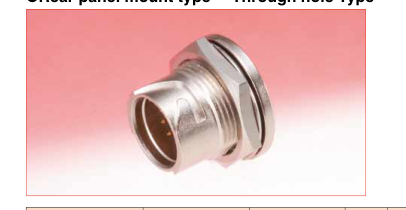
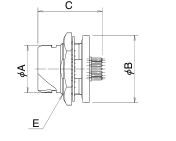
D(HEX)
(Representative example.) Unit : mm
| Part No. | HRS No. | No. of contacts | ØA | ØB | C | D | E | Weight |
|---|---|---|---|---|---|---|---|---|
| LF10WBRB-12PD | 136-1015-1 | 12 | 12.8 | 18.3 | 17.5 | 17 | M14∞0.75 | 9g |
| LF10WBRB-12SD | 136-1016-4 |
■Jacks
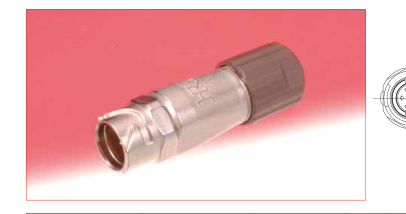
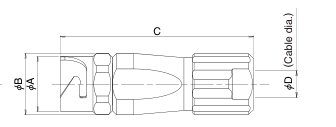
(Representative example.)
Unit : mm
| Part No. | HRS No. | No. of contacts | ØA | ØB | C | ØD |
|---|---|---|---|---|---|---|
| LF07WBJ-3P | 136-2003-8 | 3 | 10.3 | 11.5 | 36.3 | 5 |
| LF07WBJ-3S | 136-2004-0 | |||||
| LF07WBJ-6P | 136-2001-2 | 6 | ||||
| LF07WBJ-6S | 136-2002-5 | |||||
| LF10WBJ-4P | 136-2005-3 | 4 | 12.8 | 13.8 | 42.4 | 7.3 |
| LF10WBJ-4S | 136-2006-6 | |||||
| LF10WBJ-12P | 136-2007-9 | 12 | ||||
| LF10WBJ-12S | 136-2008-1 | |||||
| LF13WBJ-20P | 136-2009-4 | 20 | 15.9 | 16.9 | 52.4 | 8.7 |
| LF13WBJ-20S | 136-2010-3 | |||||
| LF13WBJ-11P | 136-2011-6 | 11 | ||||
| LF13WBJ-11S | 136-2012-9 |
Weight
11g
16g
29g 30g 29g 30g
Page 6
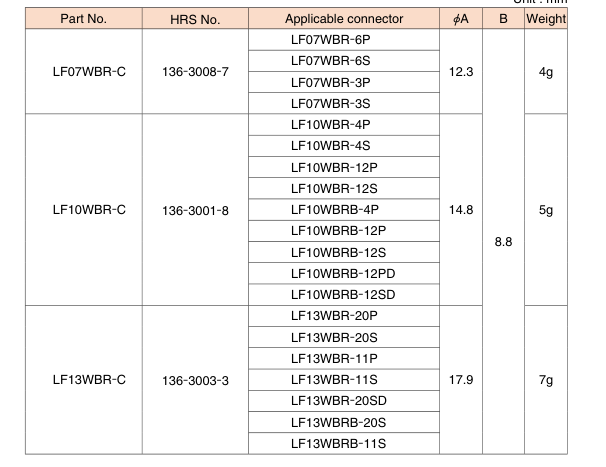
■CAP
- For Receptacles
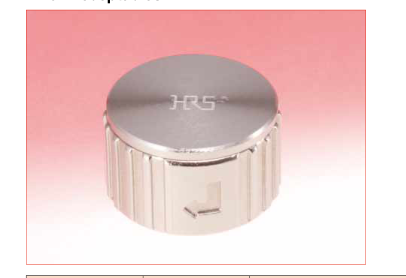
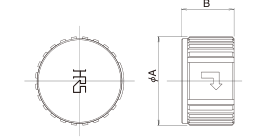
(Representative example.)
Unit : mm
Page 7
BApplicable tools
BSolder termination fixture
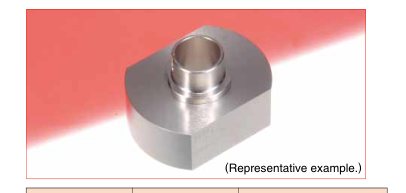
| Part No. | HRS No. | Applicable connectors |
|---|---|---|
| LF07BP-T01 | 150-0232-0 | LF07WBP-** |
| LF07BJ-T01 | 150-0233-3 | LF07WBJ-** |
| LF10BP-T01 | 150-0235-9 | LF10WBP-** |
| LF10BJ-T01 | 150-0236-1 | LF10WBJ-** |
| LF13BP-T01 | 150-0237-4 | LF13WBP-** |
| LF13BJ-T01 | 150-0238-7 | LF13WBJ-** |
BPanel Cutout
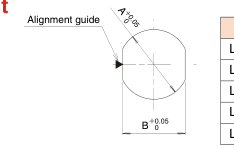
Unit : mm
| Description | Part No. | HRS No. | LF series Applicable cable dia. |
|---|---|---|---|
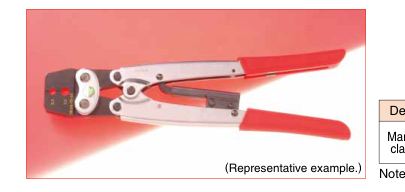
| Manual cable clamp crimp | HR10A-TC-02 | 150-0041-2 | 5 (Note) |
| LF-TC-01 | 150-0234-6 | 7.3 · 8.7 |
Note : Applicable cable dia. is only 5mm for LF series.
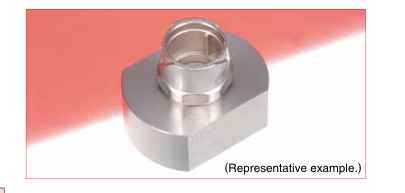
Note : It is applicable regard less of given alphabets or Numbers shown at \*.
Unit : mm
| Shell size | A | B | Weight |
| LF07WBR-** | Ø9.05 | 8.1 | 0.7 to 2 |
| LF10WBR-** | Ø11.05 | 10.2 | |
| LF13WBR-** | Ø14.05 | 13.1 | |
| LF10WBRB-** | |||
| LF13WBRB-** | Ø17.05 | 16.1 | 0.7 to 4.8 |
BContact position arrangement and specifications
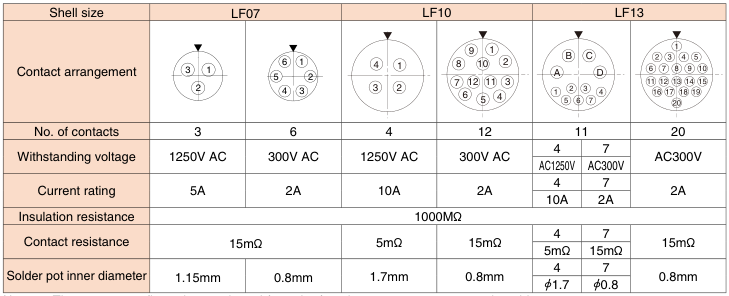
Note 1 : The contact configuration as viewed from the female contact connector mating side. Note 2 : The ▼ symbol indicates polarizing key position. Note 3 : Withstanding voltages are test voltage values.
Page 8
□Termination and Assembly Instructions
The connectors are delivered with pre-assembed condition and the disassembly as shown No.1.
| No. | Illustration | Operation |
| 1 | 1 Solder termination fixture Plug Locking collar Insertion direction | Plug disassembly 1 Insert the plug into securely held solder termination fixture as shown. Fixture Part No. Applicable connector LF07BP-T01 LF07WBP-6S,6P,3S,3P LF10BP-T01 LF10WBP-4S,4P,12S,12P LF13BP-T01 LF13WBP-20S,20P,11S,11P |
| 2 Body / insulator assembly Backshell Note Vice fixed ban Vice A A Detail view Retaining ring Vice | 2 Loosen the backshell turning it counter clockwise and remove it from the body/ insulator assembly. Note When removing, assembling and wiring, be sure to use a solder termination fixture. Directly fixing the locking collar in place with a vice etc.. could lead to damage, deformation or lacuna of retaining ring. | |
| 1 Solder termination fixture Jack Insertion direction | Jack Disassembly 1 Insert the jack into the securely held solder termination fixture as shown. Fixture Part No. Applicable connector LF07BJ-T01 LF07WBJ-6S,6P,3S,3P LF10BJ-T01 LF10WBJ-4S,4P,12S,12P LF13BJ-T01 LF13WBJ-20S,20P,11S,11P | |
| 2 Body / insulator assembly Backshell Note Vice fixed ban Vice Vice | 2 Loosen the backshell turning it counterclockwise. Note When removing, assembling and wiring, be sure to use a solder termination fixture. Directly fixing the body in place with a vice etc.. could lead to damage or deformation. | |
| 2 | Backshell 1 Threaded section Threaded section Tightening collar | Connector Assembly 1 Apply a coating of Loctite 7649 (Manufactured by Henkel Japan, Ltd,) primer to the threaded sections of the backshell and the tightening collar. Completely dry the coated surfaces. Notes (1)Drying time at room temperature is approximately 30 to 70 seconds. (2)Ensure sufficient ventilation of the area at time of drying. (3)Take necessary steps to protect the coated surfaces from contamination. |
| Strain relief collar Backshell 2 Tightening collar Cable preparation end Gasket Cable | 2 Thread the tightening collar, strain relief collar, seal bushing and the backshell over the cable as illustrated. Note Threading the components may not be possible after the cable-end finishing process. |
| Fixture Part No. | Applicable connector |
|---|---|
| LF07BP-T01 | LF07WBP-6S,6P,3S,3P |
| LF10BP-T01 | LF10WBP-4S,4P,12S,12P |
| LF13BP-T01 | LF13WBP-20S,20P,11S,11P |
| Fixture Part No. | Applicable connector |
|---|---|
| LF07BJ-T01 | LF07WBJ-6S,6P,3S,3P |
| LF10BJ-T01 | LF10WBJ-4S,4P,12S,12P |
| LF13BJ-T01 | LF13WBJ-20S,20P,11S,11P |
Page 9
| No. | Illustration | Operation |
| 3 | 1 Stripping dimensions A Cable outer jacket Table 1. Stripping Dimensions No. of Conductors A mm 3 8 to 9 6 4 13 to 14 Shielding mesh 12 14 to 15 22 to 23 (No.A to D) 11 23 to 24 (No.1 to 7) 20 23 to 24 | Cable preparation 1 Strip the cable’s outer jacket to the dimensions illustrated in the table 1. Notes (1)Exercise caution not to damage the shielding mesh. (2)Any damage to the cable’s outer jacket may affect the waterproof performance of the assembled connector. |
| Shielding mesh Cable outer jacket 2 Wires Shielding mesh 4 to 5mm (Folded back) Wires Cable outer jacket | 2 Fold back the shielding mesh over the cable’s outer jacket assuring that it is uniform on its diameter. | |
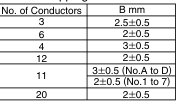
| Stripping dimensions 3 Cable outer jacket Table 2. Stripping Dimensions B Wires No. of Conductors B mm 3 2.5±0.5 6 2±0.5 4 3±0.5 12 2±0.5 3±0.5 (No.A to D) 11 2±0.5 (No.1 to 7) Conductors 20 2±0.5 | 3 Strip the wires to the dimensions illustrated in the Table 2. Note When stripping the wires exercise caution not to damage it’s insulation, folded over shielding mesh or cable’s outer jacket. It may cause deffects in insulation, conduction, and waterproof performance. | |
| 4 | Soldering 1 Soldering conditions Soldering iron tip temperature: 350±10ç Soldering time: within 5 sec. Notes (1)Assure that the solder compound is sufficiently melted on the soldering iron tip. (2)When applying, make sure that the solder will flow correctly at all the contact surfaces between the conductor and the contact. | |
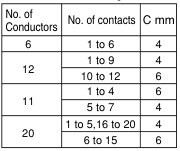
| 2 – 1 C Wire Table 3 Heat shrink tubing Dimensions Insulator No. of No. of contacts C mm Conductors Contact 6 1 to 6 4 1 to 9 4 12 10 to 12 6 1 to 4 6 Heat-shrink tubing 11 5 to 7 4 1 to 5,16 to 20 4 20 6 to 15 6 | 2 – 1 6, 12, 11(No.1 to 7), 20 Conductors (1)Place a heat-shrink tubing (inside diameter of 1.1 mm min.) over every other wire. Perform the soldering of the contact and the (2)conductor, with the wire’s insulation touching the contact as shown. After soldering, slide the heat shrink tubing (3)over the soldered joint and shrink it. The tubing should touch the insulator as shown. | |
| Insulator Insulator wall 2 – 2 Insulator Contact Contact Wire insulation Insulator wall Wire insulation Solder 0.5 mm min. | 2 – 2 3, 4, 11(No.A to D) Conductors (1)Perform the soldering of the contact and the conductor, with the wire’s insulation touching the contact as illustrated. (2)When soldering, to maintain the insulation between adjacent contacts. Make sure that the wire’s insulation remains below the edge of the insulator’s wall 0.5 mm min., as illustrated. |
| No. of Conductors | A mm |
| 3 | 8 to 9 |
| 6 | |
| 4 | 13 to 14 |
| 12 | 14 to 15 |
| 11 | 22 to 23 (No.A to D) 23 to 24 (No.1 to 7) |
| 20 | 23 to 24 |
Page 10
| No. | Illustration | Operation |
| 4 | 3 D Cable outer jacket Table 4. Wire Dimensions No. of Conductors D mm 3 6 to 7 6 Shielding mesh 4 10 to 11 (Folded back) 12 13 to 14 11 18 to 19 20 | 3 After the soldering, keep a distance of D between the contact end and the cable’s outer jacket as illustrated. Note The distance of D is required in order to assure correct assembly of the backshell. |
| 5 | Solder termination fixture 1 Body / insulator assembly Soldered joints | Crimping of the Shielding Clamp 1 After completion of the soldering operations carefully remove (holding on the locking collar) the body/insulator assembly from the solder termination fixture. Note Exercise caution not to damage or deform the solder joints. |
| 2 Cable outer jacket Cable outer jacket Wires Copper tape mm max. 2 Shielding mesh 5 to 6mm Copper tape | 2 Wrap the folded over shielding mesh with 5 to 6mm wide copper tape to assure that it will not become loose. Apply the copper tape so that the shielding mesh does not protrude from under it. Note After wrapping the copper tape, the tape should overlap itself by 2mm max. | |
| 3 Cable outer jacket Copper tape Ground clamp 1±0.5mm Cable outer jacket Copper tape Wires Shielding clamp Shielding mesh Overlap of the copper tape | 3 Insert the “U” shaped shielding clamp over the copper tape as shown on the illustration. It is critical that the overlap of the copper tape is located inside the shielding clamp as shown on the illustration. Note When the end of the copper tape wrapping is positioned at the open side of the ground fitting, the end portion of the copper tape wrapping will no longer be covered by the ground fitting when the ground fitting is crimped. | |
| 4 Commercially available pliers E Shielding clamp Overlap of the copper tape | 4 Using commercially available pliers bend the open ends of the shielding clamp as illustrated, assuring that it stays in place. The dimension of E. between opposing edges of the shielding clamp is necessary to assure correct final crimp. Table 5 Shell size E LF07 5mm max. LF10 7mm max. LF13 |
| Shell size | E |
| LF07 | 5mm max. |
| LF10 | 7mm max. |
| LF13 |
Page 11
| No. | Illustration | Operation |
| 5 | Crimping tool 5 Forming cavity 7.0 5.3 | 5 Both sides of the shielding clamp must be placed in the forming cavity of the tool (as shown on the illustration) and crimped over the cable by closing the tool completely. Applicable Shielding clamp Crimping tool Forming cavity cable diameter diameter after crimping 5.3mm to 5.3 5mm 5.5mm HR10A-TC-02 7.0 ––– ––– 7.9mm to 7.9 7.3mm 8.1mm LF-TC-01 9.1 8.7mm 9 9.1 .3m mm m to |
| 6 | 1 , 2 Locktite area Wiring side 1 to 2 threaded portion Body/insulator assembly Threaded section Backshell Wrench width : D Table 6 (Recommend tightening torgue) Shell size Tightening torque Wrench width LF07 1N·m to 1.5N·m 10mm LF10 1N·m to 1.5N·m 13mm LF13 1.5N·m to 2N·m 16mm | Connector Assembly 1 Place the body/insulator assembly in the applicable solder termination fixture. For plug assembly Fixture Part No. Applicable connector LF07BP-T01 LF07WBP-6S,6P,3S,3P LF10BP-T01 LF10WBP-4S,4P,12S,12P LF13BP-T01 LF13WBP-20S,20P,11S,11P For jack assembly Fixture Part No. Applicable connector LF07BJ-T01 LF07WBJ-6S,6P,3S,3P LF10BJ-T01 LF10WBJ-4S,4P,12S,12P LF13BJ-T01 LF13WBJ-20S,20P,11S,11P 2 Coat the thread section of the body/insulator assembly with Loctite 263 compound (manufactured by Henkel Japan, Ltd.) or equivalent, tightening it with a torque specified in the table 6. Notes (1)The applied loctite should not protrude out further than the wiring side 1 to 2 threaded section. If it does, it may affect waterproof performance and locking. Please remove any protruding loctite with a cloth or cotton swab. etc. (2)It is critical that the cable itself will not turn or twist during this operation. It may cause breakage at the soldered area. |
| 3 4 , Gasket Strain relief collar Groove Protrusion Tightening collar | 3 Slide forward the gasket and insert it in the backshell until fully seated. 4 Slide forward the strain relief collar and insert it in the backshell, making sure that the opposing protrusions fit inside the corresponding grooves, as shown on the illustration. Note It is critical that the protrusions are inside the corresponding grooves. It may cause breakage, when a tightening collar is assembled. | |
| 5 Threaded section Tightening collar | 5 Verify that the Locktite 7649 primer (or equivalent) on the threaded sections of the backshell and tightening collar are dry. Apply the Locktite 263 compound to the tightening collar’s threaded section and attach it to the backshell. |
| Crimping tool | Forming cavity | Applicable cable diameter | Shielding clamp diameter after crimping |
|---|---|---|---|
| HR10A-TC-02 | 5.3 | 5mm | 5.3mm to 5.5mm |
| 7.0 | ––– | ––– | |
| LF-TC-01 | 7.9 | 7.3mm | 7.9mm to 8.1mm |
| 9.1 | 8.7mm | 9.1mm to 9.3mm |
| Fixture Part No. | Applicable connector |
|---|---|
| LF07BJ-T01 | LF07WBJ-6S,6P,3S,3P |
| LF10BJ-T01 | LF10WBJ-4S,4P,12S,12P |
| LF13BJ-T01 | LF13WBJ-20S,20P,11S,11P |
| Shell size | Tightening torque | Wrench width |
| LF07 | 1N·m to 1.5N·m | 10mm |
| LF10 | 1N·m to 1.5N·m | 13mm |
| LF13 | 1.5N·m to 2N·m | 16mm |
Page 12
| No. | Illustration | Operation |
| 6 | 6 Tightening collar Wrench width | 6 Remove the connector from the solder termination fixture, holding it by the locking collar. Do not pull on the cable. It may cause breakage. Recommended tightening torgue Shell size Tightening torque Wrench width LF07 0.8N·m to 1N·m 10mm LF10 0.7N·m to 1N·m 14mm LF13 1 N·m to 1.5 N·m 16mm |
| 7 | Confirmation of Waterproof Performance After connector assembly procedure is completed, compress air in to the connector from the mating side under 17.6 kPa for 30 seconds check that no air leaks out of the connector. |
| Shell size | Tightening torque | Wrench width |
| LF07 | 0.8N·m to 1N·m | 10mm |
| LF10 | 0.7N·m to 1N·m | 14mm |
□Cable Specifications (Reference)
| No. of contact | 3 pos. | 4 pos. | 6 pos. | 12 pos. | 20 pos. | 11 pos. | ||
| Conductor | Material | Tin plated soft copper wire | ||||||
| Size (mm) | Ø0.18 | Ø0.26 | Ø0.16 | Ø0.16 | Ø0.16 | Ø0.26 | Ø0.16 | |
| Construction | 20 /Ø0.18 mm dia. | 20 /Ø0.26 mm dia. | 7 /Ø0.16 mm dia. | 7 /Ø0.16 mm dia. | 7 /Ø0.16 mm dia. | 26 /Ø0.26 mm dia. | 7 /Ø0.16 mm dia. | |
| Size (AWG) | 20 AWG | 16 AWG | 26 AWG | 26 AWG | 26 AWG | 16 AWG | 26 AWG | |
| Sectional area | 0.5 | 1.25 | 0.14 | 0.14 | 0.14 | 1.25 | 0.14 | |
| Diameter (mm) | Ø0.98 | Ø1.5 | Ø0.48 | Ø0.48 | Ø0.48 | Ø1.5 | Ø0.48 | |
| Insulator | Diameter (mm) | Ø1.5 (Standard) | Ø2.1 (Standard) | Ø0.88 (Standard) | Ø0.9 (Standard) | Ø0.9 (Standard) | Ø2.1 (Standard) | Ø0.95 (Standard) |
| Thickness (mm) | 0.26 | 0.3 | 0.2 | 0.21 | 0.21 | 0.3 | 0.24 | |
| Shield | Material | Tin plated soft copper wire | ||||||
| Density | 85% | 80% or more | 85% | 80% or more | 80% or more | 80% or more | ||
| Diameter (mm) | Ø3.6 | Ø5.5 | Ø3.4 | Ø4.2 | Ø5.1 | Ø6.7 | ||
| Jacket | Diameter (mm) | Ø5±0.2 | Ø7.3±0.2 | Ø5±0.2 | Ø7.3±0.2 | Ø8.7±0.2 | Ø8.7±0.2 | |
Remarks : The cable satisfies required specifications for UL specification. Notes : The cable pull and twisting strength, waterproof tightness and other characteristics may differ, depending on the cable structure, please confirm before the use.

2-6-3,Nakagawa Chuoh,Tsuzuki-Ku,Yokohama-Shi 224-8540,JAPAN TEL: +81-45-620-3526 Fax: +81-45-591-3726 http://www.hirose.com http://www.hirose-connectors.com
The characteristics and the specifications contained herein are for reference purpose. Please refer to the latest customer drawings prior to use. The contents of this catalog are current as of date of 07/2018. Contents are subject to change without notice for the purpose of improvements.