

DS005AKA SONY
Document overview
- PDF pages: 12
Technical content
Page 1
Single-Panel Liquid Crystal Optical Engine for Rear Projectors
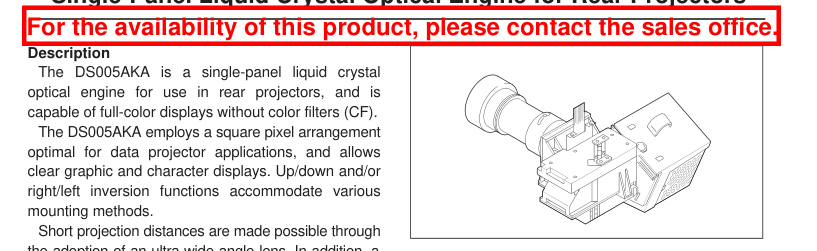
the adoption of an ultra-wide angle lens. In addition, a

projection lens floating mechanism delivers 40" to 50" projected images with minimal image distortion. A high intensity discharge (HID) lamp ensures high luminance and low power consumption.
Features
- Number of active dots: 1,456,000
- Horizontal resolution: 600 TV lines
- Supports SVGA (804 × 3 × 604)/PC98∗ (804 × 3 × 500) mode display NTSC/NTSC-WIDE/PAL/PAL-WIDE modes also available through conversion of scanned dot numbers by an external IC
- Up/down and/or right/left inverse display function
- Full-color display with CF-less projection system
- High luminance: normally-white 200 ANSIlm (typ.)
- Ultra-wide angle lens for short projection distances (592.8mm/39.8")
- Image distortion correction floating mechanism to support 40" to 50"
- Relative luminance: 70% or more
- Uses HID lamp (100W) ∗ "PC98" is a trademark of NEC Corporation.
Engine Configuration
- HID lamp
- Lamp driver (DC 300V input)
- High-efficiency illumination system employing an integrator
- Separate RGB illumination systems using dichroic mirrors (DM)
- LCD panel mounting mechanism, adjustable along XYθ axes
- LCD panel (LCX021BM) Dots: 2412 (H) × 604 (V) = 1,456,848 dots
- Wide fixed focal length lens for enlarged projection of LCD
Applications
Liquid crystal rear projection TV/monitor
Sony reserves the right to change products and specifications without prior notice. This information does not convey any license by any implication or otherwise under any patents or other right. Application circuits shown, if any, are typical examples illustrating the operation of the devices. Sony cannot assume responsibility for any problems arising out of the use of these circuits.
– 1 –
E99262A97-PS
Page 2
Description of Basic Operation
- Apply DC 300V to the lamp driver.
- Light emitted by the lamp is focused by an elliptical reflector and is converted to an approximately collimated
ray by a relay lens.
- After that the light passes through the polarizer conversion system elements and an optical integrator.
- Light output from the optical integrator passes through a Fresnel lens to become a collimated ray, which is
color-separated by a group of dichroic mirrors.
- The color-separated rays illuminate the LCX021BM evenly, and are focused on the respective RGB dots by
microlenses mounted on the LCX021BM and distributed.
- After transmitting the panel, the light is enlarged and projected onto a screen by a projection lens.
For details of the LCD panel operation, see the LCX021BM specifications.
Block Diagram
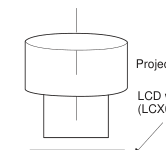
Projection Lens
LCD with burried Microlens Array
Fresnel Lens
(LCX021BM)
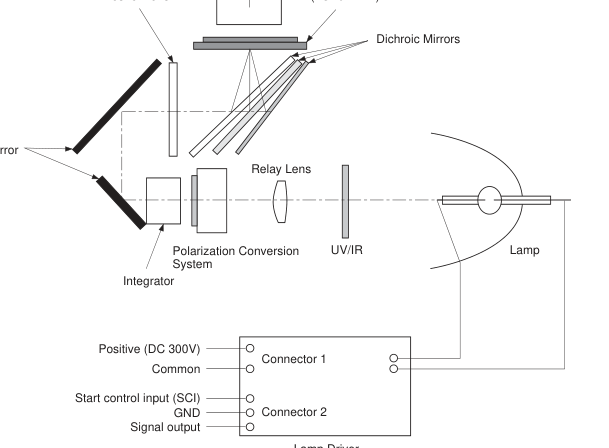
Mirror
Lamp Driver
– 2 –
Page 3
Pin Description and Operating Conditions Absolute Maximum Ratings (∗ measured by thermocouples) Optical engine unit (excluding lamp driver)
- Operating temperature Topr
0 to +40
°C
- Panel and incident side polarizer temperature∗
55°C or less (∆T = 15°C or less at an ambient temperature of 40°C)
- PBS top (no contact with metal portions)∗
70°C or less (∆T = 30°C or less at an ambient temperature of 40°C)
- Storage temperature
Tstg –20 to +60
°C
Lamp driver unit
- Operating temperature Topr
–5 to +65
°C (under forced air cooling)
- Storage temperature
Tstg –40 to +85
°C
Lamp Driver Unit
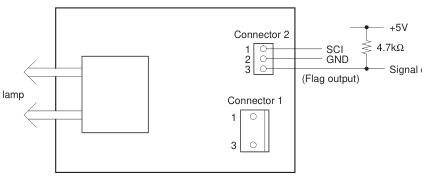
Signal output
Pin Description
| Connector 1 DC power supply input | Connector 2 SCI (start control input) and signal output | |
| 1 | Positive (DC 300V) | Start control input (SCI) |
| 2 | — | GND |
| 3 | Common | Signal output (flag output) |
| Connector type | JST (J.S.T. Mfg. Co., Ltd.) B 2P3-VH-B | JST (J.S.T. Mfg. Co., Ltd.) B 3B-PH-K |
Operating Conditions
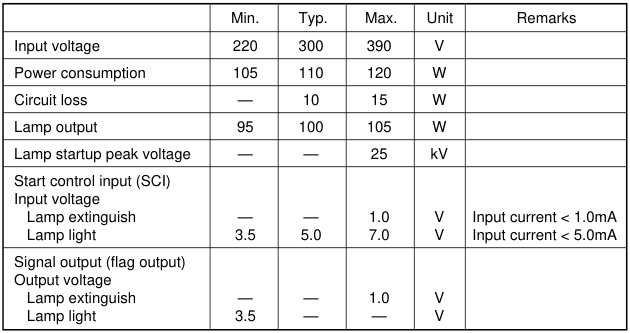
For details of the LCD panel operating conditions and pin description, see the LCX021BM specifications.
– 3 –
Page 4
(Ta = 25°C)
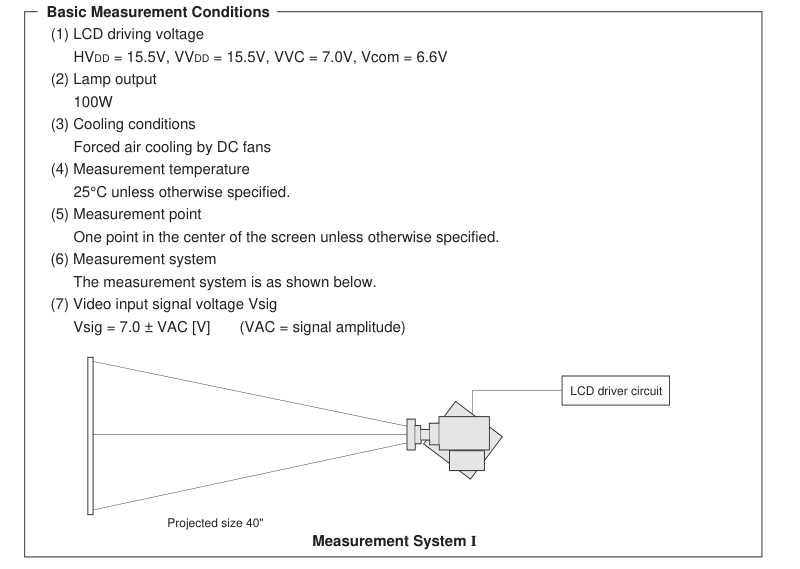
Electro-optical Characteristics
| Item | Symbol | Measurement method | Min. | Typ. | Max. | Unit | ||
|---|---|---|---|---|---|---|---|---|
| Contrast ratio | 25°C | CR25 | 1 | 130 | 180 | — | — | |
| Luminous intensity | 25°C | L | 2 | 150 | 200 | — | ANSIlm | |
| Chromaticity | R | x | Rx | 3 | 0.570 | 0.600 | 0.640 | CIE standards |
| y | Ry | 0.300 | 0.340 | 0.380 | ||||
| G | x | Gx | 0.265 | 0.305 | 0.345 | |||
| y | Gy | 0.620 | 0.660 | 0.700 | ||||
| B | x | Bx | 0.125 | 0.155 | 0.185 | |||
| y | By | 0.030 | 0.060 | 0.090 | ||||
| W | x | Wx | 0.240 | 0.280 | 0.320 | |||
| y | Wy | 0.300 | 0.340 | 0.380 | ||||
| Color shading | W | ∆u'v' | ∆u'v'w | 4 | — | 0.015 | 0.025 | |
– 4 –
Page 5
- Contrast ratio Contrast ratio (CR) is given by the following formula. L (White): Surface illuminance of the screen at the input signal amplitude VAC = 0.5V. L (Black): Surface illuminance of the screen at VAC = 4.5V. Both luminances are measured by Measurement System I.
CR = L (White)/L (Black)
- Luminous intensity In Measurement System I, the average of the illuminance at the nine points specified in the ANSI standards when the input signal amplitude VAC is 0.5V, multiplied by the projection area, is computed.
L = average illuminance at nine ANSI points (lm/m2) × projection area (m2)
H/3
H/3
H/3
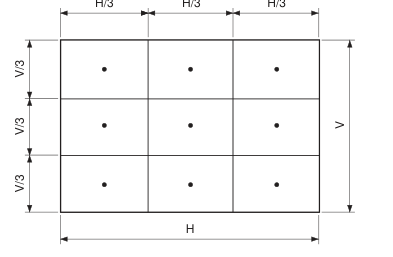
Nine ANSI points: centers of each of the
areas obtained by dividing the effective display area into nine smaller areas
- Chromaticity Raster modes of each color are defined by the representations at the input signal amplitude conditions shown in the table below. Measurement System I uses chromaticity of x and y of the CIE standards here.
| Signal amplitude (VAC) applied to each input | ||||
| R input | G input | B input | ||
| Display raster | R | 0.5 | 4.5 | 4.5 |
| G | 4.5 | 0.5 | 4.5 | |
| B | 4.5 | 4.5 | 0.5 | |
(Unit: V)
- Color shading In Measurement System I, the maximum values of CIE color differences at the three points in the middle row of the nine ANSI points, measured at an input signal amplitude VAC of 0.5V, are used to compute the color shading.
∆u'v' = (u'1 – u'2)2 + (v'1 – v2)2
For other electro-optical characteristics, see the LCX021BM specifications.
– 5 –
Page 6
Optical Characteristics
The optical performance is specified for the following projection conditions.
Projection Conditions
| Item | Setting value | |
| 1 | Panel | 1.60'' (32.4mm × 24.3mm) |
| 2 | Panel shift | None |
| 3 | Dot pitch | 13.5µm × 40.5µm |
| 4 | Maximum image height | 20.25mm |
| 5 | Overscan | –2.0% |
| 6 | Effective panel size | 1.60'' (32.4mm × 24.3mm) |
| 7 | Effective projection size | 40" to 50" (screen size) |
| 8 | Projection magnification | 24.631 times/40" (including distortion) |
in air
Projection Lens Specifications (design)
| Item | Design value | Remarks | ||
| 1 | F number | 1.79 | ||
| 2 | Half angle of view | at 39.2" projection | at 49" projection | |
| 38.1° | 38.1° | |||
| 3 | Back focus | 25.778mm | 25.519mm | (at ∞) |
| 4 | Projection distance | 592.8mm | 752.3mm | (from front of projection lens bulb) |
| 5 | Conjugate length | 820mm | 933mm | between panel and screen |
| 6 | Panel side pupil position | –1050mm | –1150mm | (from panel) |
| 7 | Panel side pupil diameter | φ623.0mm | φ623.0mm | |
| 8 | Screen side pupil position | –138.7mm | –138.5mm | (from panel) |
| 9 | Screen side pupil diameter | φ14.4mm | φ14.4mm | |
| 10 | Focal length | 25.772mm | 25.841mm | |
| 11 | Distortion aberration Up/down 1.0H Right/left | –0.89% –0.97% | –0.93% –1.16% | (contracting side) |
| 12 | TV distortion Up/down Right/left Center up/down Center right/left | –0.11% –0.05% –0.43% –0.18% | –0.20% –0.11% –0.51% –0.26% | (contracting side) |
| 13 | MTF (12.5lp/mm) 0H to 0.5H to 0.7H to 0.86H to 1.0H | 90% 75/70% 50/65% 50/45% 45/35% | 90% 75/65% 50/60% 45/30% 45/30% | Sagittal/Tangent. |
| 14 | Relative luminance 1.0H | 50% | 50% | |
– 6 –
Page 7
- TV distortion TV distortion is defined by the diagrams and formulas below.
A
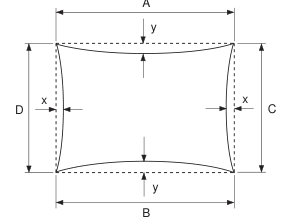
Right/left distortion = (4x)/(A + B) Up/down distortion = (4y)/(C + D)
A A'
B' B
A' B' C' D': Points at the four corners of the
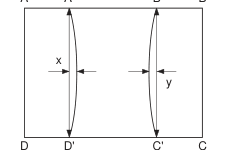
quadrangle where center pin is most apparent, and where the right/left
4x and 4y
positions of A'D' and B'C' are symmetrical.
A'B' + C'D'
Where, A'B' ≥ AB/2, C'D' ≥ CD/2, A'D' ≥ AD/2 and B'C' ≥ BC/2
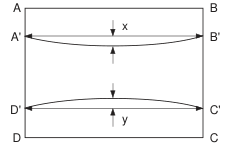
The same measurement method and
4x and 4y
standard values are used for center
A'D' + B'C'
barrel.
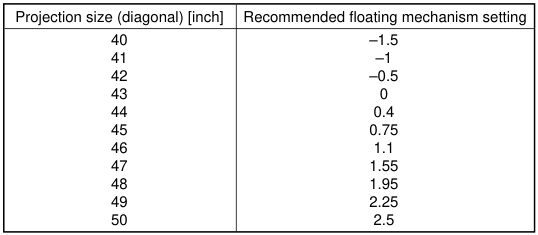
- Floating mechanism The floating mechanism corrects image distortion between 40" and 50". At time of shipment, it is optimized for a diagonal of 40" (including 2.0% underscan), but the floating mechanism should be adjusted if the projection size is different and image distortion becomes prominent. Recommended values for different projection sizes are given below, but adjustments should be made such that image distortion is minimized.
Recommended floating mechanism settings
– 7 –
Page 8
- Panel position adjustment range Adjustment of the LCD panel registration is possible in the horizontal (∆h) and vertical (∆v) directions. The adjustment ranges are as follows.
Horizontal adjustment (∆h): ±0.5mm Vertical adjustment (∆v): ±1.0mm
Angular adjustment (∆θ) is included in the vertical adjustment.
Service Parts The following is a list of service parts.
| Part number | Name | Configuration | Remarks | |
|---|---|---|---|---|
| 1 | DS-B001 | Lamp unit | Lamp + lamp housing | |
| 2 | DS-B002 | Lamp driver | ||
| 3 | DS-B003 | Polarizer unit | Polarizer + polarizer holder | |
| 4 | DS-B004 | Projection lens | ||
| 5 | DS-B005 | Integrator unit | Polarization conversion element + integrator |
– 8 –
Page 9
Notes on Handling
(1) Cooling 1) This optical engine is provided with fans to cool the panel and lamp unit. However, the set should be designed for enough ventilation and convection to ensure sufficient cooling. 2) The lamp should under no circumstances be lit while the cooling fans are not operating. The cooling fans are provided with sensor output pins to detect operation, and the lamp driver is provided with start control input pins. The set should be designed so that if the cooling fans are not operating, the lamp driver does not operate. 3) When using a dust filter with the ventilation orifices, reduced ventilation due to filter clogging can cause rises in temperature, possibly damaging the LCD or other components. The temperature of the optical
engine should be controlled, and filters should be changed as appropriate.
(2) Lamp unit 1) In order to prevent burns and other accidents, do not directly touch the lamp housing while the lamp is lit or immediately after it has been extinguished. 2) Because of the extremely high focusing power of the ellipsoid reflector, if it is not installed in the specified position, damage to the engine or other problems may arise. Ensure that, if the lamp housing is not mounted in the specified position when changing the lamp, the lamp power supply will not operate. 3) Always use the included lamp driver to light the lamp. If the lamp is turned on and off repeatedly in short cycles, the lamp lifetime will be shortened. 4) The lamp is designed to be lit in a horizontal position. Ensure that the optical axis of the ellipsoid
reflector is within ±20° of horizontal. 5) The lamp emits ultraviolet rays while lit and immediately after being extinguished. Be sure not to look directly at the lamp.
(3) Protection from dust and dirt Image quality is significantly degraded by dust on the LCD panel and the polarizer. Employ a set construction such that after dust is removed by a filter (mesh size 50µm or less) during air cooling, air is blown into the optical engine. 1) Employ a dust resistant set construction, and operate in a clean environment. 2) Do not touch the surface of the projection lens and polarizer. The surfaces are easily scratched. When cleaning, use a clean-room wiper with isopropyl alcohol. Be careful not to leave stains on the surface. 3) Use ionized air to blow off dust adhered to the optical engine.
(4) Static charge prevention 1) Use non-chargeable gloves, or simply use bare hands. 2) Do not touch any electrodes. 3) Wear non-chargeable clothes and conductive shoes. 4) Keep optical engines away from any charged materials. 5) Use ionized air or some other means to discharge.
– 9 –
Page 10
(5) Other handling precautions 1) The DM angles of this optical engine are adjusted to their optimal values, and should not be changed. 2) Do not remove or take apart the engine cover, projection lens, projection lens mount, relay lens, integrator support, or lamp housing. 3) Light emitted from the lamp and from the projection lens may harm the eyes. Do not look directly into the light from the lamp or lens. 4) Do not drop the optical engine. 5) Do not twist or bend the optical engine. 6) Keep the optical engine away from heat sources. 7) Do not dampen an optical engine with water or other solvents. 8) Avoid storing or using the optical engine at high temperature or high humidity, as this may result in
optical engine damages.
– 10 –
Page 11
– 11 –
Page 12
– 12 –