
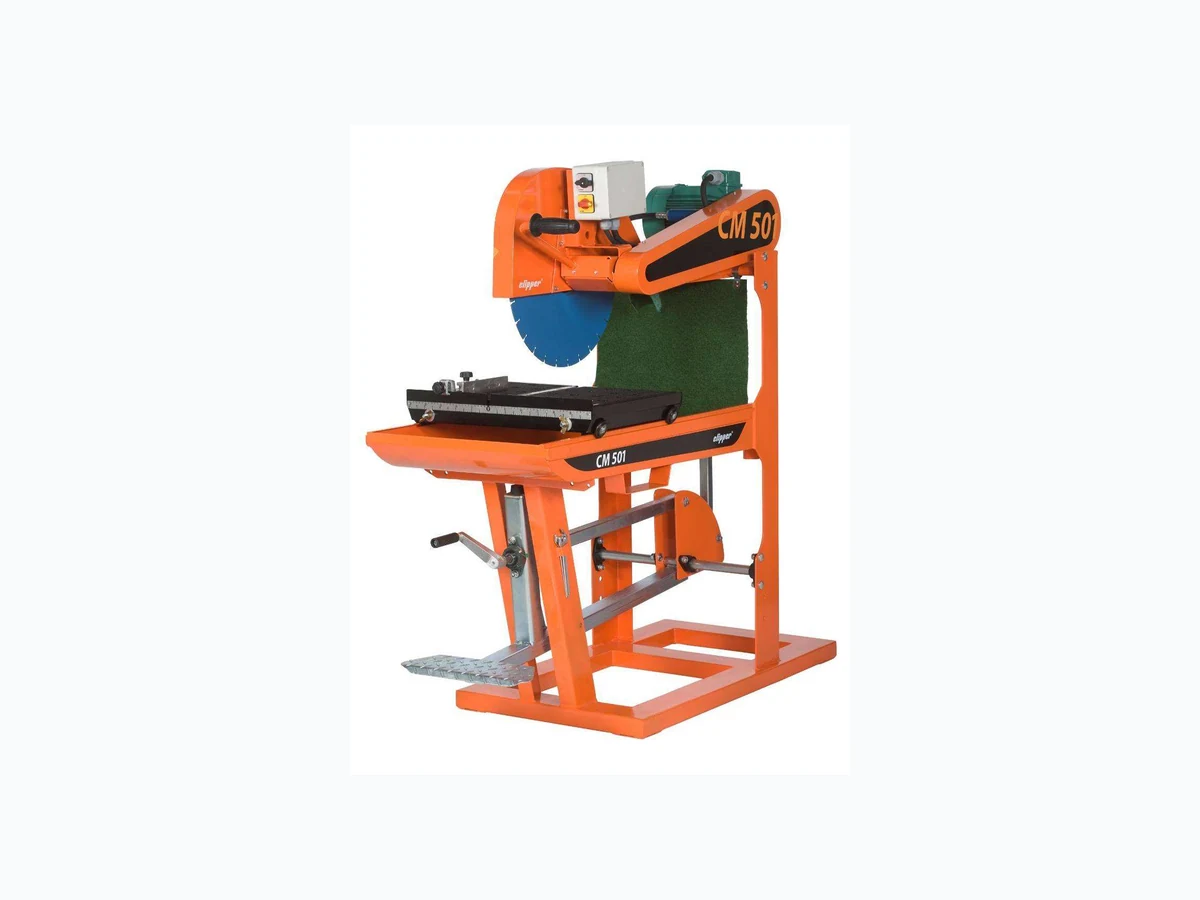
CM501 ETC2
Document overview
- Manufacturer or author: Provided By www.digicamel.com(FREE DATASHEET DOWNLOAD SITE)
- PDF pages: 27
Technical content
The undersigned manufacturer: SAINT - GOBAIN ABRASIVES S.A. 190, BD J.F. KENNEDY L- 4930 BASCHARAGE Declares that this product: Masonry Saws: CM 501 Codes / Models: 70184627018 CM 501 3.55.3 400V 70184628230 CM 501 1.40.3 400V 70184628232 CM 501 5.55.3 400V 70184628233 CM 501 3.55.3 230/400V BI 70184628234 CM 501 1.40.3 230/400V BI 70184628235 CM 501 3.20.1 115V 70184628236 CM 501 3.30.1 230V 70184628235 CM 501 3.55.3 525V is in conformity with the following Directives:
- European Machinery Directive 2006/42/EC
- “LOW VOLTAGE" 2006/95/EC
- Electromagnetic Compatibility Directive 2004/108/EC and European standard:
- EN 12418 – Masonry and stone cutting-off machines – Safety Pierre Mersch Business Manager Machines Europe Declaration of conformity
OPERATING INSTRUCTIONS AND SPARE PARTS LIST
1 Basic Safety Instructions 6
1.1 Symbols 6
1.2 Machine plate 7
1.3 Safety instructions for particular operating phases 7
2 Machine description 9
2.1 Short description 9
2.2 Purpose of use 9
2.3 Layout 9
2.4 Technical Data 11
3 Assembly and commissioning 13
3.1 Tool assembly 13
3.2 Electrical connections 13
3.3 Starting the machine 13
3.4 Water cooling system 14
4 Transport and storing 15
4.1 Securing for transport 15
4.2 Transport procedure 15
4.3 Long period of inactivity 15
5 Operating the machine 16
5.1 Site of work 16
5.2 Cutting methods 16
6 Maintenance and servicing 18
7 Faults: causes and cures 19
7.1 Fault-finding procedures 19
7.2 Trouble-shooting guide 19
7.3 Circuit diagram 20
7.4 Customer service 24
1 Basic Safety Instructions
The CM501 is exclusively designed for the cutting of construction products mainly on construction sites. Uses other than the manufacturer's instructions shall be considered as contravening the regulations. The manufacturer shall not be held responsible for any resulting damage. Any risk shall be borne entirely by the user. Observing the operating instructions and compliance with inspection and servicing requirements shall also be considered as included under use in accordance with the regulations.
1.1 Symbols
Important warnings and pieces of advice are indicated on the machine using symbols. The following symbols are used on the machine: Read operator’s instructions Ear protection must b e worn Hand protection must be worn Eye protection shall be worn Rotation direction of the blade Danger: risk of cu t
1.2 Machine plate
Important data can be found on the following plate located on the machine:
1.3 Safety instructions for particular operating phases
- Before commencing work, make yourself familiar with the working environment at the place of use. The working environment includes: obstacles in the area of work and manoeuvre, the firmness of the floor, necessary protection at the site relating to public thoroughfares and the availability of help in the event of accidents.
- Check for correct mounting of the blade regularly.
- Immediately remove damaged or badly worn blades, as they endanger the operator whilst rotating.
- Only fit NORTON diamond blades to the machine! The use of other tools can damage the machine!
- Attention is drawn to the use of BS2092 safety goggles in conformity with specified Processes No.8 of the Protection of Eyes Regulation 1974, Regulation 2(2) Part 1.
- For security reasons, never leave the machine unattended, untied or unlocked. Electrical powered machine
- Always turn off the machine and separate it from the main source of electricity before any work on the machine is done.
- Make all electrical connections securely to eliminate contact of live wires with spray water or dampness.
- When the machine is used with water, it is IMPERATIVE that you earth the machine properly. Let a qualified electrician check in case of doubt.
- In the event of the machine breaking down or stopping for no apparent reason, switch off the main electricity supply. Only a qualified electrician is allowed to investigate the trouble and remedy the fault.
- In case of emergency, you can stop the machine by :
- pushing on the front cover of the switch for 230V powered machines.
- turning the switch 0/1 on 0 for 115V powered machines.
- turning the ON-OFF switch on OFF for 400V powered machines.
- You can lock the ON-OFF-switch on 400V powered machines using a padlock. Machine Model Machine Code Weight Year of production Maximum blade diameter Machine type Serial number Power Safety standard Blade speed Bore diameter
2 Machine description
Any modification, which could lead to a change in the original characteristics of the machine, may be done only by Saint-Gobain Abrasives who shall confirm that the machine is still in conformity with the safety regulations.
2.1 Short description
The CM501 block saw is designed for durability and high performance for onsite wet and dry cutting operations of a wide range of masonry, refractory and natural stone products. As with all other NORTON products, the operator will immediately appreciate the attention given to detail and quality of materials used in construction. The machine and its component parts are assembled to high standards assuring long life and minimum maintenance.
2.2 Purpose of use
The machine is designed for cutting a large range of building and refractory materials. It is not designed for cutting wood or metals.
2.3 Layout
Frame (1) The jig-welded, reinforced and all-steel construction, diagonally braced to ensure perfect rigidity. The frame includes a large capacity, sloping water tray with drain plug. Frame has built-in fork lift brackets (7) for easy transportation. The large base ensures stability while used.
Cutting head (2) Jig-welded, steel console equipped with pivot bar, which is fixed to frame uprights. Console supports the electric motor and switch (10), the belt drive with its guard (4), the blade shaft assembly and the stay level blade guard (3). The balancing of the cutting head is achieved using a heavy-duty spring. Bearings are machined for perfect fit and alignment. Blade guard (3) Jig-welded steel construction with stay level arm and 500mm-diameter blade capacity, which offers maximum operator protection and increased visibility of the work piece. Incorporated in the blade guard is a shaft vent cover, which can be easily hinged opened. This allows easy access to shaft for inspection and blade replacement when motor is switched off, while fully protecting the blade when in operation. Down feed and cutting depth adjustment The spring-loaded cutting head, activated by hand with the grip on the blade guard or with the foot pedal (5), ensures smooth lowering of the cutting head for shock-free penetration of the work piece and improved control of the cutting pressure. A crank assembly (6) in conjunction with a depth locking device on the cutting head pivoting bar enables the operator to set the cutting head to desired maximum cutting depth. Conveyor cart (8) Large, heavy-duty conveyor cart fitted with water flow-control vents, mounted on 4 rollers to give maximum stability and smooth movement. The conveyor cart is equipped with graduated scale on the backstop and with a guide-a-cut device. Water cooling system (9) The coolant system comprises:
- A powerful, submersible mechanical water pump.
- Plastic suction pipe delivering the water from the water pan to the cutting head.
- A large capacity water pan supplied with drain plug.
- A water-tap, fitted to the blade guard, permitting controlled water flow.
- Two water nozzles located inside the blade guard ensure adequate flow of water to both sides of the cutting blade.
- A water curtain, fixed to head pivoting bar restricts water spray and minimises water loss. Electrical Motor and switch (10) Motor: Low voltage trigger (NVR) built in the switch prevents the motor to restart for example after a power cut. The electric motor has an overload protection. Thermal overload tripping can occur for two reasons: a. tripping under light load If connection is incorrect b. tripping under heavy load If motor has been overloaded
2.4 Technical Data
2,2kW 115V 1 phase NVR 50Hz 3000min -1 70184628235 2,2kW 230V 1 phase NVR 50Hz 3000min -1 70184628236 3kW 400V 3 phases NVR 50Hz 3000min -1 70184628230 3kW dual tension 230V/400V 3 phases NVR 50Hz 3000min -1 70184628234 4kW dual tension 230V/400V 3 phases NVR 50Hz 3000min -1 70184628233 4kW 400V 3 phases NVR 50Hz 3000min 70184627018 70184628232 Motor 4kW 525V 3 phases NVR 50Hz 3000min -1 70184628238 Electric motor protection IP54 350mm 70184628234 70184628230 500mm 70184627018 70184628233 70184628235 70184628236 70184628238 Max. blade diameter 600mm 70184628232 Bore 25,4mm 2700 min -1 70184628234 70184628230 Blade shaft speed 1900 min -1 70184627018 70184628233 70184628235 70184628236 70184628238 70184628232 125mm 70184628234 70184628230 195mm 70184627018 70184628233 70184628235 70184628236 70184628238 Cutting depth mm (without reversing the material) 245mm 70184628232 Flange diameter 90mm 70184628234 70184628230
(following ISO EN 11201) 81 dB (A) Sound energy level (following ISO EN 3744) 97 dB (A) Cutting length 500mm Conveyor cart dimensions (Lxl) 580x420mm Machine Dimensions (LxlxH) 1480x610x1550mm Weight Machine 168 kg Max.
3 Assembly and commissioning
The machine is delivered fully equipped and assembled (although without diamond blade) and is ready for operation after connection to the appropriate power supply.
3.1 Tool assembly
Only NORTON blades can be used with the CM501. All tools used must be selected with regard to their maximum permitted cutting speed for the machine’s maximum permitted rotation speed. Before mounting a new blade into the machine, switch off the machine and isolate it from the main source of electricity. To mount a new blade, follow these steps:
- Open the shaft vent cover on the blade guard.
- Loosen the hexagonal nut on the blade shaft, which holds the removable outer flange.
- Remove the outer flange.
- Clean the flanges and blade shaft and inspect for wear.
- Mount the blade on arbor ensuring that direction of rotation is correct. Wrong direction of rotation blunts the blade quickly.
- Replace outer blade flange.
- Tighten hexagonal nut with spanner supplied for this purpose.
- Shut the vent cover. The blade bore must correspond exactly to the diameter of the blade shaft. Cracked or damaged bore is dangerous for the operator and for the machine.
3.2 Electrical connections
Check that,
- the voltage/phase supply corresponds to the information indicated on the motor plate.
- Available power supply must have ground connection in conformity with safety regulations.
- The connecting cables should have at least a 2.5mm 2-section per phase.
3.3 Starting the machine
Open the switch cover and press the green button to start the machine. To stop either use the red button or press directly on the switch front cover. 115V Motor To switch the machine on, turn the 0/1 switch on 1. To switch the machine off, turn the 0/1 switch on 0. 400V Motor Put the ON-OFF-Switch on ON. Then put the Star-Triangle-Switch on Y. Wait until the blade reaches its maximum rotational speed, then turn the Star-Triangle-switch on Δ. The direction of rotation is indicated on the blade guard. If the direction of rotation does not correspond to the direction shown by the arrow, then reverse the motor polarity by turning the
phase inverter inside the male plug with a screwdriver. Machine dual voltage 230V/400V Set the 230V/400V switch on the voltage corresponding to the one supplied to your machine. A wrong voltage choice can damage the electrical equipment of your machine. The direction of rotation is indicated on the blade guard. If the direction of rotation does not correspond to the direction shown by the arrow, then reverse the motor polarity by turning the phase inverter inside the male plug with a screwdriver.
3.4 Water cooling system
Fill the water pan with clean water to approximately 2cm from top (ensure that bottom of pump is fully immersed in water). Open water-tap at blade guard (note that handle on water-tap should be in line with water-flow). Ensure that water is flowing freely in the circuit and is delivered adequately to both sides of the blade, as insufficient water supply may result in premature failure of the diamond blade. The water pump must never run without water. Always make sure that there is enough water in the pan and refill if necessary. In case of frost, empty the water cooling system from its water.
4 Transport and storing
4.1 Securing for transport
- Before transporting or lifting the machine, always remove the blade and the conveyor cart and empty the water pan.
4.2 Transport procedure
If you transport the machine using a fork-lift truck, you have to use EXCLUSIVELY the two fork lift brackets under the water pan.
4.3 Long period of inactivity
If the machine is not going to be used for a long period, please take the following measures:
- Completely clean the machine
- Loosen the drive belts
- Empty the water system
- Take the water pump out of the slurry and clean it thoroughly. The storage site must be clean, dry and at a constant temperature.
5 Operating the machine
5.1 Site of work
5.1.1 Siting the machine
- Remove from the site anything, which might hinder the working procedure!
- Make sure the site is sufficiently well lit!
- Observe manufacturer's conditions for connecting to power supplies!
- Place electric cables in such a way that damage by the device is excluded!
- Make sure you have a continual adequate view of the working area so you can intervene in the working process at any time!
- Keep other staff out of the area, so you can work securely.
5.1.2 Space required for operation and maintenance
Leave 2 m in front of the machine and 1,5 m around it for usage and maintenance of the CM501.
5.2 Cutting methods
To use the machine correctly, you must face it with one hand on the handle of the cutting head, and the other on the conveyor cart. You can possibly press on the pedal with one foot. Always keep your hands away from the moving blade.
5.2.1 Full depth or fixed cutting
In full depth or fixed cutting, the cutting head is locked in a fixed position and the material is pushed into it as shown.
- Lower the cutting head to the desired cutting depth (in “through cutting”, lower cutting head until blade periphery reaches max. 3mm under the surface of the conveyor cart) by means of the handle on the blade guard or of the foot pedal, or using the crank.
- Put material on conveyor cart against the backstop.
- Push the conveyor cart slowly and without undue pressure towards the rotating blade and cut the material as shown on the picture. NOTE: While recommended, it is not absolutely necessary to lock the cutting head into a given depth position with the crank when jam cutting. The desired cutting depth can be maintained by holding firmly the depth feed handle on the blade guard or pressing on the foot pedal. If the full depth of cut requires excessive pressure (on very dense material e.g.) make 2 or 3 shallow cuts.
5.2.2 Multiple step cutting
Multiple step cutting consists of moving the conveyor cart with the material to be cut back and forward under the rotating blade,
- Place the material to be cut on the conveyor cart firmly against the guide-a-cut and the backstop, keeping the hands well away from the blade.
- Move conveyor cart forward near the blade and pull down the cutting head until blade is lowered to a point where it will lightly contact the surface of the material.
- Then pass the material beneath with rapid full length strokes, taking a shallow cut (approximately 3 mm deep as shown on the picture) on the forward. On the backward stroke, lift the blade just clear over the cutting line.
- Complete each rapid stroke backward and forward by passing the material beyond the centre of the blade before starting the reverse movement of the conveyor cart. NOTE: the harder the material, the more rapid should be the forward and backward strokes. Step cutting lessens the area of the blade circumference in contact with the material, keeping the blade cool, running free and cutting at peak efficiency.
5.2.3 General advice for the cutting
- Material weighting under 40 kg and having dimensions smaller than 600x500x390mm (cut with reversing of the material) can be cut with the machine.
- Before commencing work make sure tools are firmly seated!
- Select the right tools as recommended by the manufacturer depending on the material to be worked, the working procedure (dry or wet cut) to be carried out and the required efficiency.
- Apply cooling water continuously whilst cutting and in good time! Make sure the water pan contains enough water.
- When dry cutting, ensure sufficient dust extraction and wear a dusk protection mask! You can also order a dust extraction device (Art. Number 00310004580).
- When cutting work is finished, close the water-tap so you can remove the cut pieces from the conveyor cart without getting wet.
- If the thermal protection trips, reactivate the motor by pushing on the black button located on the motor (230V motors) or on the switch (115V motors) or allow the thermal protection to cool down (400V and dual tension 230V/400V motors). Wait a few minutes to allow the motor to cool down before restarting the machine.
6 Maintenance and servicing
To ensure a long-term quality from the cutting with the CM501, please follow the maintenance plan below: Begin of the day During the changing of tool End of the day or more often if required Every week After a fault After a damage Visual control (general aspect, watertightness) Whole machine Clean Flange and blade fixing devices Clean Belts tension Check and adjust Motor cooling fans Clean Water pump Clean Water pan Clean Water hoses and nozzles Clean Water pump filter Clean Cart guiding bars Clean Motor housing Clean Reachable nuts and screws Tighten up Maintenance of the motor Always perform the maintenance of the motor with the machine isolated from the electrical supply. Cleaning of the machine Your machine will last longer if you clean it thoroughly after each day of work, especially water pump, water pan, motor and blade flange. Lubrication The CM501 uses life-lubricated bearings. Therefore, you don’t need to lubricate the machine at all. Adjustment and replacement of the belts To adjust the belts, firstly remove the belt guard by unscrewing the 4 screws. To remove the belt guard, you need to remove the upper part of the pivot bearing. Loose the 4 motor bolts and shift the motor by using the two screws on the side. To replace the belts, move the motor forward on the cutting head. Adjust the belts and retighten them by shifting the motor to the rear of the machine. Always use a matched set of belts. Do not replace single belts.
7 Faults: causes and cures
7.1 Fault-finding procedures
Should any fault occur during the use of the machine, turn it off, and isolate it from the electrical supply. Any works dealing with the electrical system or supply of the machine can only be carried out by a qualified electrician.
7.2 Trouble-shooting guide
Trouble Possible source Resolution No electricity Check the electrical supply (fuse for example) Connection cable section too small Change connection cable Defective connection cable Change connection cable Defective switch CAUTION : can only be solved by qualified electrician Motor is not running Defective motor Change motor or contact motor manufacturer Blade is not turning Belts not tightened or defective Check the belts tension and change them if needed Cutting advance too quick Cut slowly Blade is blunt or glazed Sharpen the blade in calcareous stone Defective blade Change blade Motor stops during the cutting, but can be restarted after a short period (overload protection) Wrong blade specification for the application Change blade Not enough water in the pan Refill the water pan Water tap is closed Open tap on blade guard Water supply system is blocked up Clean water supply system No water on the blade Water pump is not working • Check if pump pulley is driven by the belts
- Change the pump
7.3 Circuit diagram
CM 501 4kW : 5.3 A CM 501 3 kW : 4.1 A
230V/400V dual tension motor CM 501 4kW : 5.3 A CM 501 3 kW : 4.1 A
7.4 Customer service
When ordering spare parts, please mention:
- The serial number (7 digits).
- The code of the part.
- The exact denomination.
- The number of parts required.
- The delivery address.
- Please indicate clearly the means of transportation required such as "express" or "by air". Without specific instructions, we will forward the parts through the means which seem appropriate to us --- but which is not always the quickest way. Clear instructions will avoid problems and faulty deliveries. If not sure, please send us the defective part. In the case of a warranty claim, the part must always be returned for evaluation. Spare parts for the motor can be ordered with the manufacturer of the motor or with their dealer, which is often quicker and cheaper. This machine has been manufactured by Saint-Gobain Abrasives S.A. Saint-Gobain Abrasives S.A. 190, Bd. J.F. Kennedy L- 4930 BASCHARAGE Grand-Duché de Luxembourg. Tel. : 00352-50401-1 Fax : 00352- 50 16 33 http://www.construction.norton.eu e-mail: sales.nlx@saint-gobain.com
Guarantee can be claimed and technical support obtained from your local distributor where machines, spare parts and consumables can be ordered as well: Benelux and France : From Saint-Gobain Abrasives S.A. Free telephone numbers: Belgium : 0 800 18951 France: 0 800 90 69 03 Holland: 0 8000 22 02 70 e-mail: sales.nlx@saint-gobain.com Czech Republic Norton Diamantove Nastroje Sro Vinohrdadska 184 CS-13000 PRAHA 3 Tel: 0042 0267 13 20 21 Fax : 0042 0267 13 20 21 e-mail : norton.diamonds@komerce.cz United Kingdom Saint-Gobain Abrasives Ltd. Doxey Road Stafford ST16 1EA Tel : 0845 602 6222 Free fax : 0800 622 385 e-mail : nortondiamonduk@saint-gobain.com Germany Saint-Gobain Diamond Products GmbH Birkenweg 45-49, D-50389 WESSELING Tel : (02236) 8911 0 Fax : (02236) 8911 30 e-mail: sales.ngg@saint-gobain.com Spain Saint-Gobain Abrasivos S.A. C/. Verneda del Congost s/n Pol.Ind. El Pedregar E-08160 MONTMELÓ (Barcelona) Tel: 0034 935 68 68 70 Fax: 0034 935 68 67 14 e-mail : Comercial.sga-apa@saint-gobain.com Italy Saint-Gobain Abrasivi S.p.A. Via per Cesano Boscone, 4 I-20094 CORSICO-MILANO Tel: 0039 02 44 851 Fax : 0039 024 51 01 238 e-mail : Norton.edilizia@saint-gobain.com Austria Saint-Gobain Abrasives GmbH Telsenberggasse, 37 A-5020 SALZBURG Tel : 0043 662 43 00 76 77 Fax : 0043 662 43 01 75 e-mail: office@sga.net Hungary Saint-Gobain Abrasives KFT. Banyaleg Utca 60B H-1225 BUDAPEST Tel: ++36 1 371 2250 Fax: ++36 1 371 2255 e-mail: nortonbp@axelero.hu Poland Saint-Gobain Diamond Products Sp.zO.O. AL. Krakowska 110/114 PL-00-971 WARSZAWA Tel: 0048 22 868 29 36 Tel/Fax: 0048 22 868 29 27 e-mail: norton-diamond@wp.pl
190, Bd. J. F. Kennedy L-4930 BASCHARAGE LUXEMBOURG Fax: ++352 501633 e-mail: sales.nlx@saint-gobain.com www.construction.norton.eu 06.11.2008